Roblox - How To Boost FPS On Low-End PC

Welcome to the digital realm of Roblox, where imagination knows no bounds and the possibilities are endless. However, for those with low-end PCs, the gaming experience may not always be as smooth and immersive as desired. That's where we come in! This informative guide will unveil the secrets to enhancing your Roblox adventure by boosting FPS (frames per second) on budget-friendly computers. Dive into the world of optimized gameplay as we unlock tips, tricks, and tweaks that will transform your low-spec machine into a powerful platform for pixel-perfect performance. So gear up, Robloxians, as we embark on a journey to overcome hardware limitations and elevate your gaming experience, one frame at a time.
Change the Roblox Process Priority
To further increase your Roblox performance on your PC, we will change the application’s priority compared to other programs running in the background. Right-click your taskbar to open up your Task Manager. In the Processes tab, right-click the Roblox process and select to “Go to Details”. In the Details tab, the application should be highlighted. Right-click the game process and set the priority to high. Don’t change the priority to High if the game already uses up 100% of your CPU capabilities.
This will allocate more resources to playing Roblox and should increase your performance, especially if other programs run in the background. To reduce the CPU utilization from other programs, we suggest you end some programs from running in the background, which you don't need when playing Roblox. Make sure only to end programs from running, which you know won't break your operating system. In the Startup tab, you can prevent programs from starting on system boot.

Task Manager > Details > Roblox.exe > Set Priority > High
Update Graphics Card Driver
NVIDIA graphics cards can utilize the GeForce Experience application. Click here to download the application to your system. When the download is completed, open up the application, and in the Drivers tab select Download. This will download and install the latest GPU update and should only take a few minutes to complete.

GeForce Experience > Drivers > Download
Update Operating System
To optimize your system for performance, you should make sure that your operating system is up to date. Simply search for Update in your taskbar search. In your Check for updates system settings window, make sure to download the latest update and make sure to restart your PC after that the download is completed. This will in any case help you with performance issues.

Windows Settings > Windows Update
Disable Xbox Game Bar Recording
Eliminating unnecessary hindrances, such as native Windows 10 settings, is essential for unlocking the full potential of your low-end PC while enjoying Roblox. One such performance-hogging feature is the Xbox Game Bar recording option. By default, this function records your gameplay and audio continuously, draining precious system resources.
To resolve this issue, simply navigate to your taskbar search and type in "Game Bar" to access the Game Bar system settings. Within these settings, ensure that you uncheck the recording option. Delve deeper into the Captures tab and additionally disable the background recording feature. Disabling these options will prevent any unwarranted reduction in your PC's performance while playing Roblox.
For those who wish to capture their in-game achievements and memorable moments, consider alternatives like the versatile OBS Studio or an external capture card. OBS Studio is a popular, free, and open-source software that provides efficient recording and streaming options. An external capture card can also be a game-changer for those with performance limitations, as it offloads the recording tasks from your PC, ensuring a smoother gameplay experience.
By following these simple yet effective steps, you'll be well on your way to boosting FPS in Roblox, making every moment count as you explore the boundless universe of creativity and fun.

Windows Settings > Gaming > Game Bar
Optimize Roblox Performance with the NVIDIA Control Panel
Enhancing Roblox performance on your low-end PC can often be achieved by fine-tuning settings within the NVIDIA Control Panel. This powerful tool offers various options that, when optimized, can significantly improve your Roblox gameplay experience.
To access the NVIDIA Control Panel, simply right-click on your desktop and select the corresponding option. Within the control panel, navigate to Manage 3D Settings > Program Settings to customize settings specifically for Roblox.
Click on "Add a program to customize" and search for Roblox in the program list. If the game is not readily available, select "Browse" and manually locate the drive and path where Roblox is installed. Once found, add it to the program list to begin tweaking the settings.
Several key adjustments can make a noticeable impact on your Roblox performance. First, ensure that the CUDA setting is set to your primary GPU, which will allocate graphics processing tasks to the most powerful unit available. Next, modify the Power management mode to "Prefer maximum performance," which prioritizes performance over energy conservation. Finally, adjust the texture filtering quality to "Performance," enabling faster processing of in-game textures without significantly sacrificing visual quality.
By implementing these changes within the NVIDIA Control Panel, you can effectively optimize Roblox performance on your system, paving the way for a more seamless and enjoyable gaming experience, even on low-end PCs.
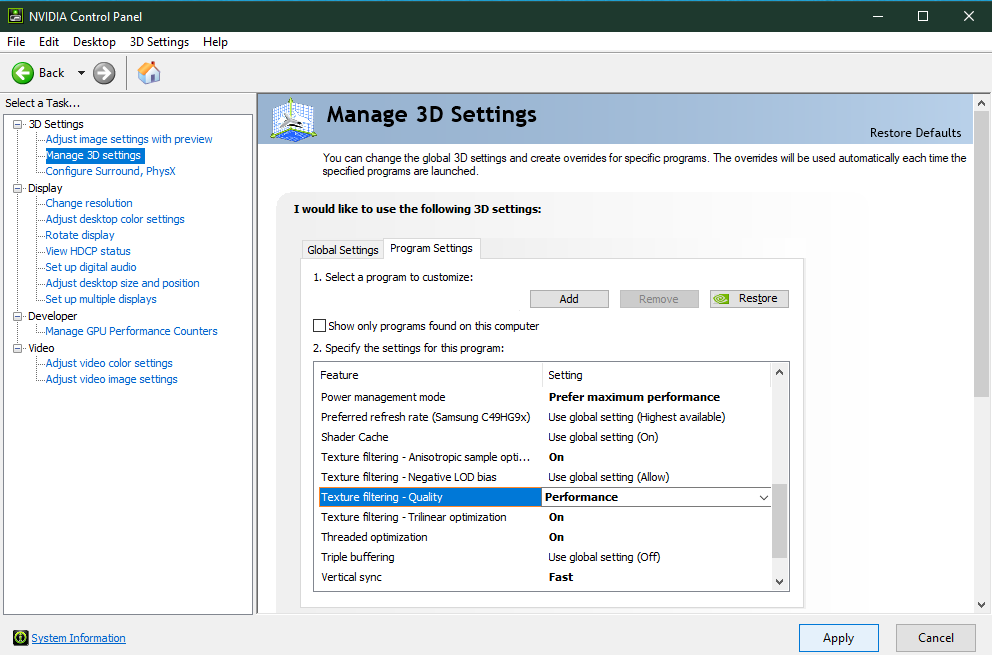
NVIDIA Control Panel > Manage 3D Settings > Program Settings > Roblox
Change the Roblox Graphics Preference
Leveraging Windows 10 power user settings, such as graphics preferences, can greatly influence your Roblox gaming experience, especially on low-end PCs. Modifying these settings allows you to optimize your system for improved performance and smooth gameplay.
To access your graphics settings, simply type "Graphics Settings" in your taskbar search, which will lead you to the native settings menu. From there, click "Browse" to open the file explorer, and navigate to the drive and path where Roblox is installed. By adding the program to your graphics settings list, Windows 10 enables you to choose from several performance-oriented options:
Let Windows decide
Power Saving (usually employs Intel HD Graphics)
High Performance (typically utilizes your dedicated graphics card(s))
Specific GPU (manually select which GPU to use)
To maximize system performance, opt for the "High Performance" setting, which prioritizes utilizing your dedicated graphics card(s). However, if you suspect your GPU is bottlenecking your performance, consider setting it to "Let Windows Decide," allowing the operating system to make an informed decision based on your system's capabilities. Remember to apply your changes to ensure they take effect.
By fine-tuning your graphics preferences within Windows 10, you can significantly enhance your Roblox gameplay experience, ensuring that every adventure unfolds seamlessly and without compromise, even on modest hardware.
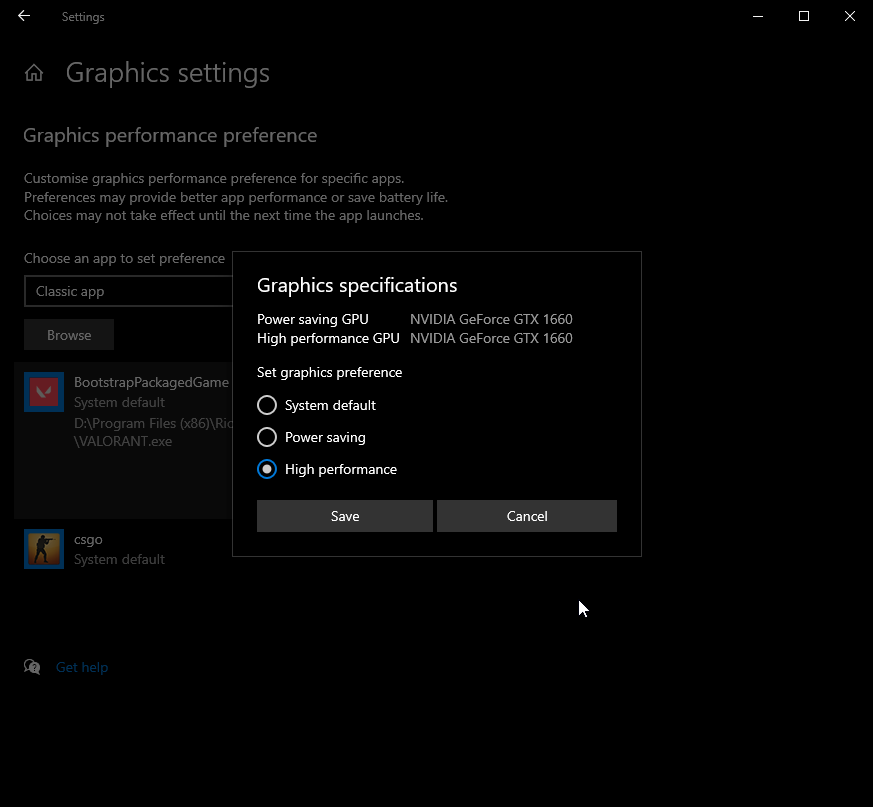
Graphics Settings > Graphics Preference > High Performance
Delete the Windows Temporary Files
Your hard-drive might be cluttered with unwanted files. These files will induce lag if not removed properly. You can delete your temporary files manually, or you can use PC cleanup programs, such as CCleaner. These applications are usually the best choice as it will automatically keep your hard-drive clean for you.T o manually delete your temporary files, enter %temp% in your taskbar search and hit enter. A new folder will open up. Make sure to delete the content of your temporary files folder.
In some cases, this can take a couple of minutes if you haven’t done this before. Some files will most likely stay in your temp folder, as these are still in use by your programs. In order to completely delete these files, you should also make sure to empty your recycle bin.
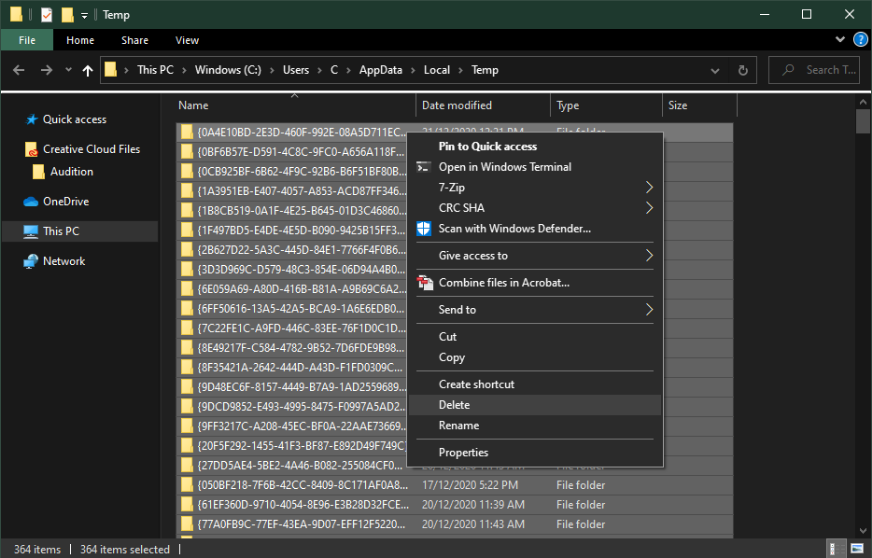
Delete the content of your %temp% folder