Valorant - How To Only Change Voiceline Language
Valorant is a popular online tactical first-person shooter game developed and published by Riot Games. Players worldwide can enjoy this game with a unique set of characters known as Agents. These agents come from various countries and speak different languages. If you are an avid Valorant player, you may be looking for ways to change the voice line language of your favorite Agent. In this article, we will guide you on how to change the voiceline language in Valorant while ensuring that the process is quick and easy.
Access your Valorant Language Files
Right-click your Valorant desktop shortcut and select Open File Location. If you cannot locate your shortcut, then search for Valorant in your start menu search, right-click the icon, and select Open File Location.
Valorant > Open File Location
Copy your Valorant Language Files
In your file explorer, navigate back to the Riot Games folder. Navigate to VALORANT > live > ShooterGame > Content > Paks. We will save your English game files, by saving them in another folder. We will save these to a folder on the desktop. Simply copy and paste the US_Text-WindowsClient.pak and US_Text-WindowsClient.sig files to another folder. Move this folder out of the way for now and open up your Riot Games launcher.
Save the enUSText_Windows language files to your desktop
Change the Valorant Voiceline Language
Click on the gear icon at the bottom right of this window and change the Game Text Language option to whichever language you’d like to hear while in-game. After making your language changes, close the launcher completely.
When re-opening the launcher, it will take a minute to redownload the language pack for the language you chose to play on. When clicking on Play, you will notice that the voice lines will have changed to the selected language and your interface language. To revert the interface language to English, you must close Valorant.
Riot Launcher > Valorant > Settings > Game Text Language
Change Text File Name
Open up your Paks folder and you will notice that these first files will have changed from EN_Text-WindowsClient to, in my example, DE_Text-WindowsClient, as we selected German before.
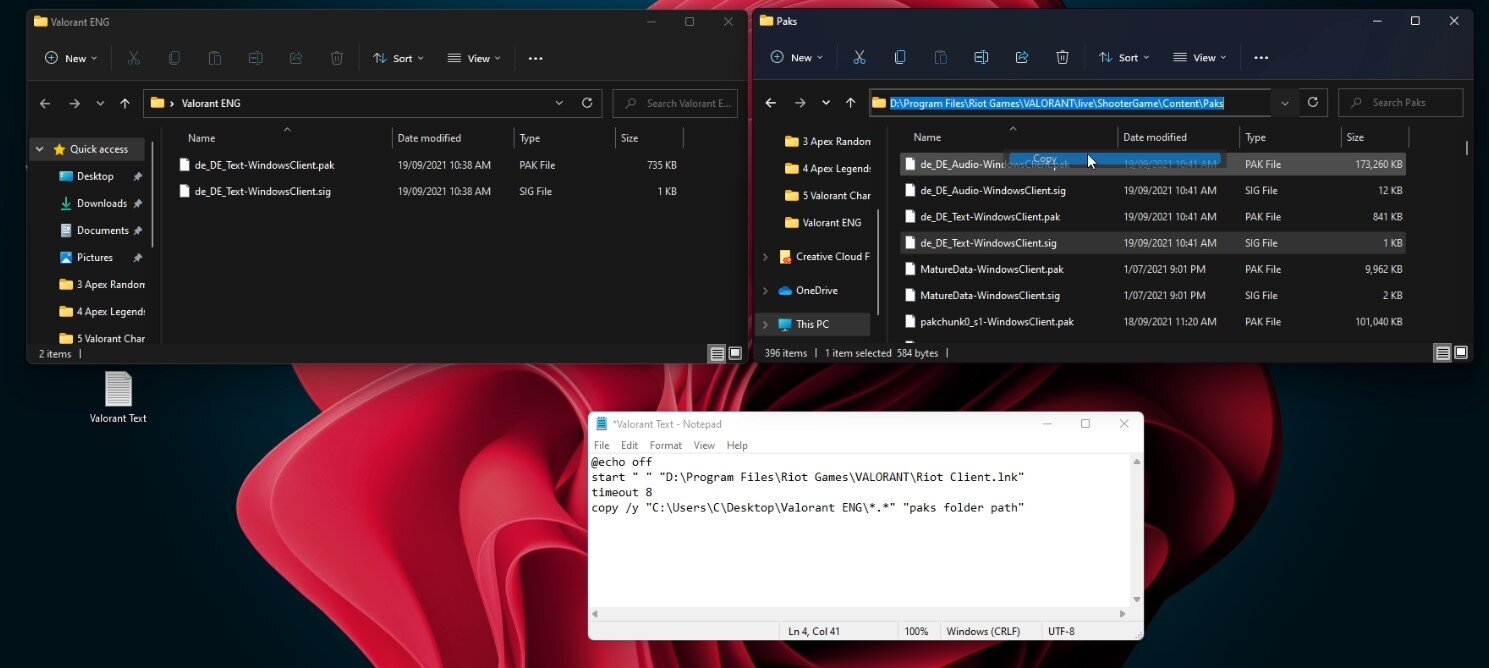
Open up your saved folder with the English text windows client files. For the game to think that you are using the other language files, even if it’s still set to English, you will have to rename your English text files to the text file name of the selected language. In my example, I will change the original English file’s name to DE_Text-WindowsClient, and so on.
Rename the Valorant language text files
Copy Filepath & Finalise Language Change
Open up Notepad or any other text editing software on your PC and paste these text lines into your text editor:
@echo off
start " " "valorant game path\VALORANT.lnk"
timeout 8 copy /y "english files folder path\*.*" "paks folder path"
Next, search for Valorant in your start menu or taskbar search again, right-click the icon and select Open File Location. In your File Explorer, click on your file path, and it should highlight immediately. Copy your file path for the Valorant shortcut. After copying the file path, navigate back to your text editor and replace the existing file path with the one you copied while leaving .lnk.
Replace the Paks Folder
Open up the folder with the renamed English text files for Valorant, and copy this file path. Paste the file path in the last line while leaving the backslash and other icons as they are. Also, make sure not to create spaces between or at the end of these text lines.
Lastly, you will need to replace the paks folder path text with the file location of your Paks folder. Simply head back to the Paks folder, click on the file path, and copy and paste it into your text editor while replacing paks folder path. Save your text file as, and instead of .txt, make sure to replace it with .bat
Replace the Paks folder to change the Valorant voiceline language
Launch Valorant
After saving the batch file, you can execute it, and Valorant will start after a few seconds. On some systems, you will need to restart Valorant one time in order for the changes to take effect, so keep that in mind.
Run the Windows Batch File


