After Effects - How To Fix Display Acceleration Disabled

If you're a creative professional working with Adobe After Effects, you know how frustrating it can be to encounter errors hindering your workflow. One common issue that many users face is "Display Acceleration Disabled." This error occurs when After Effects fails to utilize your graphics card's hardware acceleration, resulting in slower render times and decreased performance. But don't worry; there are several ways to fix this problem and get back to creating stunning visual effects.
To start, we'll dive into the basics of the error and why it occurs. Then, we'll explore different methods for fixing the problem, including updating drivers, adjusting settings, and troubleshooting hardware issues. By the end of this article, you'll clearly understand how to fix "Display Acceleration Disabled" in After Effects and improve your performance.
Enable GPU Acceleration
While using After Effects, navigate to File and select Project Settings. Ensure the Video Rendering and Effects option is set to Mercury GPU Acceleration (CUDA). This will allow After Effects to use your graphics card to process video and audio.

After Effects > File > Project Settings
Update Adobe After Effects
Ensure your After Effects application is up to date. Close After Effects and open up your Creative Cloud application. Under Updates, click on Update in case an update is available to you. This should only take a few minutes to complete.

Creative Cloud > After Effects > Update
Update Graphics Card Driver
Ensure your graphics card driver is up to date. NVIDIA graphics cards can utilize the GeForce Experience application. Click here to download the application to your system. When the download is completed, open up the application, and in the Drivers tab, select Download. This will download and install the latest GPU update and should only take a few minutes to complete.
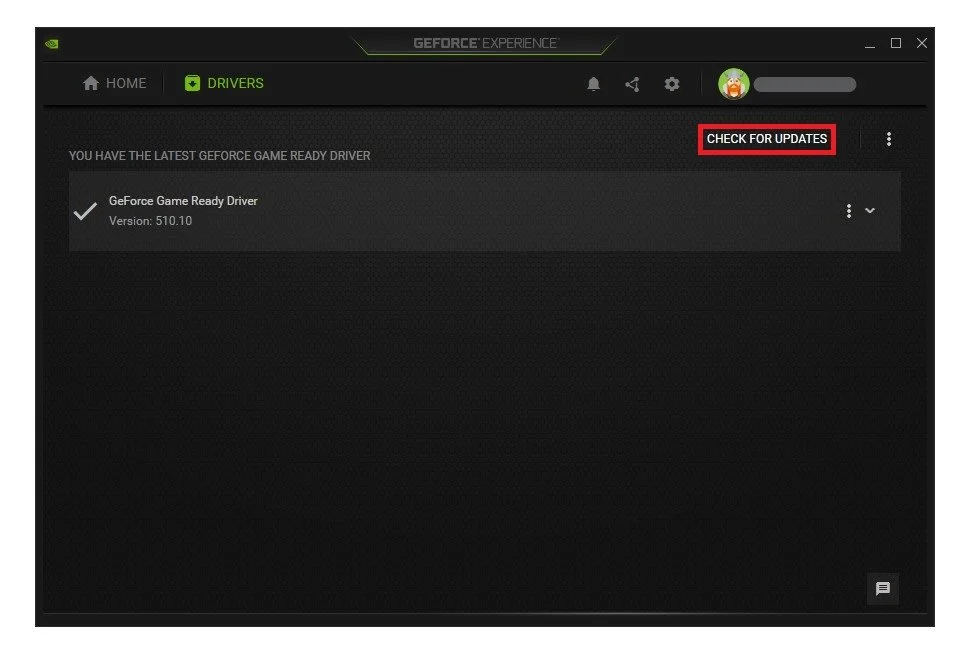
GeForce Experience > Drivers > Download
Update Operating System
To optimize your system for performance, you should ensure your operating system is up to date. Search for Update in your taskbar search. In your Check for updates system settings window, download the latest update and restart your PC after that the download is completed. This will in any case, help you with performance issues.

Windows Settings > Windows Update
Delete the Windows Temporary Files
Your hard drive might be cluttered with unwanted files. These files will induce lag if not removed properly. You can delete your temporary files manually or use PC cleanup programs, such as CCleaner. These applications are usually the best choice as they automatically keep your hard drive clean. To manually delete your temporary files, enter %temp% in your taskbar search and hit enter. A new folder will open up in which you should delete everything.
Sometimes, this can take a few minutes if you haven’t done this before. Some files will most likely stay in your temp folder, as these are still in use by your programs. To completely delete these files, you should also empty your recycle bin.

Delete the content of your temporary files folder
Reinstall Adobe After Effects
As a last resort, we suggest uninstalling After Effects and reinstalling it, preferably on another drive. In your Creative Cloud application, under All Apps, click on this menu for After Effects and select Uninstall. After a minute or two, you will have the option to reinstall it.