Audacity - How to Record Computer Audio

Are you interested in recording computer audio for your next podcast or video project? Look no further than Audacity, the free and open-source digital audio editor that offers a range of recording and editing features for Windows, Mac, and Linux users. With Audacity, you can easily record any audio playing on your computer, whether it's from a YouTube video or a streaming service like Spotify. In this article, we'll guide you through the process of recording computer audio with Audacity, step by step.
Enable the Stereomix Device in your Sound Control Panel
Open up Audacity and navigate to your sound devices by right-clicking your taskbar. In your Sound settings, right-click some space and select Show disabled devices
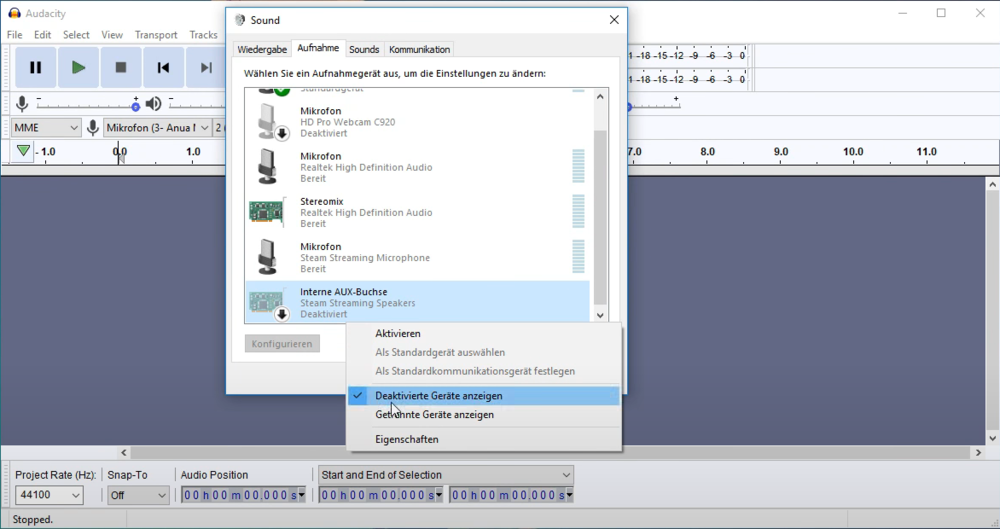
Sound Control Panel > Recording > Show Disabled Devices
This will make sure that Stereomix will be visible.
Right-click Stereomix and enable it
Open the Properties of Stereomix
On the new window, navigate to the Listen tab, and uncheck Listen to this device

Stereomix Properties > Listen
Record the Stereomix Device in Audacity
Close your sound settings and head back to Audacity. Open up the Audacity preferences by using the shortcut CTRL + P, or navigate to Edit > Preferences. Navigate to Devices on the new window. Under Device, set this option to Stereomix.

Audacity Preferences > Devices > Recording