Black Ops Cold War - How To Fix FPS Drops

Embarking on a thrilling gaming experience with Black Ops Cold War can be exhilarating, but encountering sudden FPS drops can severely dampen the fun. Ensuring a smooth and enjoyable gaming session is crucial for players who want to immerse themselves in the fast-paced action. This comprehensive guide aims to provide you with the essential tips and tricks needed to optimize your game settings, reduce lags, and maintain a consistent frame rate. Dive into the world of Black Ops Cold War, armed with the knowledge to combat FPS drops and elevate your gaming experience to new heights.
Optimize Black Ops Cold War In-Game Settings for Better Performance
Launch the game and head over to your graphics settings. We recommend using most of our settings, as they are primarily set to the lowest, except for a few options that won't significantly impact your performance.
Ensure that your display mode is set to fullscreen, although we have it set to windowed for easier recording. Capping your framerate can help conserve resources while still providing a stable and enjoyable gaming experience. We advise setting the custom gameplay framerate limit to a value slightly above your screen's refresh rate but below the maximum FPS achievable.
Decrease the overall texture and model quality to further optimize performance. Under the "Shadow & Lighting" section, it's best to lower these settings to the minimum, as reducing shadows should be a priority for improving performance and minimizing FPS drops. If you have a low-end graphics card, ensure that all ray tracing options are disabled.
For post-processing effects, set the NVIDIA DLSS option to performance if you're using an NVIDIA GPU. We recommend disabling motion blur for a better visual experience. Finally, in your advanced settings, make sure not to allow the game to use excessive VRAM, especially if you have other programs running in the background. This will help maintain smooth gameplay and prevent FPS drops.
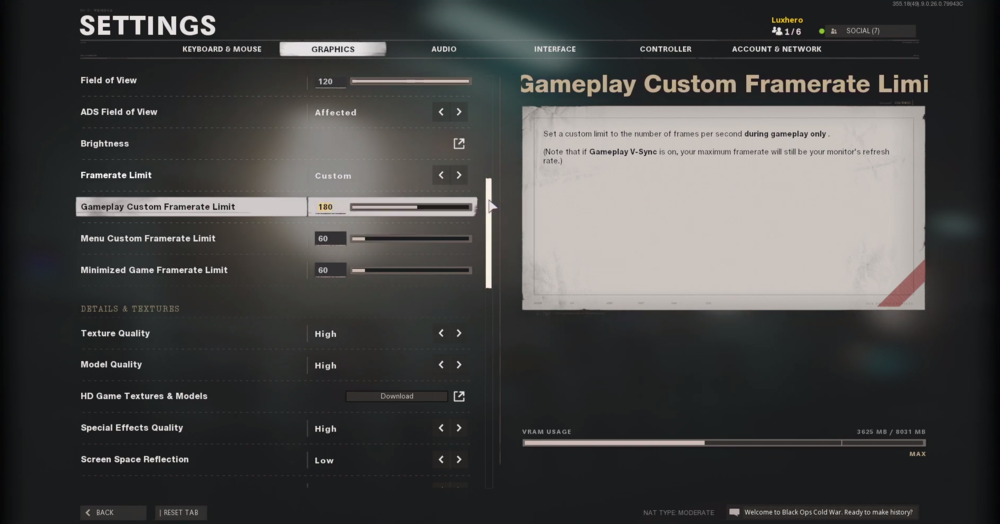
Black Ops Cold War > Settings > Graphics
Optimize Black Ops Cold War Process Priority for Enhanced Performance
To further boost the game's performance on your PC, it's helpful to adjust the application's priority in relation to other programs running in the background.
Right-click your taskbar to open your Task Manager. Navigate to the Processes tab, locate the game process, right-click it, and choose to go to details. Within the Details tab, the game process should be highlighted. Right-click the process and set its priority to high.
By doing so, you'll allocate more resources to the game, potentially increasing performance, especially if you have other programs running simultaneously.
To decrease CPU utilization from other applications, it's a good idea to close any unnecessary background programs while playing the game. Ensure that you only terminate processes that you're certain won't disrupt your operating system. Additionally, in the Startup tab of Task Manager, you can prevent specific programs from launching on system boot, which can further improve your gaming experience and system performance.

Task Manager > Details > BlackOpsColdWar.exe > Set Priority > High
Update Graphics Card Driver
NVIDIA graphics cards can utilize the GeForce Experience application. Click here to download the application to your system. When the download is completed, open up the application, and in the Drivers tab select Download. This will download and install the latest GPU update and should only take a few minutes to complete.

Keep Your Operating System Up-to-Date for Enhanced Performance
For optimal system performance, it's essential to ensure that your operating system stays up to date. To check for updates, simply use the taskbar search and type "Update." This action will direct you to the Check for updates system settings window. Confirm that you download and install the most recent update available. Don't forget to restart your PC after the download completes to apply the changes. Regularly updating your operating system can significantly help address performance issues, maintain system stability, and ensure that you're benefiting from the latest features and security improvements. By doing so, you'll create a more seamless and enjoyable gaming experience.

Windows Settings > Windows Update
Turn Off the Game Bar Background Recording for Better Performance
Certain default Windows 10 settings can negatively impact your in-game performance. One such setting is the Game Bar recording option, which continuously captures both gameplay and audio. Disabling this feature can lead to a noticeable improvement in performance.
To access the Game Bar system settings, simply type "Game Bar" in your taskbar search. Once there, ensure that the recording option is unchecked. Proceed to the Captures tab and disable the background recording option as well. These settings tend to consume system resources and hinder overall performance.
If you're interested in recording your gameplay, consider using alternatives like OBS Studio or an external capture card. These options provide more control over resource usage and can help maintain optimal performance while capturing your gaming sessions.

Windows Settings > Gaming > Game Bar
Optimize NVIDIA Control Panel Settings for Better Performance
Tweaking the settings in your NVIDIA control panel can significantly impact your game's performance. You can enhance the gaming experience on your system by making a few adjustments. To access the NVIDIA control panel, right-click on your desktop and select 'NVIDIA Control Panel.' From there, navigate to 'Manage 3D Settings' > 'Program Settings.'
Choose 'Add a program to customize' and select the game from the program list. If you cannot locate the game in the list, click 'Browse.' In your file explorer, find the drive and path where you installed the game, and add it to the program list.
Once you've added the game, ensure that the CUDA setting is configured to use your primary GPU. Set the 'Power management mode' to 'Prefer maximum performance' and adjust the 'Texture filtering - Quality' setting to 'Performance.' These changes will help optimize your game's performance by leveraging the full capabilities of your NVIDIA graphics card.
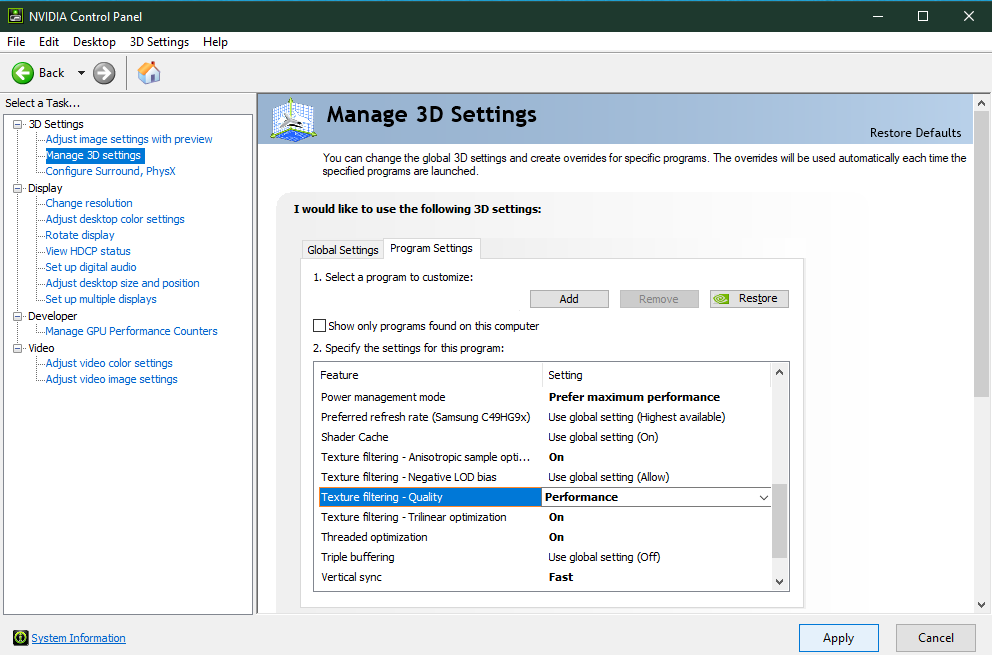
NVIDIA Control Panel > Manage 3D Settings > Program Settings
Optimize Windows 10 Graphics Settings for Better Gaming Performance
Windows 10 offers various power-user settings, including graphics settings that can boost your gaming performance. To access and modify your graphics settings, type 'Graphics Settings' in your taskbar search and open up your system's native settings.
When you click on 'Browse,' your file explorer will open, and you'll need to navigate to the drive and path where the game is installed. After adding the program to your graphics settings list, Windows 10 provides you with several options to choose from:
Let Windows decide
Power Saving (Usually Intel HD Graphics)
High Performance (Typically your dedicated graphics card(s))
Specific GPU (Choose a particular GPU to use)
To maximize system performance, select the 'High Performance' option. However, if your GPU is causing a bottleneck in performance, it's recommended to opt for 'Let Windows decide.' Don't forget to apply your changes to ensure the new settings take effect, enhancing your gaming experience with optimized graphics performance.
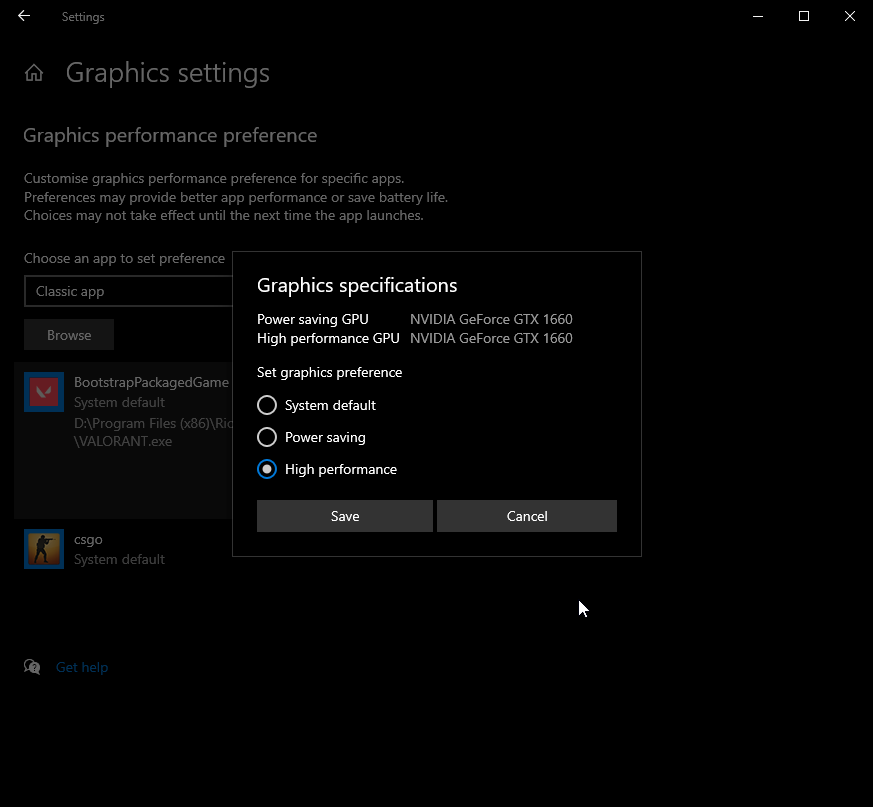
Graphics Settings > Graphics Preference > High Performance
Eliminate Unwanted Windows Temporary Files for Enhanced Performance
Your hard drive may accumulate unnecessary files over time, causing lag and affecting system performance. To ensure a smooth gaming experience, it's essential to remove these unwanted files periodically. You can either delete temporary files manually or use dedicated PC cleanup programs like CCleaner. Such applications are often the best choice, as they automatically maintain a clutter-free hard drive for you.
To manually delete your temporary files, type '%temp%' in your taskbar search and press enter. A new folder containing temporary files will open up. Proceed to delete the contents of this folder.
If you haven't done this before, the deletion process might take a few minutes. Some files might remain in your temp folder, as they are still being used by your programs. To fully remove these residual files, don't forget to empty your recycle bin as well. By keeping your hard drive clean, you'll enjoy a more seamless and lag-free gaming experience.

Delete your Windows temporary files from time to time