OBS Studio - How To Fix Network Lag, Dropped Frames And Stuttering For Streaming And Recording

In the world of content creation, OBS Studio has become one of the most popular software tools for streaming and recording. With its flexible features and user-friendly interface, it has revolutionized the way content creators approach their craft. However, despite its many benefits, users may sometimes encounter network lag, dropped frames, and stuttering during their streams and recordings. These issues can be frustrating and impact the quality of the final product. But fear not, as there are simple solutions to these common problems.

Update OBS Studio

Before making any changes to your OBS Studio settings, ensure the application is up to date. Open up OBS Studio, and under Help, select Check for Updates.

1.jpg

OBS Studio > Help > Check for Updates

Reduce the number of unneeded scenes and sources. Especially video capture devices, which are displaying a video feed in their native resolution and refresh rate can induce a lot of lag while trying to record or stream. If you don’t plan on using certain devices or sources, then I suggest creating a separate scene with a minimal amount of sources.

2.jpg

OBS > Sources > Remove Scene

OBS Output Settings

Navigate to your OBS Studio settings which need to be optimized to your network connection and available resources. On this window, navigate to the Output tab and set the output mode to Advanced. This will allow you to change additional settings. In the streaming tab, set the encoder to NVIDIA NVENC if you have a powerful enough NVIDIA graphics card.

If not, select x264, which will utilize your CPU rather than your graphics processor. If you’re unsure about which encoder to use, then open up your task manager by right-clicking your taskbar and selecting it. You should see the workload on your CPU and GPU in the Performance tab. Don’t forget to account for any programs running on your system while streaming or recording, such as graphics-intensive games or memory-eating programs such as Chrome or Adobe applications.

3.jpg

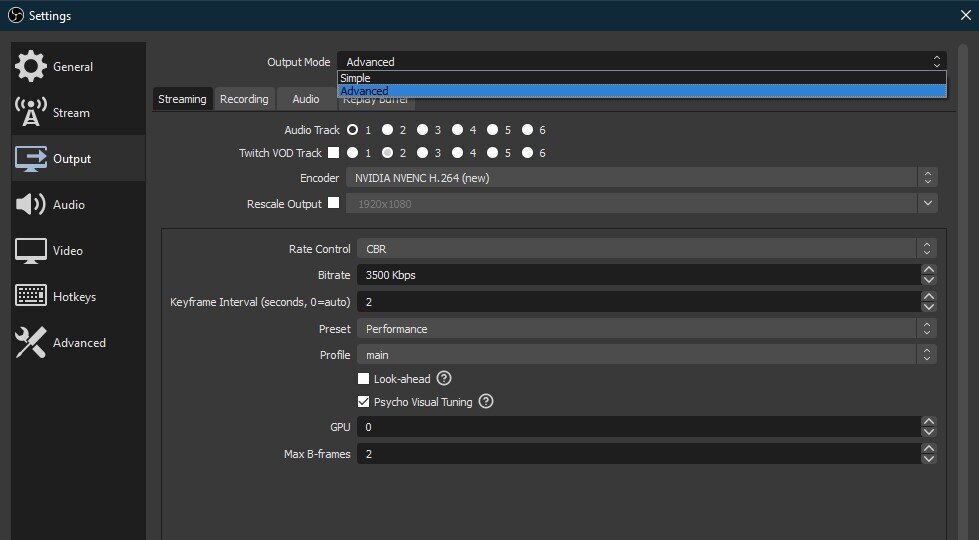
OBS Settings > Output

For NVIDIA GPUs you should make a test stream using the NVIDIA NVENC encoder to see how well it works after applying the next tweaks. You can rescale your output from here if you already know in which resolution you are streaming. This is also very useful for users with an abnormal native screen resolution. Right-click your desktop and select Display Settings. On this window, you should be able to preview your native display resolution.

Below, set the Rate Control to CBR, which stands for constant bit rate, and set your bit rate according to your internet’s upload speed. I recommend testing your connection here. On this website, you should closely examine your upload speed, which will determine how much bandwidth you can reserve for streaming. In my example, I could use a bitrate of 19’000, which would be more than enough to stream in 1080p & 60 FPS, but using this much is unnecessary!

To stream in 1080p, a bitrate of 6’000 should be more than enough; for streams in 720p, you should lower the bitrate to 3’000. In my case, I am always streaming in 720p and 60FPS, and I’m a bit paranoid about dropped frames, that’s why I am using a bitrate of 3500, which is more than enough if your network connection can support it. If you feel like your network connection is not good enough to stream with your preferred settings, then make sure to follow the network connection tweaks later in this guide.

Below, set the Keyframe Interval to 2 seconds, preset to Performance, profile to Main, disable the Look-ahead options, and enable psycho-visual tuning. These settings are if you haven’t already noticed, optimized for low to mid-end PCs.

OBS Recording Settings

In the Recording section, we suggest setting the recording path to an SSD if you have enough storage. Otherwise, choose a folder in your HDD storage. I like to use mp4 as the recording format, which keeps the file size low and allows you to import it to any video editing software. Set the encoder to NVIDIA NVENC if you have a powerful enough NVIDIA graphics card; otherwise, set it to x264.

Set your rate control to CBR and your bitrate to around 10’000. I am using 20’000, inflating the file size to 20 MB per recorded second to get even more detail in my videos. This setting will not depend on your network connection but rather on how much available storage you have left. Below, set the keyframe interval to 2 seconds, preset to quality, profile to main and max B-frames to 2. Don’t forget to apply your changes.

4.jpg

OBS Output Settings > Encoder

OBS Video Settings

In the video tab, set the base resolution to your native monitor resolution. The output, or scaled resolution, should be in a 16:9 aspect ratio, which is best for streaming or recording. That’s why most people stream in 1080, 936 or 720p.

If you experience stuttering or network lag while streaming, we suggest setting the output resolution to 720p before applying the next tweaks. This option will also come down to personal preference and on the type of content you wish to stream or record. If you don't know what to choose, make a test stream to see what works best for you and your viewers. Lastly, set the downscale filter to bicubic or bilinear when streaming and to Lanczos when recording to get a sharped image.

5.jpg

OBS Settings > Video > Downscale Filter

OBS Advanced Settings

In the Advanced tab, set the process priority to above normal, and you should be done with tweaking your OBS Studio settings.

6.jpg

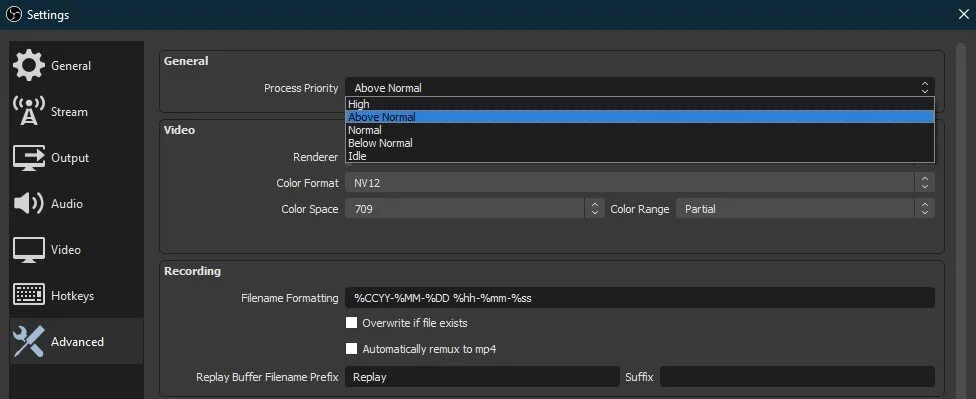
OBS Settings > Advanced

End Network-Intensive Processes

If you prefer the dedicated streaming software, these settings also apply to StreamLabs OBS. Open up your task manager by right-clicking your taskbar and selecting it. Navigate to your resource monitor. In the network tab, open the "Processes with network activity" and after a few seconds you will see every process using your network connection. This might be your browser running in the background, steam, or a download bottlenecking your connection. I suggest you only end the processes you know won't break your operating system.

7.jpg

Resource Monitor > Network > Processes with Network Activity
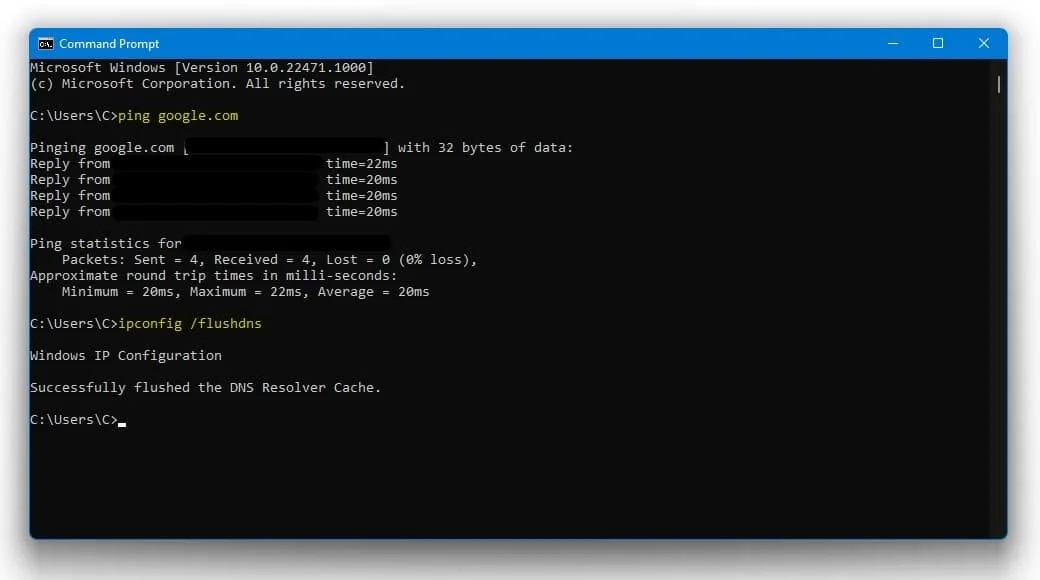
Command Prompt

Open up your command prompt by searching for CMD and hitting enter.

ping google.com

This command will check your latency and packet loss to google's servers. If your ping is higher than 100ms, or if you encounter any packet loss, you should make a few changes to your connection and follow the subsequent tweaks.

ipconfig /flushdns

This will flush and reset the content of your DNS resolver cache. Using this command can in some cases fix network related issues while streaming using OBS Studio.

Change DNS Server Addresses

If you still have latency and lag issues, then you should verify your connection to your ISP and ensure you are using a decent data plan. You can troubleshoot this step by switching your connection to your personal hotspot, for example.

Use an ethernet cable to ensure the best possible connection. If you have to use a Wifi connection, then make sure to restart your router or modem if you haven't done this in a while, and reduce the amount of devices connected to the same network. When this is done, we will change your DNS server address in case you still experience network lag while streaming. Use the shortcut Windows Key + R, and in this dialogue box, enter control and hit enter.

This will open up your control centre. From here, navigate to Network And Internet, Network & Sharing Center, and here select your connection. This will open up this window, containing general information about your connection.

Navigate to Properties and lastly, double-click the Internet Protocol Version 4. Select to use the following DNS server addresses option, and as your preferred DNS server, use : 8.8.8.8; as you alternate DNS server, use: 8.8.4.4.

9.jpg

Update Graphics Card Driver

Ensure your graphics driver is up to date. I suggest using the GeForce Experience application if you’re using an NVIDIA GPU, but you can also use the AMD driver suite. Depending on how frequently you update your GPU, this tweak can make the biggest difference. In the Drivers tab, simply click on Download and the application will automatically download and install the latest driver. In the Home tab, select Details for the game you wish to stream, and here on the right side click on the gear icon, to optimize your in-game settings for performance with a slider system. You can in addition change the display resolution and display mode from there

10.jpg

GeForce Experience > Drivers > Download

  • Network lag is caused by a slow or unstable internet connection. To fix it, you can try reducing your stream or recording bitrate, using a wired connection instead of Wi-Fi, and closing any other programs that may be using your internet bandwidth.

  • Dropped frames occur when your computer is unable to process all the data being sent by OBS Studio. To prevent them, you can try lowering your resolution and bitrate settings, closing unnecessary programs, and using a more powerful computer or graphics card.

  • Stuttering can be caused by a variety of factors, including high CPU usage, outdated drivers, or insufficient memory. To fix it, try closing any unnecessary programs, updating your drivers, and increasing your buffer size.

  • The ideal bitrate depends on your internet speed and the type of content you are streaming or recording. As a general rule, a bitrate of 2500-4000 kbps is recommended for 720p video, and 4000-6000 kbps for 1080p video.

 
Previous
Previous

Enlisted - How To Fix Network Lag, High Ping & Packet Loss

Next
Next

Valheim - How To Boost FPS & Overall Performance