The Best Render Settings for DaVinci Resolve on PC & Mac

If you're a video editor or filmmaker, you know how important it is to have the right render settings when working with DaVinci Resolve. The software is known for its powerful color grading features, but finding the correct settings for the best quality exports can also be challenging.
Whether you're working on a project for your portfolio, for a client, or for a production studio, you want to make sure your exports are the best they can be. This is why it's essential to know the best render settings for DaVinci Resolve on both PC and Mac.
This article will explore the various render settings available in DaVinci Resolve and help you determine the best settings for your particular project. We've covered you whether you're working with 4K footage or need a quick and easy export.
Adjust Your Timeline Settings
To access your timeline settings, right-click your timeline in the Media Pool.
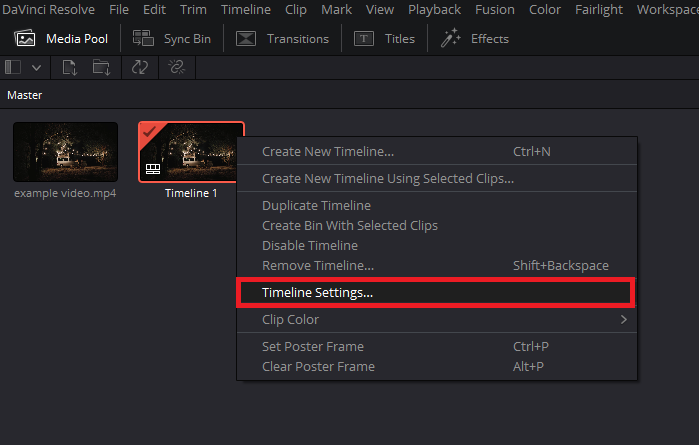
DaVinci Resolve Media Pool > Timeline Settings
Under the Format tab, ensure that the Timeline Resolution aligns with your desired output resolution. In this example, I will keep it at 1920x1080 as it is my preferred render resolution. To make adjustments, uncheck the Use Project Settings option. This applies to the aspect ratio and project frame rate as well.
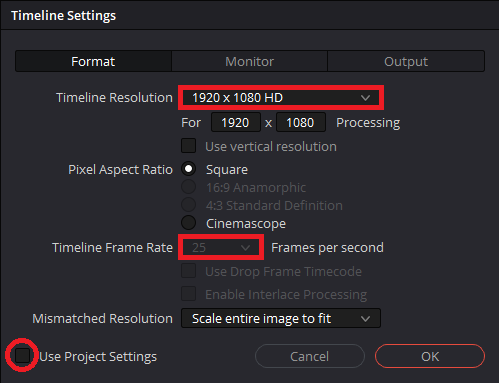
DaVinci Resolve Timeline Settings
Use A Render Preset & Choose Save Location
After making the necessary changes, click on the rocket icon to open the Deliver tab. Before adjusting the render settings, you have the option to select a render preset. For instance, if you want to upload the video to YouTube, select the YouTube preset and change the resolution as desired. I will choose Custom Export and cover the most crucial render settings. Enter a file name and select the save location for your exported project.
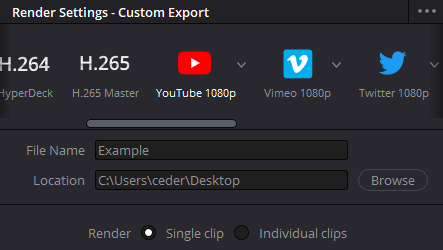
DaVinci Resolve Render Settings > Render Preset
Render Settings (Video)
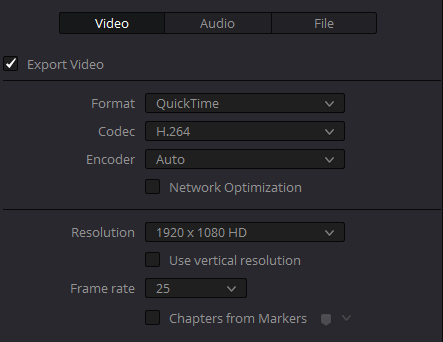
In the Video section, ensure the Export Video option is checked, and select a format that works best for you. MP4 is a popular choice as it is widely compatible and does not significantly increase file size.
Set the Codec to H.264 and Encoder to Automatic. The resolution and frame rate will be the same as your timeline. First, adjust your timeline resolution and frame rate if you want to change these settings. Similarly, if you want to export videos for TikTok or Instagram Reels, adjust your video to the respective aspect ratio to avoid black bars.
Format / Codec / Encoder Settings
Set the Quality option to Restrict, and set it to 25,000 Kb/s. This will allow DaVinci Resolve to export the video using 25 Mb/s. This depends on your project's resolution and frame rate, as well as the format if you choose something other than MP4. For a 1920x1080 resolution video in 30 FPS, 25 Mb/s should suffice. However, for 4K or fast-paced footage like GoPro videos or gameplay, increase the quality option to around 60 Mb/s.
Set the Encoding Profile to Automatic, Key Frames to Automatic, and keep the Frame Reordering option enabled. Leave the Advanced Options at their default values.

Restrict Video Quality to 25-60 Mb/s
Audio Export Settings for DaVinci Resolve
Enable the Export Audio option in the Audio section and set the Codec to AAC. This is a standard audio compression format with better sound quality than MP3.
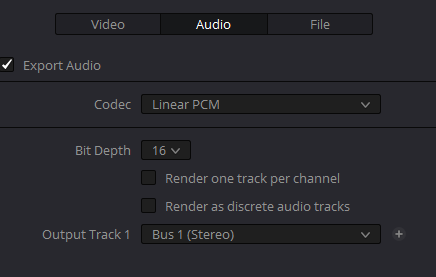
Audio Codec > ACC
Save Render Preset & Export Video
After making the desired changes, consider saving the settings as a preset. This will allow you to access these settings in the future quickly. To do this, click on the burger menu in the Render Settings window and select Save As New Preset. Enter a preset name and click Ok.
To render your project, click on Add to Render Queue. After rendering, compare your project with the original video file, and you should observe minimal to no difference in video quality.
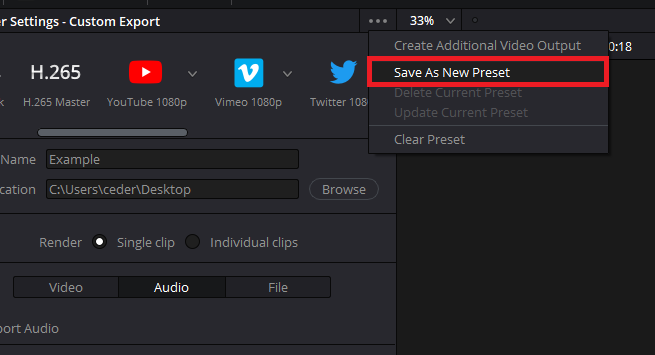
DaVinci Resolve Export Settings > Save As New Preset
-
The frame rate setting determines the number of frames per second (fps) in your video. A higher frame rate will result in a smoother video, but it will also require more processing power to export. If you're working on a project that requires a high frame rate, such as a sports or action project, a higher frame rate setting may be necessary.
-
Yes, you can use different render settings for different clips in the same project in DaVinci Resolve. This allows you to tailor your render settings to the specific needs of each clip, resulting in the best quality exports.
-
Yes, you can preview the render quality in DaVinci Resolve before exporting the project. This allows you to see how your render settings will affect the quality of your final export, and make any necessary adjustments. This can save you time and help ensure that your final export is of the best quality possible.