Mac OS Ventura Update Error - Installation Failed Fix

It's frustrating to see that error message pop up on your screen after waiting hours for an update. If you're an Apple fan, you know that Mac OS updates are a big deal, promising new features, better performance, and increased security. But what do you do when the update process stalls and the dreaded "Installation Failed" error appears? Don't panic, we've got you covered. In this article, we'll dive into the causes of the Mac OS Ventura Update Error and provide a step-by-step guide to get your Mac back up and running.
Mac OS Update Compatibility
First, you should ensure that your Mac is compatible with macOS Ventura. Here is a list of the earliest MacOS versions these Macs support. If you cannot update your Mac through your system settings, proceed to download the version. This list will apply to the MacBook Air, MacBook Pro, Mac Studio, Mac Pro, iMac, iMac Pro, and Mac mini.
Model Released in 2020 - macOS Big Sur
Model Released in 2019 - macOS Mojave
Model Released in 2018 - macOS High Sierra
Model Released in 2017 - macOS Sierra
Model Released in 2016 - macOS Sierra
Model Released in 2015 - OS X Yosemite
Model Released in 2014 - OS X Mountain Lion
If your device is not compatible, you must install a previous Mac OS version first. The How to download macOS Apple support page will redirect you to the Mac OS download of your choice. After downloading the dmg. file, you can proceed with the installation.
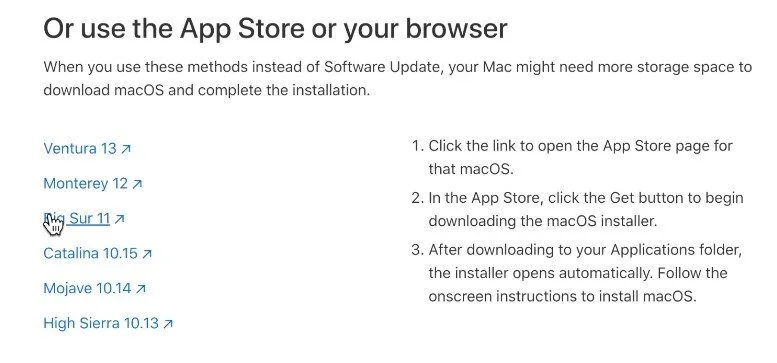
Download macOS Version through Browser
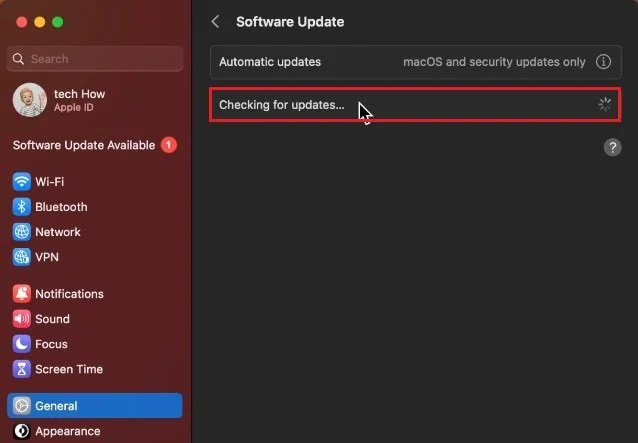
Update macOS with System Settings
Newer devices should be able to update their OS through the Mac OS system settings. Open up your System Settings and navigate to the General section. Here, under Software Update, try to update your Mac again after closing all applications running in the background.
Create New Minecraft Installation
Close Background Applications
To ensure that no other apps are running, and using up your network traffic or memory, click on the Apple icon on the top left of your screen and select Force Quit.
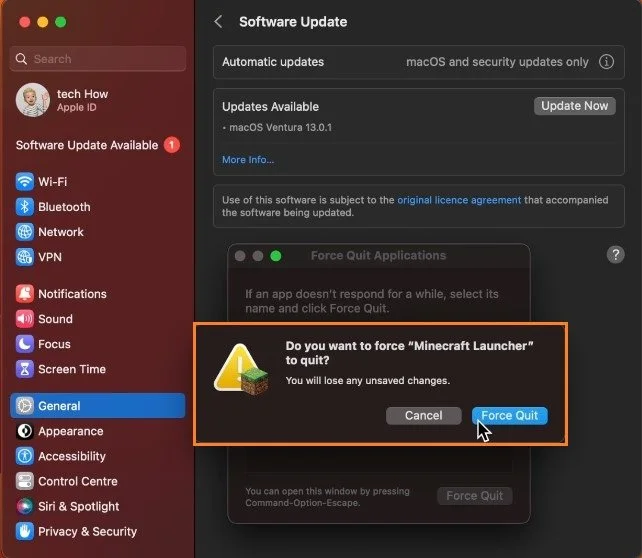
Force Quit Applications
Ensure enough System Storage
On this window, select to quit all apps aside from your System Settings. Next, head back to your settings, and in the General section, click on Storage. Make sure you have at least 5GB of storage to download and install the latest software update. In case you’re unsure what to delete, then you can start by emptying your bin and deleting files on your desktop that you no longer need.
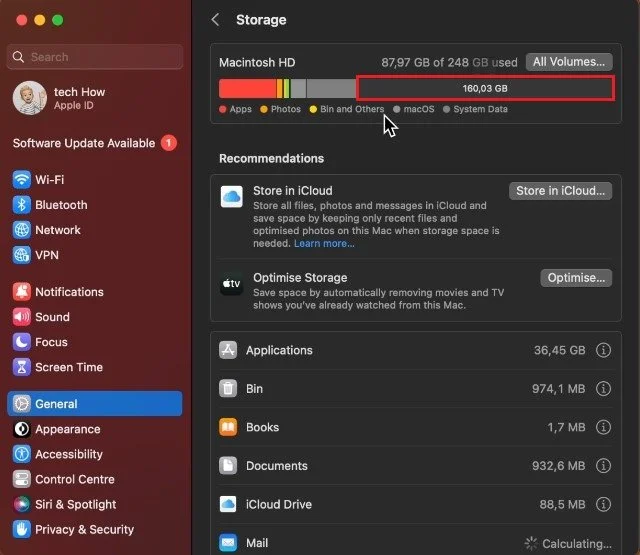
System Settings > General > Storage
Disable VPN Connection & Firewall
In your Network settings, make sure that you are connected to the right network, and below, disable your VPN service in case you are using one, as well as your Firewall for the time being. A VPN will mask your location and can cause download issues when enabled.
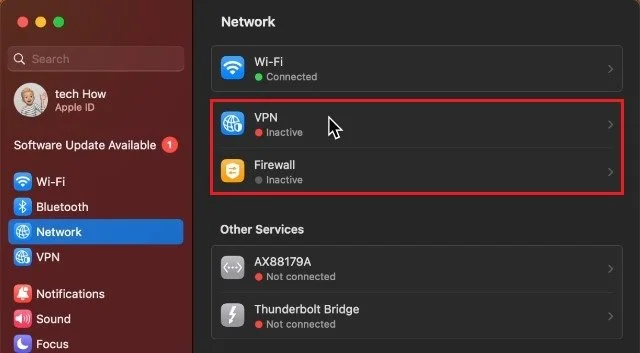
System Settings > Network > VPN
Set Date & Time Automatically
The last step in your settings would be to set your date and time correctly. Back in your General settings, select Date & Time. Here, enable the Set time and date automatically option. When disabled, this can cause install issues for newer Mac OS versions.
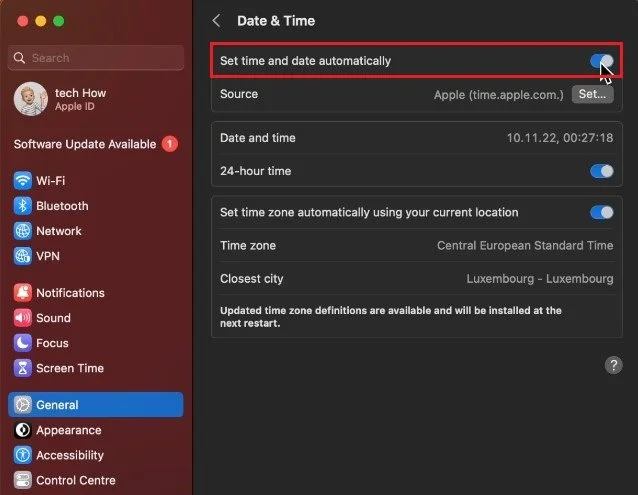
System Settings > General > Date & Time
Update Mac Through App Store
When this is done, you can try to update your Mac again. If you’re still unable to download or install the update, then open up your App Store application. Here, you’ll be able to look up Ventura (or any other Mac version) and click on Get. This will download the update through your App Store, and you can install it, hopefully without getting the installation error.
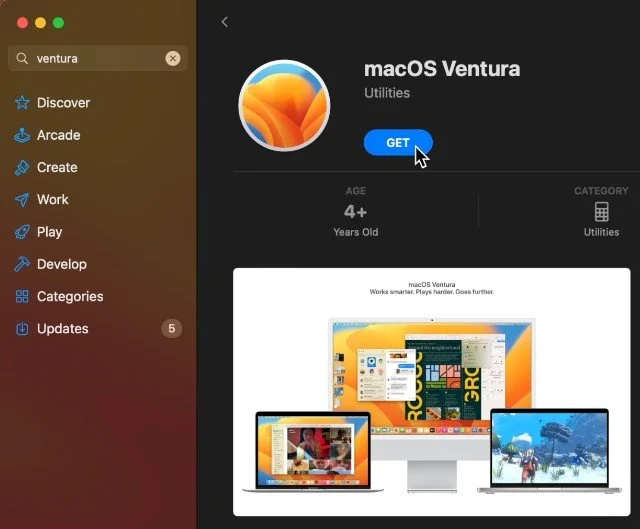
App Store > Ventura
Test & Improve Network Connection
Suppose all of these steps did not fix your problem. In that case, this issue is most likely related to an unreliable network connection, a lack of admin rights, or peripherals connected which can screw up the installation.
First, make sure that you are using a reliable network connection. You might be using a public network that blocks large downloads, or your ISP is having issues connecting to servers. You might want to test your network connection using Speed Test, which will help verify where this problem could be coming from.

Restart Mac & Unplug Peripherals
Next, restart your Mac and unplug all mice, keyboards, and other peripherals which could cause issues. After a system restart, log into the account which has admin privileges, and then you should be able to install the update on your Mac.
-
It depends on the age of your Mac and its hardware capabilities. You can check if your Mac is eligible for the update by visiting the Apple website and checking the system requirements for the Mac OS Ventura Update.
-
If your Mac's internet connection is causing the installation to fail, you may need to restart your router or modem, or check to see if there are any issues with your ISP. You can also try installing the update while your Mac is in Safe Mode.
-
Yes, you can manually download and install the Mac OS Ventura Update from the Apple website or App Store. However, it's important to follow the instructions carefully to ensure that the update is installed correctly and doesn't cause any further issues with your Mac.