How To Change Phone Number on Google Account
Introduction
Updating your phone number on a Google account is a key step in maintaining the security and accessibility of your account. In this tutorial, we'll guide you through the simple process of changing your phone number, using either the Google or Gmail app on your mobile device, or through a web browser. This change is vital for account recovery and verification purposes, ensuring that you always have control over your Google account. Follow our easy steps to update your contact information and keep your account secure and up-to-date.
Updating Phone Number in Google Account Settings
Changing your phone number linked to your Google account is essential for maintaining account security. Here's a straightforward guide to updating your contact information:
Steps to Access Google Account Settings
Open Browser:
Launch your preferred web browser on your mobile device.
Navigate to Google:
Go to google.com.
Log into Your Google Account:
If you are not logged in, tap the profile icon at the top right corner of the screen.
Enter your login credentials.
Access Account Management:
If already logged in, tap on your profile icon at the top right.
Select “Manage your Google Account”.

Tap “Manage your Google Account”
Editing Personal Information
Locate Personal Info Tab:
Inside your Google account, find and select the “Personal Info” tab.
Edit Contact Info:
Scroll to the “Contact Info” section.
Here, your current phone number will be displayed.
Tap on the phone number to edit it.
Changing Your Phone Number
Update Phone Number:
After tapping on your phone number, follow the prompts to enter and confirm your new phone number.
This method works regardless of whether you have the Google or Gmail app installed, making it a universally applicable approach to keeping your Google account secure and up to date.
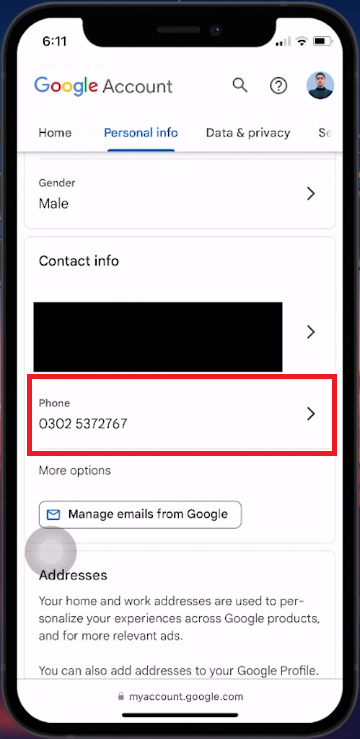
Access your Google account contact information
hanging and Verifying Your New Phone Number on Google Account
Updating your phone number in your Google account settings is a vital step for security. Follow these instructions to change and verify your new number:
Editing Your Phone Number
Locate the Edit Icon:
Find the pencil icon next to your current phone number. This represents the edit option.
Begin the Update Process:
Tap on the pencil icon to start editing your phone number.
Pass the Security Check:
For security, Google may request you to enter your account password.
This step verifies your identity and protects your account.
Updating with New Number
Enter New Phone Number:
After verification, select "Update Number".
Input your new phone number and tap “Next”.
Verifying the New Number
Receive Verification Code:
Google will send a verification code to your new phone number to confirm it's active and in your possession.
Complete Verification:
Enter the received code in the designated field.
Tap on “Verify” to finalize the update.
Confirmation
Successful Update:
Once verified, your Google account will be updated with the new phone number.
This process ensures your Google account remains secure and linked to a phone number you currently have access to, enhancing overall account security and recovery options.
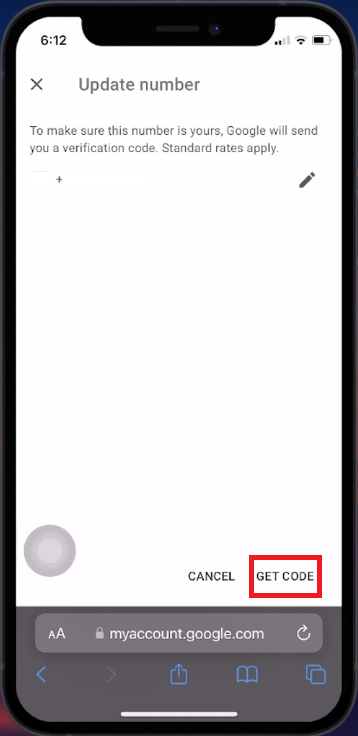
Verify your new phone number
-
Yes, you can change your Google account phone number using a web browser on your mobile device or computer, without needing the Google or Gmail app.
-
Google requests your password as a security measure to verify your identity and protect your account from unauthorized access.
-
You can use any active phone number to which you have access. This number is used for account recovery and verification purposes.
-
Verification is almost instant. Once you enter the new phone number, Google sends a verification code to that number which you must enter promptly to complete the process.
-
Ensure the phone number is correct and check for any network issues. If the problem persists, request Google to resend the verification code.