How To Make Custom Minecraft Skins (Bedrock & Java Edition)
Introduction
Personalizing your Minecraft experience is an essential part of making the game feel truly your own. One of the best ways to do this is by creating custom Minecraft skins for both Bedrock and Java Editions. In this comprehensive guide, we will show you step-by-step how to design, create, and upload unique skins that will make your character stand out in the vast world of Minecraft. Whether you're a seasoned player or just starting your block-building journey, this article will provide all the necessary information and tips to help you craft the perfect skin for your Minecraft avatar. Get ready to unleash your creativity and make a lasting impression in the Minecraft community!
Create and Save Your Unique Minecraft Skin
Crafting a custom Minecraft skin is simple with the help of user-friendly tools such as photo editing software or dedicated web applications like the widely-used Minecraft skin editor on MinecraftSkins.net.
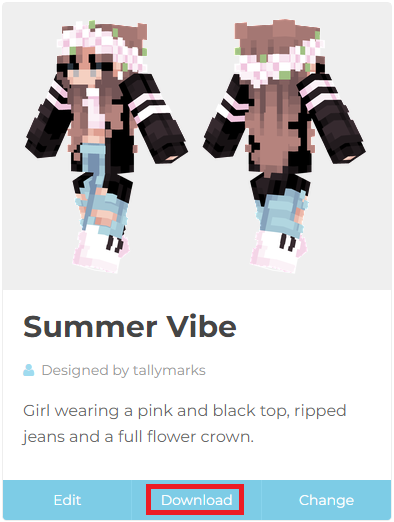
This platform offers a wealth of popular pre-made skins for inspiration or allows you to start from scratch using a customizable template. Once you've finished designing your one-of-a-kind skin, download the skin file and make a note of where it's saved, usually in your computer's downloads folder.
Download any Minecraft Skin
Apply Your Custom Skin on Minecraft Bedrock Edition
Now, let's dive into the process of uploading your unique Minecraft skin to the Bedrock edition of the game. First, launch Minecraft Bedrock and ensure you're logged in with your Microsoft account.
Navigate to the "Dressing Room," and from there, access your "Classic Skins." Choose the "Owned Skins" tab and click on "Choose New Skin."
Minecraft Bedrock Edition > Classic Skins
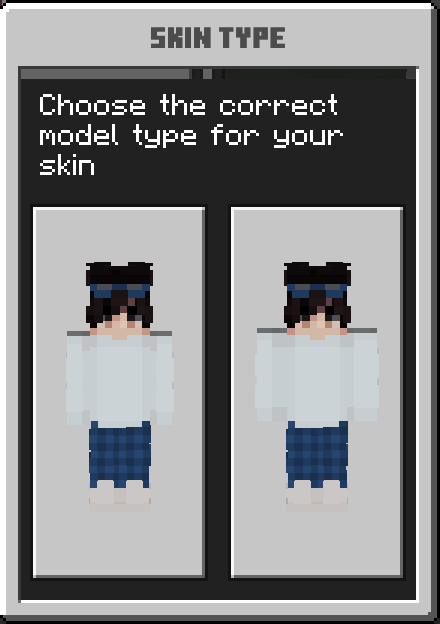
Your file explorer will pop up, allowing you to locate the custom Minecraft skin you downloaded earlier. Select the appropriate model type for your skin and import it.
By following these steps, you can effortlessly import any custom skin into the Minecraft Bedrock edition and showcase your creativity.
Choose the Correct Model for your Skin
Apply Your Custom Skin on Minecraft Java Edition
For those who prefer Minecraft: Java Edition, begin by opening the Minecraft Launcher. Choose the Java Edition of the game and click on "Skins."
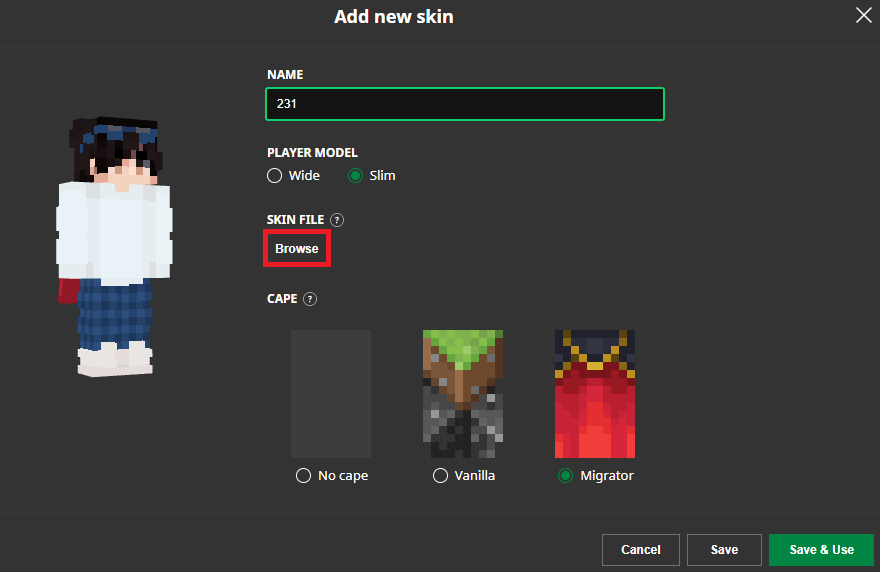
You'll see your current Minecraft skin, and when you select "New Skin," you can provide a new name and choose a player model. Click on "Browse" to locate the downloaded skin from your downloads folder.
Minecraft: Java Edition > Skins
You may have extra customization options to explore before saving your changes and applying the new Minecraft skin to your account.
To use the custom skin in Minecraft Pocket Edition, ensure you log in with the same Minecraft account on your mobile device. This way, you can enjoy your personalized skin across multiple platforms.
Minecraft Skins > Add New Skin
-
Yes, you can create custom skins for both Minecraft Bedrock and Java Editions using photo editing apps or online skin creators like MinecraftSkins.net. You can then follow the steps in this article to apply your custom skin to the respective edition.
-
Open the Minecraft Launcher, choose the Java Edition, and click on "Skins." Select "New Skin," provide a name, and choose a player model. Click "Browse" to locate the downloaded skin file, then save your changes and apply the new skin to your account.
-
Open Minecraft Bedrock, sign into your Microsoft account, and navigate to the "Dressing Room." Access your "Classic Skins" and select "Owned Skins." Click "Choose New Skin," locate the downloaded skin file, select the correct model type, and import it.
-
Yes, you can use the same custom skin on multiple devices, such as PC and mobile, by logging into the same Minecraft account across devices.
-
There are no specific limitations to the design of custom Minecraft skins. However, make sure to follow Minecraft's community guidelines and avoid creating offensive or inappropriate skins.


