How To Extract Audio from Video on iPhone
Introduction
Navigating the digital labyrinth of multimedia files can sometimes be a puzzle. But what if you want to go beyond watching videos and aim to isolate the audio track for listening or sharing? Whether it's for a personalized ringtone or capturing a podcast snippet, extracting audio from video on your iPhone has never been easier. In this comprehensive guide, we'll walk you through a streamlined process using iOS shortcuts to convert video to audio. Get ready to tap into a whole new realm of iPhone functionalities.
Create Your 'Video to Audio' iOS Shortcut
Extracting audio from videos on your iPhone has never been more straightforward, thanks to iOS shortcuts. Here's how to set up your own 'Video to Audio' shortcut:
Open Shortcuts App: Locate and open the Shortcuts app on your iPhone.
Initiate New Shortcut: Tap on the '+' symbol found at the top-right corner to create a new shortcut.
Rename the Shortcut: Choose your newly created shortcut and tap 'Rename' to change its name to 'Video to Audio'.

Shortcut App > Create New
Configure Share Sheet & Media Settings
Access Shortcut Settings: Tap on the 'i' icon situated at the bottom middle of your screen.
Enable Share Sheet: In the pop-up, toggle the 'Show in Share Sheet' option to ON, and tap 'Done'.
Refine Media Input: An option saying 'Receive images and 18 more input from Share Sheet' will appear. Tap it, then hit 'Clear' to deselect all. Finally, toggle the Media option back on and confirm with 'Done'.

Enable “Show in Share Sheet”
Add Actions for Encoding and Saving
Add Encoding Action: Tap 'Add action' and type 'Encode' in the search bar. Select 'Encode Media' from the list.
Choose Audio-Only: Under 'Encode Media', toggle on the 'Audio Only' feature.
Add Save File Action: Go back to the search bar, type 'Save File' and select it from the Documents section.
Specify Save Location: Click the arrow under 'Save' to ensure 'Ask Where to Save' is enabled. If not, toggle it on.
Tap 'Done' to complete the setup, and your new 'Video to Audio' shortcut is now ready for use.
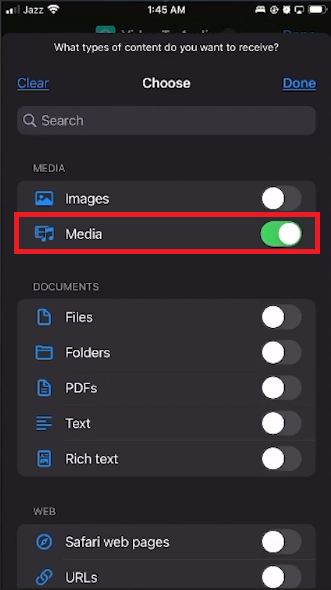
Choose Media > Media
How to Use Your 'Video to Audio' Shortcut and Save the Extracted Audio
Unleashing the power of your newly created "Video to Audio" shortcut is a simple process. Follow these steps to extract audio from any video and save it in a location of your choice.
Locate the Video: Open the video you want to extract audio from on your iPhone.
Access the Share Sheet: Navigate to the Share Sheet of that particular video.
Find and Run the Shortcut: Scroll through the list of options until you find your "Video to Audio" shortcut. Tap on it to start processing the video.
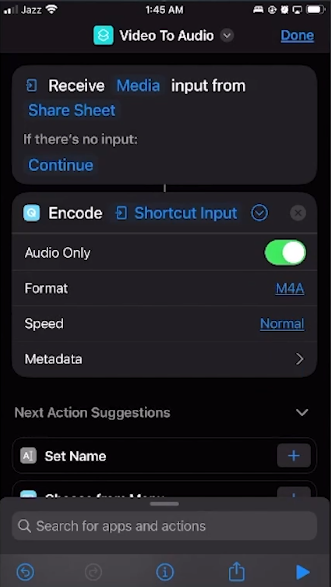
Encode Audio Only for the new shortcut
Save the Audio File in Files App
Choose Storage Location: A pop-up window from the Files app will appear. Browse and select your desired folder or location where you want the extracted audio to be stored.
Complete the Save: Once you've selected the location, tap "Open" and voilà! Your audio file will be saved in the chosen directory within the Files app.
Now you have a straightforward method to extract and save audio from videos right on your iPhone.

Use the “Video to Audio” shortcut
-
Yes, the "Video to Audio" iOS shortcut is designed to work with multiple video formats, making it a versatile tool for audio extraction.
-
The quality of the extracted audio depends on the original video's audio quality. However, using the iOS shortcut should provide you with high-quality audio output most of the time.
-
The Share Sheet is accessible from within the video you are viewing. Look for the 'Share' icon, usually represented by a square with an upward-pointing arrow, and tap on it to open the Share Sheet.
-
Yes, you can. During the extraction process, the Files app will open a pop-up window, allowing you to browse and select your preferred storage location.
-
If the shortcut is missing from the Share Sheet, make sure it is toggled ON in the 'Show in Share Sheet' option within your Shortcuts app.