Create a Logo Reveal Animation in Premiere Pro - Tutorial & Template
Introduction
In the dynamic world of multimedia and branding, making your mark can often boil down to the details. And what better way to stand out than with an engaging and modern logo reveal animation? This guide will unveil the simple process of creating an enticing logo animation using a template in Adobe Premiere Pro. From securing a versatile template from the Evanto Elements platform to mastering the art of customization and exporting, we'll illuminate every step of this straightforward yet impactful process. Perfect for beginners and professionals alike, our tutorial ensures your logos aren't just seen, but remembered.
Acquire and Extract the Premiere Pro Logo Reveal Template
Kickstart your journey by securing your logo reveal template from Envato Elements. Tthis resource-rich platform offers a 7-day free trial that gives you access to the necessary Premiere Pro template, and so much more. Besides the template, the trial period unlocks a world of creative assets, including numerous add-ons, plugins, and other templates to enhance your Premiere Pro projects.

Download the Logo Animation template
Once your download is complete, which should typically take about a minute, find the template file within your downloads folder. As most files from Envato Elements come in a compressed form, you'll need to extract the contents. If you're using a Windows PC, a simple right-click on the .zip file and choosing to extract the entire file in your downloads folder will do the trick. If you're working on a Mac, you can follow identical steps to unzip the file. This process prepares your template for use in the upcoming stages of creating your logo reveal animation.
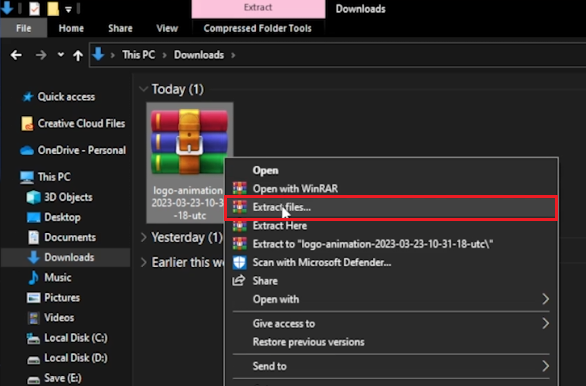
Unzip the downloaded logo template file
Initiate and Modify the Logo Reveal Template in Premiere Pro
Once the extraction is complete, the resultant folder is ready for use. Kickstart the process by launching Premiere Pro and simultaneously opening the logo file. Now, to facilitate seamless navigation, key in the name of the recently downloaded file in the essential graphics window. For instance, if your file is named "logo", inputting this keyword will swiftly lead you to the file. You can then incorporate it into your project by either double-clicking it or dragging it into your timeline.
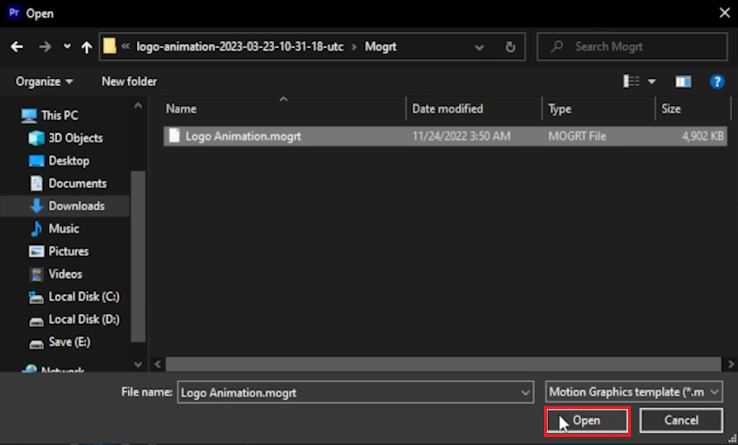
Import the Logo Anmiation.mogrt file in Premiere Pro
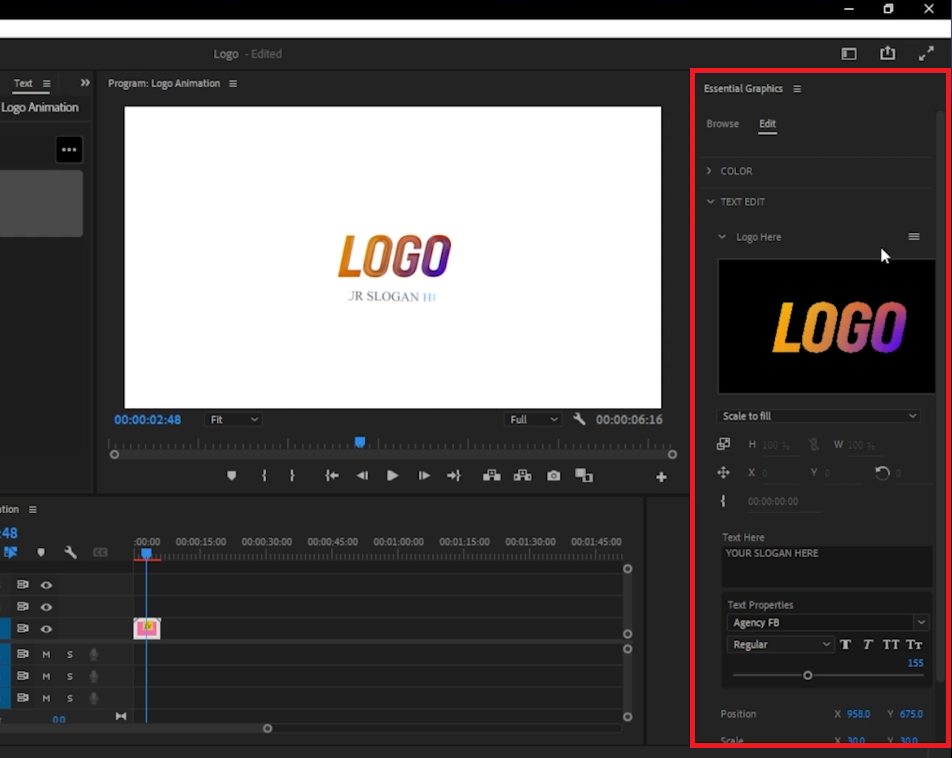
Subsequent to this, launch the properties of the logo file by double-clicking it on the timeline. This reveals a myriad of customization options, ranging from color selections to text modifications. You can expand the text field to view the placeholder "logo". By clicking the corresponding lines, you can swap this placeholder with your desired logo. The entire process is user-friendly, requiring only a few clicks.
Additionally, to personalize your logo reveal further, you can adjust the dimensions and position of your logo. Whether you want it larger, smaller, or centrally aligned, the control is at your fingertips.
Premiere Pro > Window > Essential Graphics
Tailor, Enhance, and Export Your Custom Logo Reveal Template
Upon finalizing your logo, you have the liberty to further customize it by adding a slogan. If you prefer a cleaner look, this layer can be readily eliminated. For those interested in adding a tagline, simply double-click the text field and input your chosen phrase. In this editing window, you can also alter the text font and tweak other elements to match your brand identity.
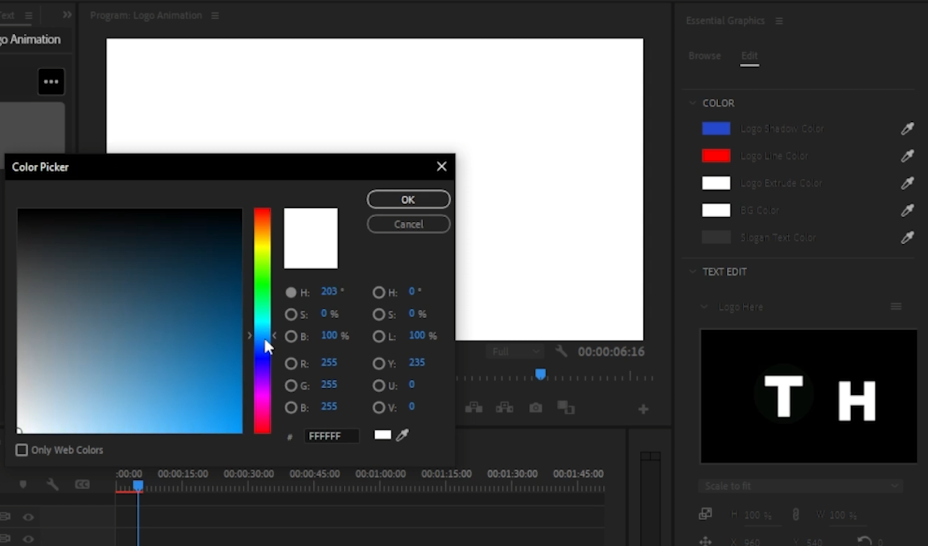
Adjust the Logo Shadow, Line, Extrude and background colors
Additionally, you get the ability to determine the positioning and size of the slogan, offering flexibility in design. Besides this, you can alter the colors of the background and logo to suit your brand aesthetics.
To personalize the colors, expand the color settings. From here, you can alter the shadow color of your logo, enhancing its visual depth. Not only this, you have the option to customize the color of your logo's lines.
Further, by clicking the color pickers, you can modify the extrude and background colors. To fine-tune your branding, you can also adjust the text color of your slogan.
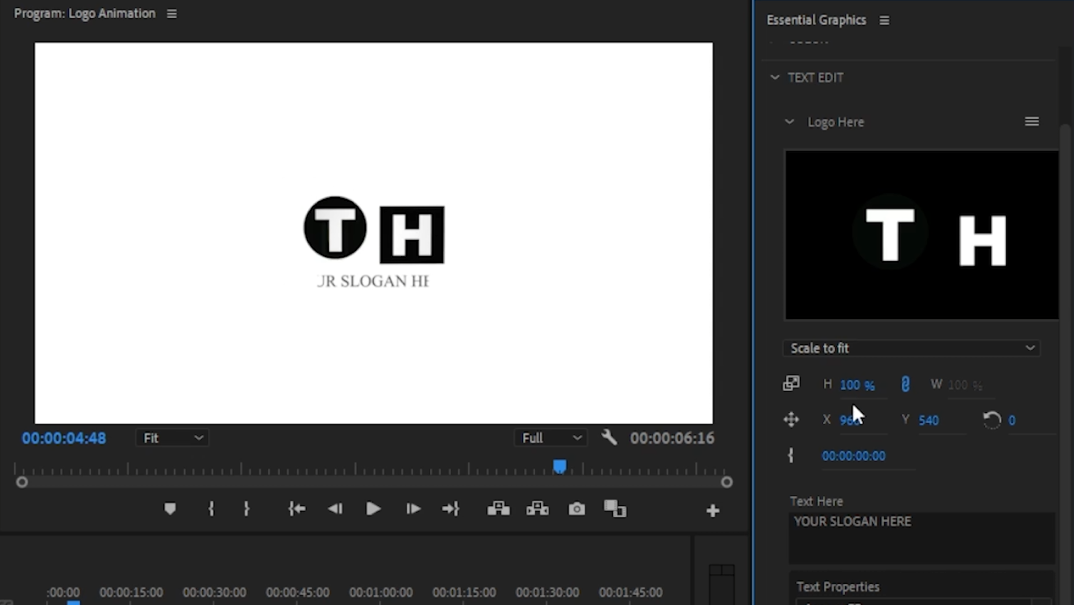
Adjust the logo animation size based on your logo
Once you are content with your logo's look and feel, mark the in-out area and press 'Enter'. This renders your logo for a high-quality preview.
Having scrutinized your logo reveal and its details, you can export it in your preferred format, ready to captivate your audience.
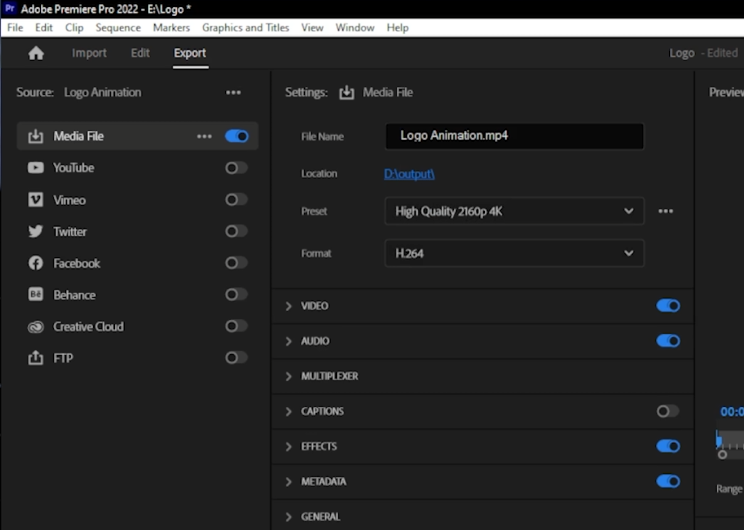
Export the logo animation
-
Yes, the Logo Reveal template for Premiere Pro is highly customizable. You can adjust the logo, add or remove the slogan, change text fonts, modify the color schemes, and alter the logo's position and size according to your brand identity.
-
Adding a slogan in Premiere Pro's Logo Reveal template is simple. Click on the text option in the properties, input your desired text in the dialogue box, and adjust its font, position, and scale as needed.
-
You can easily alter the colors of your logo in Premiere Pro. Simply expand the color options in the properties and adjust the color pickers to change the shadow, lines, extrude, and background colors of the logo.
-
After you've done all adjustments, select the in-out area in the timeline and press 'Enter' to render a high-quality preview of your Logo Reveal in Premiere Pro.
-
Premiere Pro allows exporting in various formats according to your needs. Whether you require a video file, an animated GIF, or any other format, you can export the Logo Reveal as desired.