How To Make Multiple Emails in One Gmail Account
Introduction
Efficient email management is crucial for organizing personal, business, or shopping communications. This guide shows you how to create multiple email addresses within a single Gmail account, helping you keep your inbox organized and tailored to different purposes.
Set Up Alias Email Addresses in Gmail
Creating alias email addresses in Gmail allows you to manage various types of communication under one account:
Access Gmail: Open your browser and log into your Gmail account.
Create an Alias: Compose a new email. In the 'To' field, enter your primary Gmail address with a '+' sign and a keyword before the '@' symbol. Example: 'example+work@gmail.com' for work emails if your primary email is 'example@gmail.com'.
This method allows you to create multiple custom email addresses linked to your main account, helping you categorize emails for work, shopping, personal use, and more.
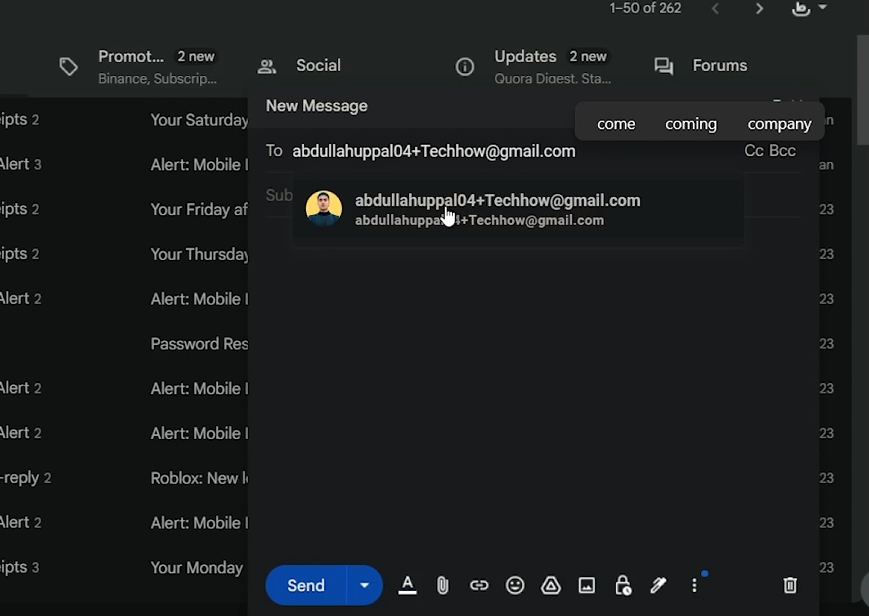
Create an alias email address within Gmail
Organize Emails with Gmail Alias Filters
Use alias email addresses to keep your inbox organized with Gmail filters:
Seamless Delivery: Emails sent to aliases like 'example+work@gmail.com' or 'example+newsletters@gmail.com' arrive in your primary inbox.
Set Up Filters:
Access Settings: Click the settings gear icon and select 'See all settings'.
Create a New Filter: Go to 'Filters and Blocked Addresses' and click 'Create a new filter'.
Filter by Alias: Enter your alias email (e.g., 'example+work@gmail.com') in the 'To' field.
Specify Actions: Choose actions like 'Skip the Inbox (Archive it)', 'Apply the label', or 'Forward it'.
Apply Filter: Click 'Create filter' to activate it.
These filters automatically sort incoming emails based on the alias, ensuring each type of email is organized into its designated folder or label.
By following these steps, you can easily create and manage multiple email addresses within a single Gmail account, keeping your inbox organized and efficient.
-
Yes, you can create multiple email aliases using your primary Gmail address by adding a '+' symbol followed by a keyword to your original address.
-
No, emails sent to your alias addresses are delivered to your primary Gmail inbox, but you can use filters to automatically organize them into separate folders.
-
Absolutely! You can create aliases for various purposes, such as 'yourname+work@gmail.com' for work and 'yourname+personal@gmail.com' for personal emails.
-
Go to Gmail settings, choose 'Filters and Blocked Addresses', click 'Create a new filter', enter the alias in the 'To' field, specify your actions, and then create the filter.
-
Yes, you can set a filter to automatically forward emails received on an alias to a different email address.