PUBG - Fix High Ping & Packet Loss

Are you tired of experiencing high ping and packet loss while playing PlayerUnknown's Battlegrounds (PUBG)? The frustration of laggy gameplay can quickly turn your gaming experience sour. Luckily, there are ways to fix this issue and enjoy seamless gameplay without any interruptions. This article will discuss effective strategies to fix high ping and packet loss in PUBG.
Enable the PUBG Network Debug Statistics
To test your system and network connection’s performance, you should use an FPS counter and enable your Network Debug Statistics option to preview your server latency and other network-related information to troubleshoot performance issues. Enable your Network Debug Stats option in your PUBG General settings.

PUBG Settings > General > Network
Verify the PUBG Server Status
We suggest verifying the PUBG service status page to ensure your network issues are unrelated to the server you are playing on. You can preview all server outages reported in the last 24 hours on the server status page. Below, you can see which problems are most often reported, such as the Server Connection, Website, or Game Play. Use the live outage map to see where these reports are coming from.
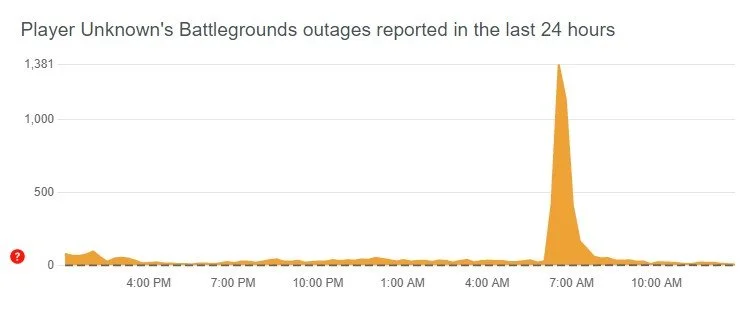
PUBG Live Server Outage Reports
Network Connection Test
If you feel like the issue is related to your own network connection, then test your connection by visiting Speedtest.net. A normal Up & Download speed, without interruption, is essential to have a stable gaming experience. Especially your Ping should remain below 100ms.
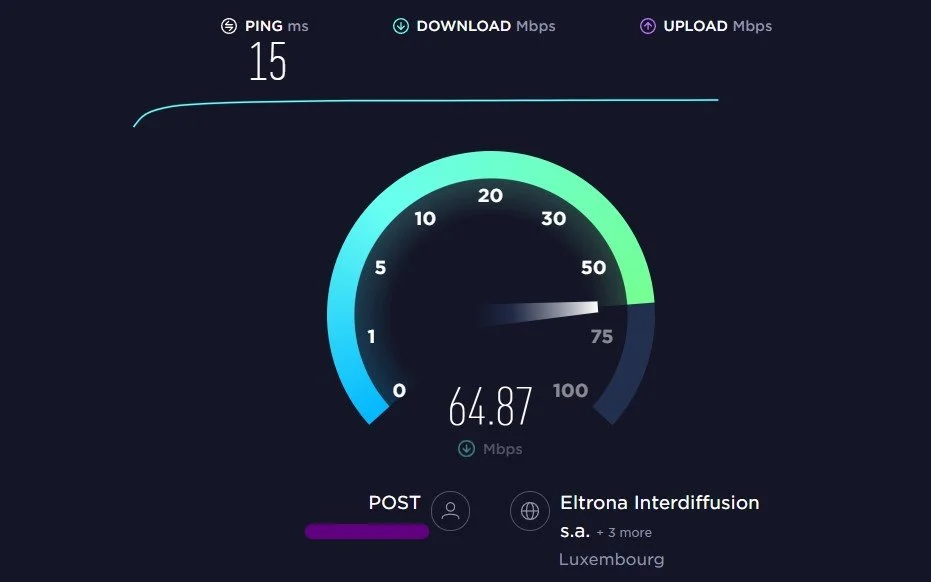
Test your internet connection to the closest server
Disable your VPN or Proxy Connection
Account for any VPN service which could be running on your system. Or turn off your VPN while in-game. Make sure to use an ethernet cable to ensure the best possible connection. If you have to use a Wifi connection, restart your router or modem if you haven't done this in a while, and reduce the number of devices connected to the same network.
Disable Network-Intensive Processes
Open up your Task Manager by searching for it in your Start Menu search. In the Performance tab, click on Open Resource Monitor.
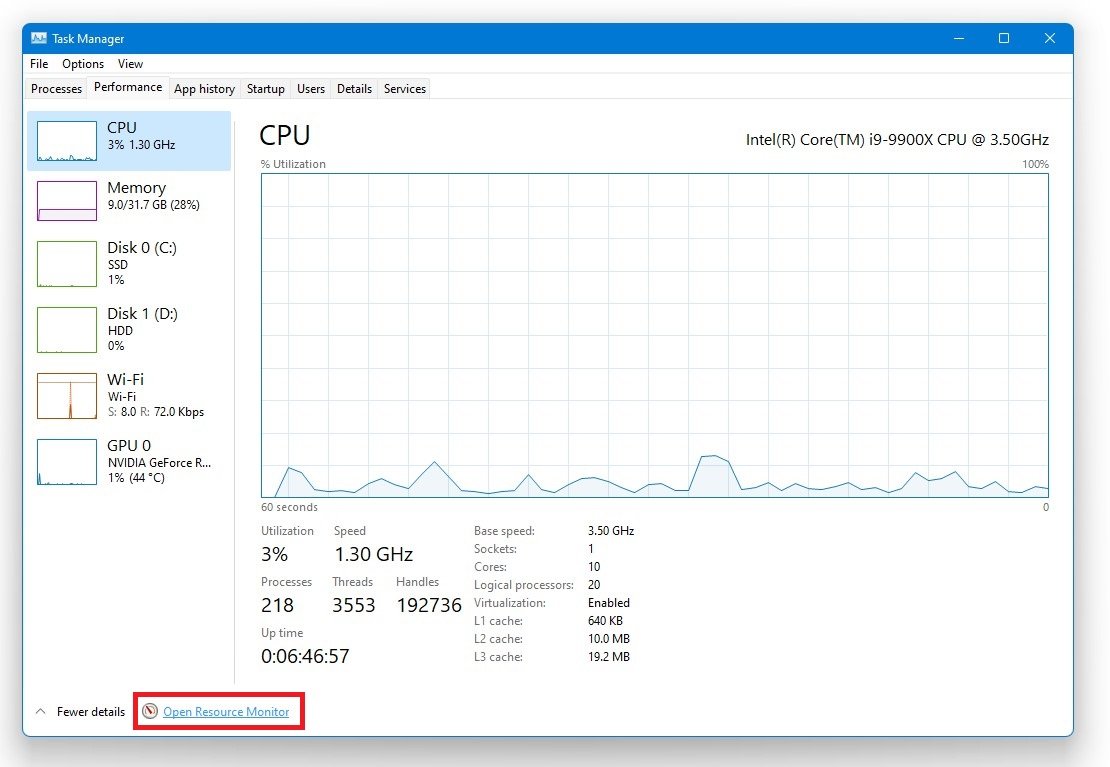
Task Manager > Performance > Open Resource Monitor
In the Network tab, open the Processes with network activity, and after a few seconds, you will see every process using your network connection. This might be your browser running in the background, steam, or a download bottlenecking your connection. I suggest you only end the processes you know won't break your operating system.
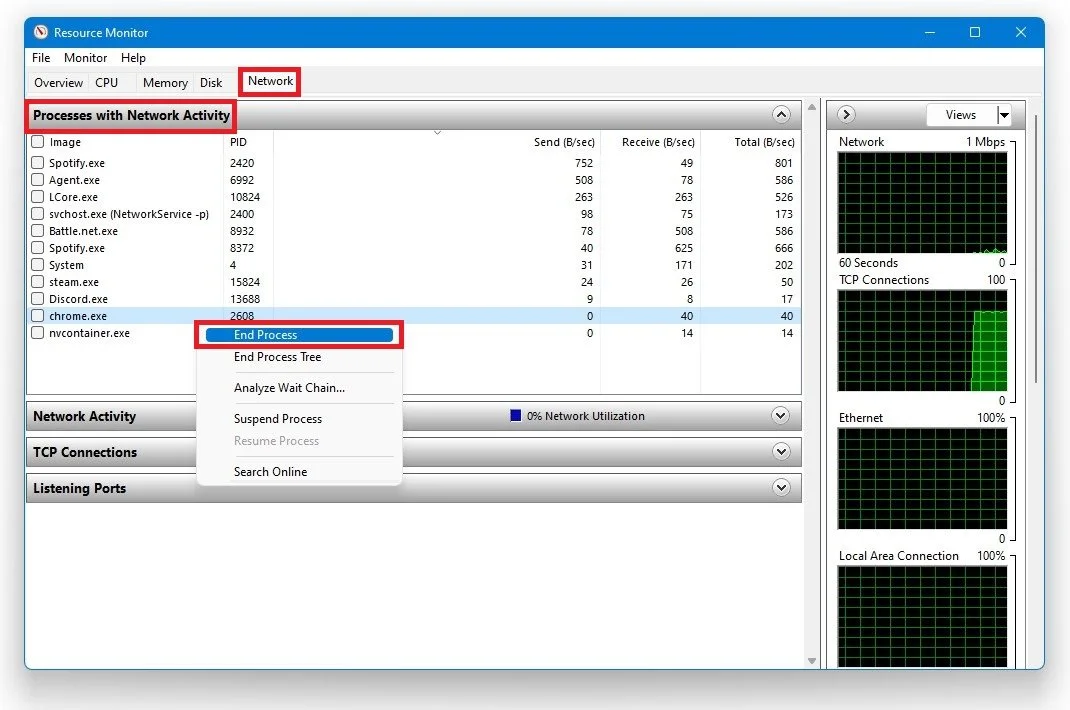
Resource Monitor > Network > Processes with Network Activity
Flush your DNS Resolver Cache
Open up your Command Prompt, by searching for CMD and hitting enter. Use the following commands:
ping google.com
This command will check your latency and packet loss to google's servers. If your ping is higher than 100ms, or if you encounter any packet loss, you should make a few changes to your connection and follow the subsequent tweaks.
ipconfig /flushdns
This will flush and reset the content of your DNS resolver cache. Using this command can, in some cases, fix network-related issues with PUBG.
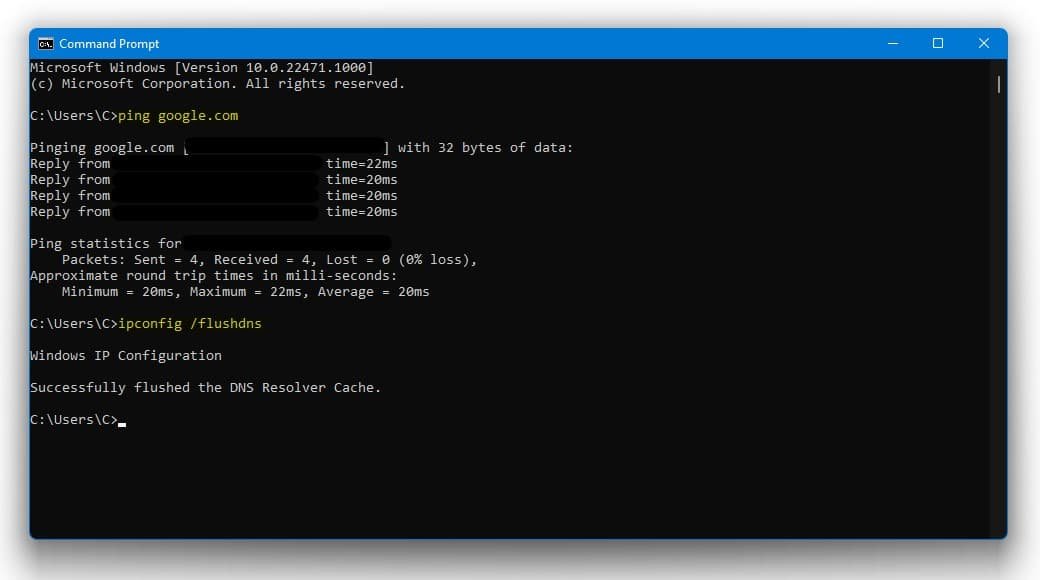
Windows Command Prompt
Verify the Internet Connection with your ISP
If you still have latency and lag issues, verify your connection to your ISP and use a decent data plan. You can troubleshoot this step by switching your connection to your hotspot, for example.
Change DNS Server Address
Next, we will change your DNS server address, in case your network connection still causes the problem. Open your Control Panel by searching for it in your start menu search. Make sure to View by: Category, and click on Network and Internet.
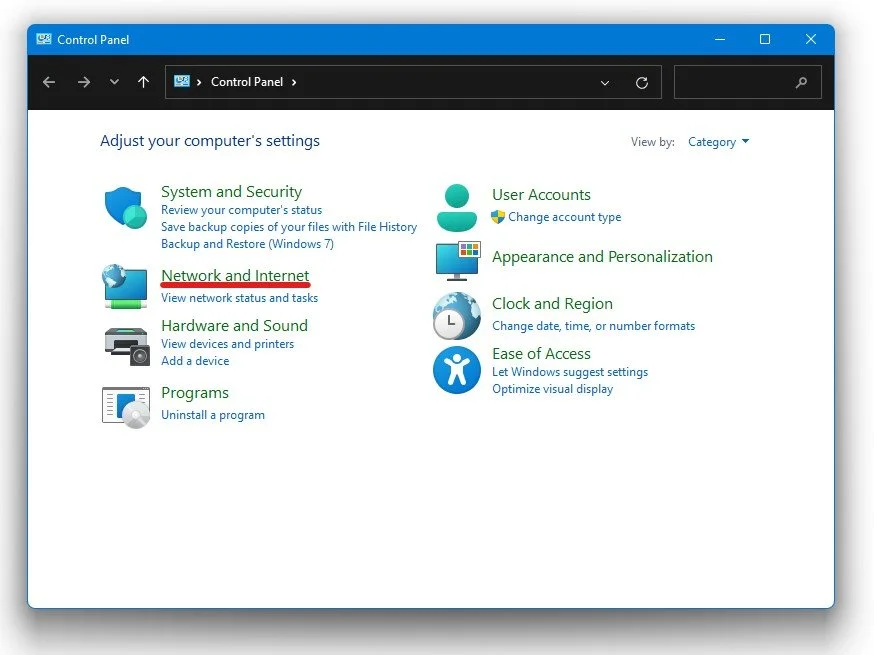
Control Panel > Network and Internet
Click on Network and Sharing Center, and select your connection. This will open up this window, containing general information about your connection. Navigate to Properties, and lastly, double-click the Internet Protocol Version 4.

Network and Internet > Network and Sharing Centre
Select to Use the following DNS server addresses option, and as your Preferred DNS server, use: 8.8.8.8, and as your Alternate DNS server, use: 8.8.4.4. This will for a lot of users fix network-related issues when playing PUBG, as these are the official public DNS server addresses from Google, which are safe to use.
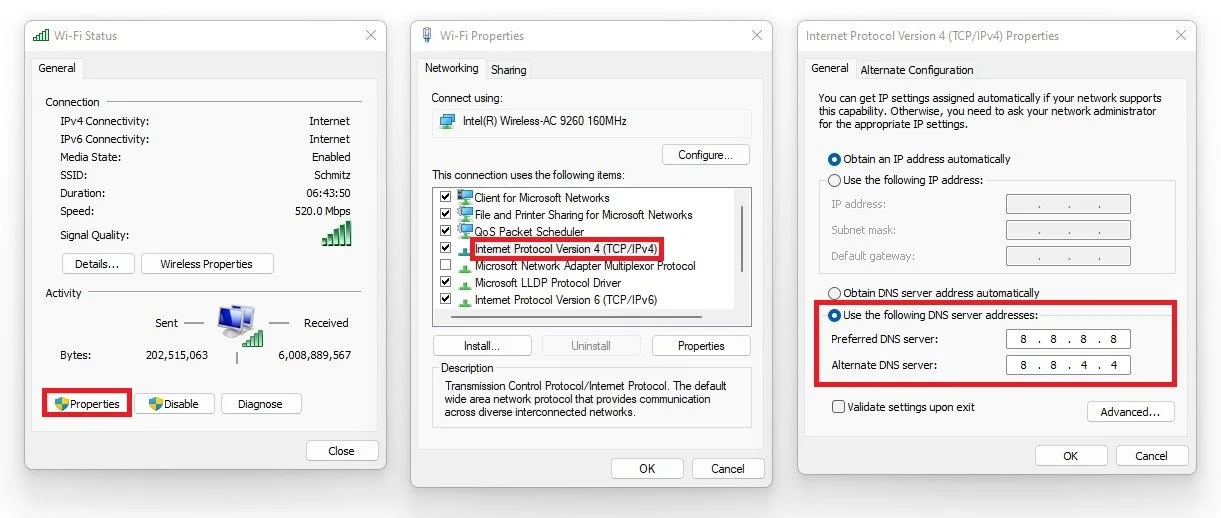
Use the following DNS server addresses
Update your Network Adapter (GPU) Driver
We suggest updating your Network Adapter’s driver to troubleshoot network-related problems further. Search for Device Manager in your start menu search to open it up. Expand your Network Adapters, right-click the one you are using, and select Update Driver. Finally, click on Search automatically for drivers. This will take a second to download and install the latest Network Adapter driver.

Device Manager > Network Adapters > Update Driver
Windows Operating System Update
Ensure your Windows 11 version is up to date. Search for Update to open up your Check for Updates system settings window. Your Settings will open up. Click on Check for Updates, Download or Install Now, and restart your PC after making all these changes to your OS.
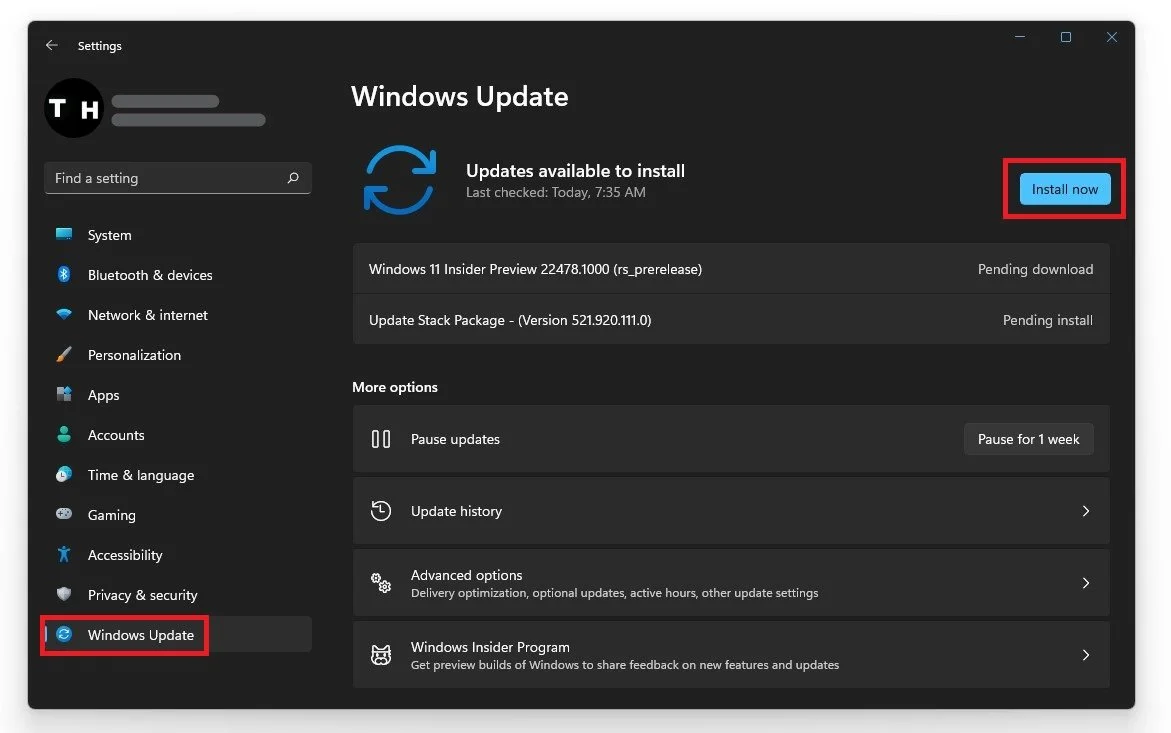
Windows Settings > Windows Update
End Resource-Intensive Processes
Lastly, if you still get network-related issues, you most likely have software running on your system that is hindering you from playing PUBG. To fix this problem, we suggest ending processes from running in your Task Manager of recently installed programs that can change your files or use up your available resources, such as OBS, Shadowplay, CCleaner, or Adobe applications, to troubleshoot which program is causing the issue.
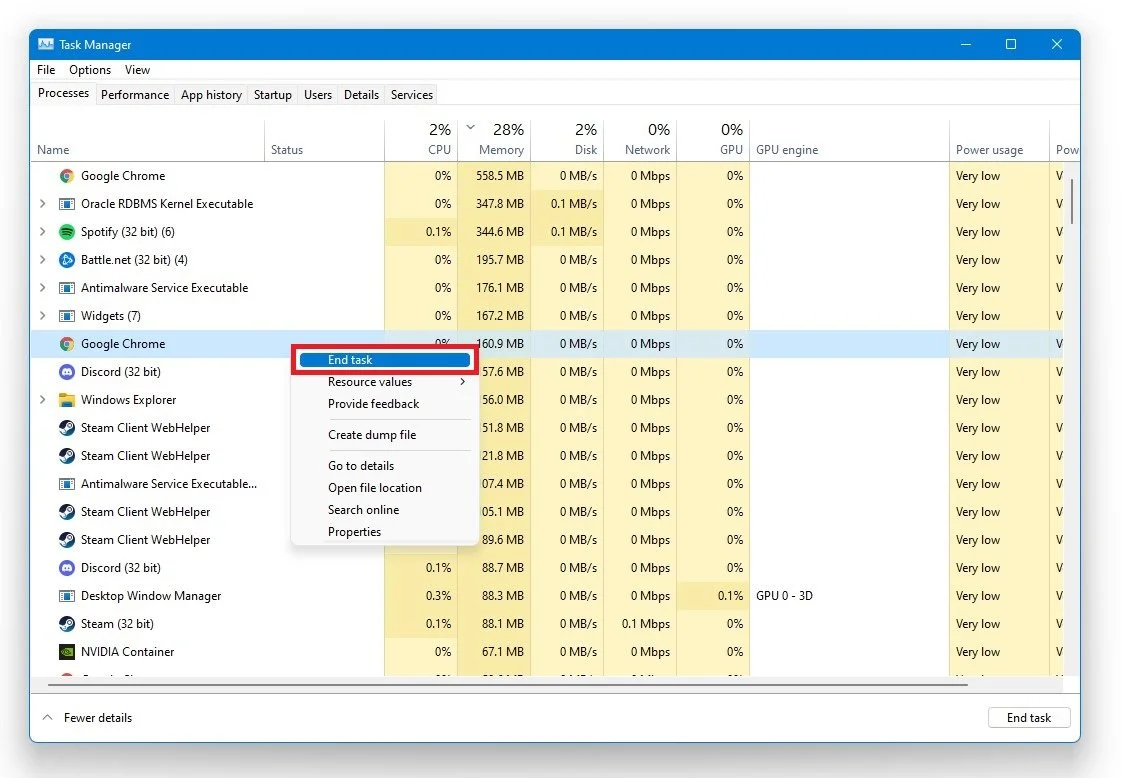
Task Manager > Processes > End Task