Minecraft - How To Boost FPS on Low-End PC & Laptop - Windows 10

Minecraft is a popular game enjoyed by millions of players worldwide, but low-end PC and laptop users often face frustrating FPS issues that can affect their gameplay experience. Fortunately, you can use several tips and tricks to boost your FPS and improve your gameplay. In this article, we will show you how to optimize Minecraft on low-end PCs and laptops running Windows 10. Whether you're a beginner or an experienced player, this guide will provide the necessary information to improve your Minecraft experience.
Download & Install Optifine
Click here to get to the official Optifine download page. Navigate to the Downloads tab, select Show All Versions, and select download the Optifine version you wish to use. If you’re unsure about which version to download, open up your Minecraft launcher. On this window, go to Installations, and here you will see which version you are currently using. Go back to the Optifine downloads page to select the correct download.
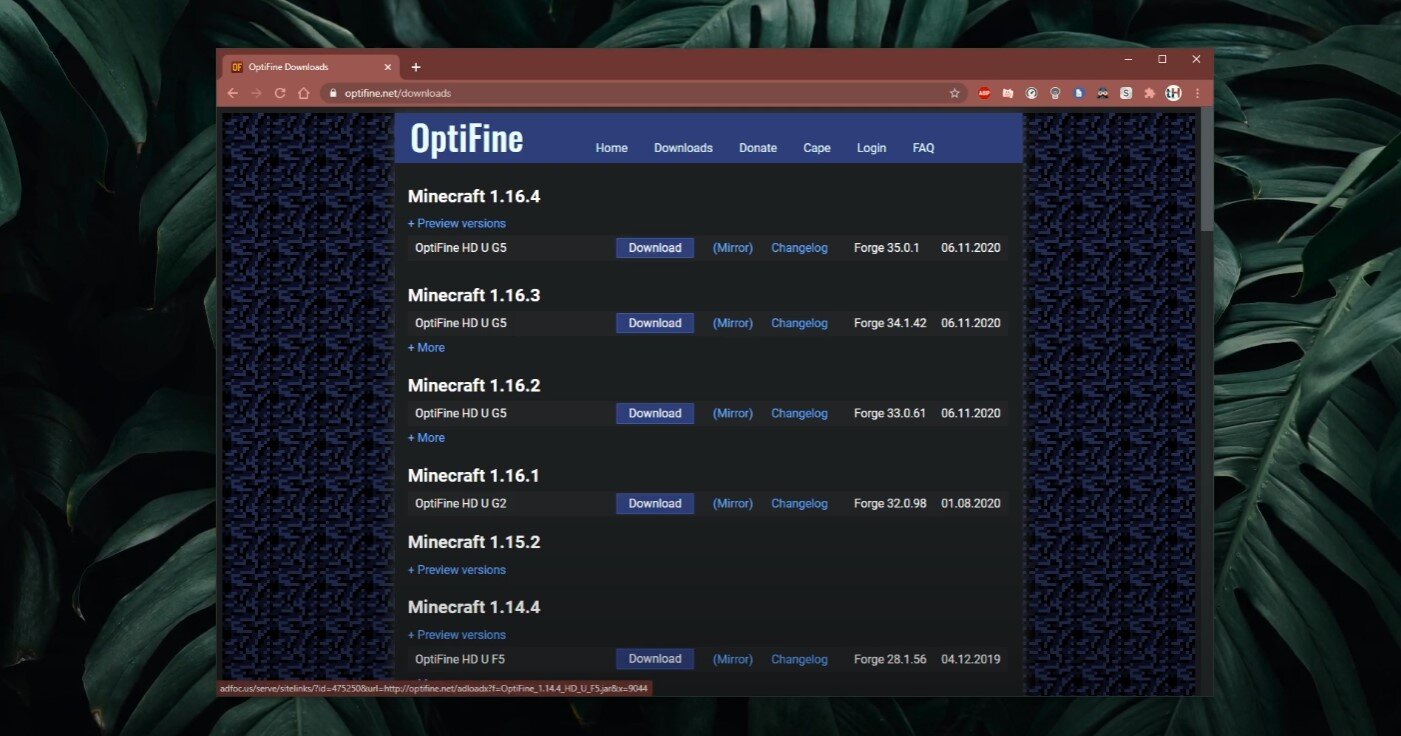
Download the latest OptiFine version
It should take a few seconds to download the file, and your browser might warn you that the file could harm your PC. Keep the file, and locate it in your downloads folder. The file should have a java icon. Double-click the file to open up the installer, and select Install. In case Minecraft is saved on another drive, then select this icon to navigate to the correct Minecraft install location. After selecting Install, OptiFine will be installed.

Run the OptiFine Installer
Run the Optifine Installation
Re-launch your Minecraft launcher; you will see a new Optifine installation. Select Play, and Minecraft will run with Optifine installed. If you wish to delete the new version, then delete it in your installations tab.
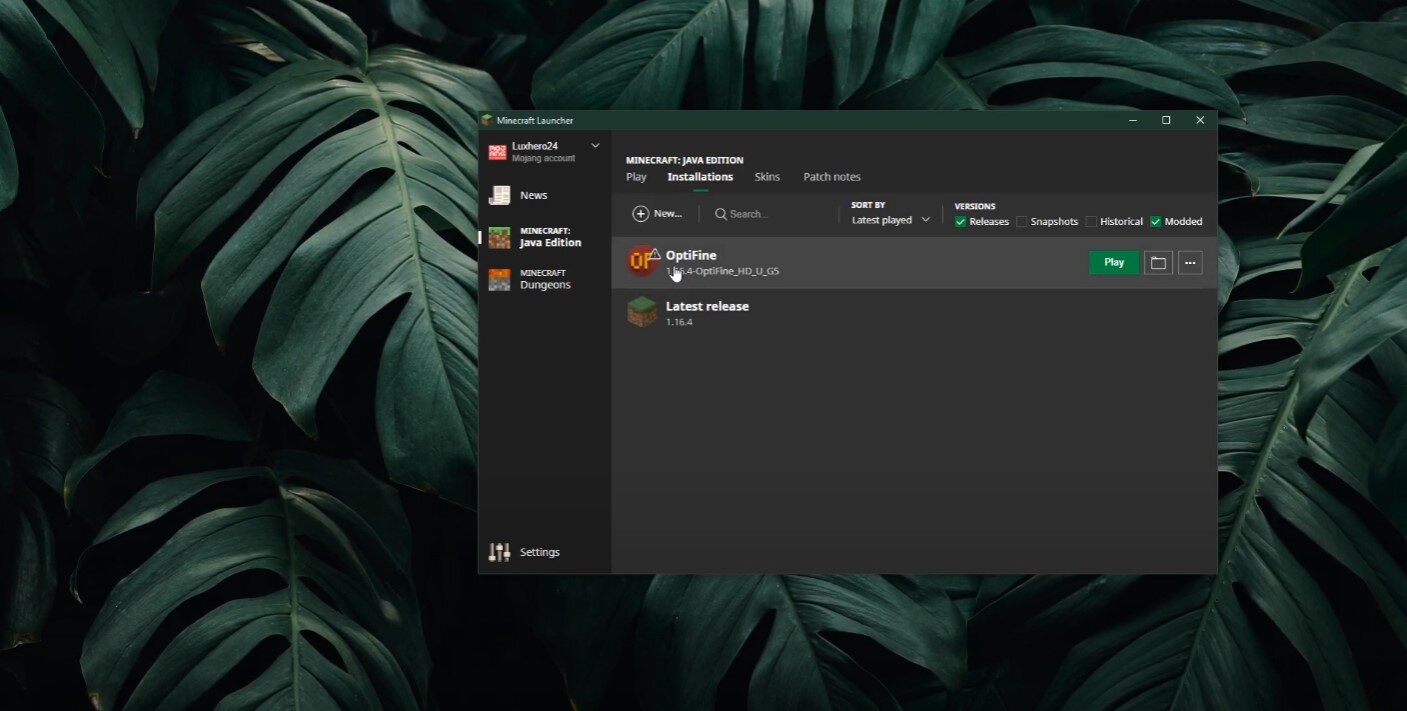
Play the OptiFine Minecraft installation
Best Minecraft Settings to Fix Lag & Boost FPS
Video Settings
Launch Minecraft and navigate to your Options. In your Video settings, set the Graphics option to Fast, Smooth Lighting to OFF, and Smooth Lighting Level to OFF, which will Disable Shadows.
Below, set the GUI scale to what works best for you, as it will not change your performance. Disable Dynamic lights, and under Shaders, disable anti-aliasing. When using the Internal shaders, you will be able to change the settings below, but these will reduce your performance. In case you have some frames to spare then we suggest increasing your render distance and not your shaders options.

Minecraft Settings > Video Settings
Detail Settings
Back in your video settings, navigate to Details, and set most of these settings to default, as it will then depend on your overall graphics setting, which is set to fast. Turn off the Sky setting, Sun & Moon to ON, and Fog to Fast. Entity distance to 100%, turn off Cloud height, and the rest can be set to default.

Minecraft Settings > Detail Settings
Animation Settings
Under Animations, youcan turn all Animations off. This will increase your performance, but the game might not look as good as you wish. You can enable a few options, such as fire & flame animations, potion particles, and lava animation, and set the Particles option to Decreased. The Render Distance option will have a big impact on your performance. A visible chunk distance of 8 should be a good trade-off for performance and visual gaming experience. It would help if you considered lowering this setting even more for low-end PCs and laptops running on Intel HD graphics. Below, set the maximum framerate option above your monitor’s refresh rate and below the maximum FPS you can get. Below, disable the View Bobbing and Entity Shadows options.

Minecraft Settings > Animation Settings
Quality Settings
Under Quality, turn off Mipmap levels. Disable anisotropic filtering, as well as Emissive Textures, Better Grass, and Custom Fonts.Disable Connected Textures, Custom Sky and Custom Entity Models. The other settings can be left to default.

Minecraft Settings > Quality Settings
Performance Settings
Under Performance, ensure that the Render Regions option is turned off, and that Fast Render is enabled. This option should reduce your CPU usage while in-game and could allow you to run the game at a higher render distance. It would be best if you also watched your framerate after changing your in-game settings with Optifine.
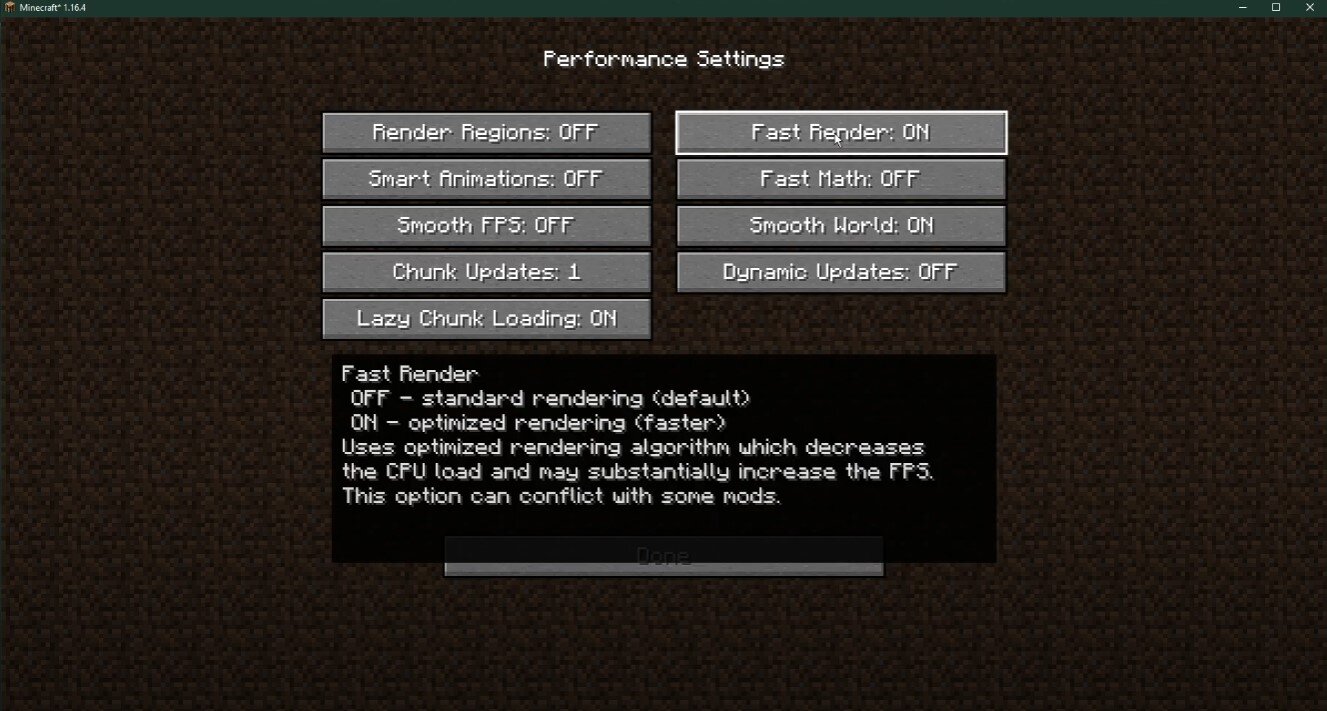
Minecraft Settings > Performance Settings
Change the Minecraft Process Priority
Leave Minecraft running and open up your Task Manager. In the Processes tab, expand the Java Platform SE binary, right-click Minecraft and select to go to Details. In the Details tab, the JavaW.exe application should be highlighted. Simply right-click it and set the Priority to High.
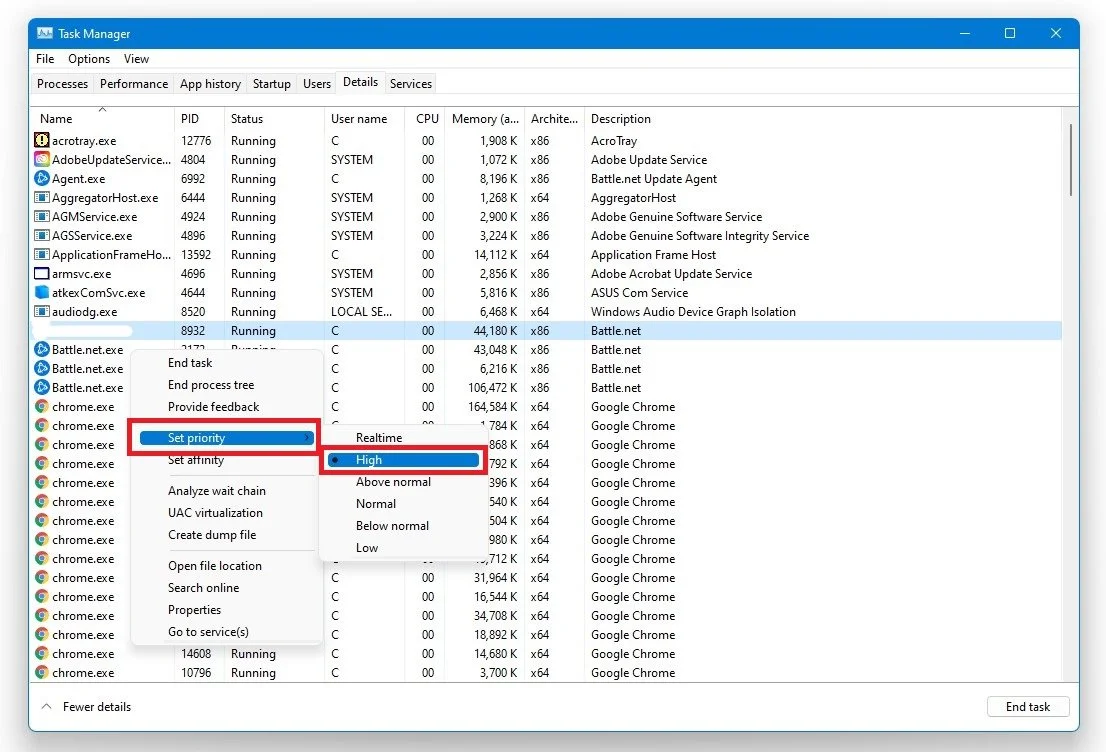
Task Manager > Details > Minecraft.exe > Set Priority > High
This will allocate more resources to playing the game and should increase your performance, especially if you have other programs running in the background. In order to reduce the CPU utilization from other programs, I suggest you end some programs from running in the background, which you don't need when playing the game. But make sure to only end programs from running, that you know won't break your operating system.
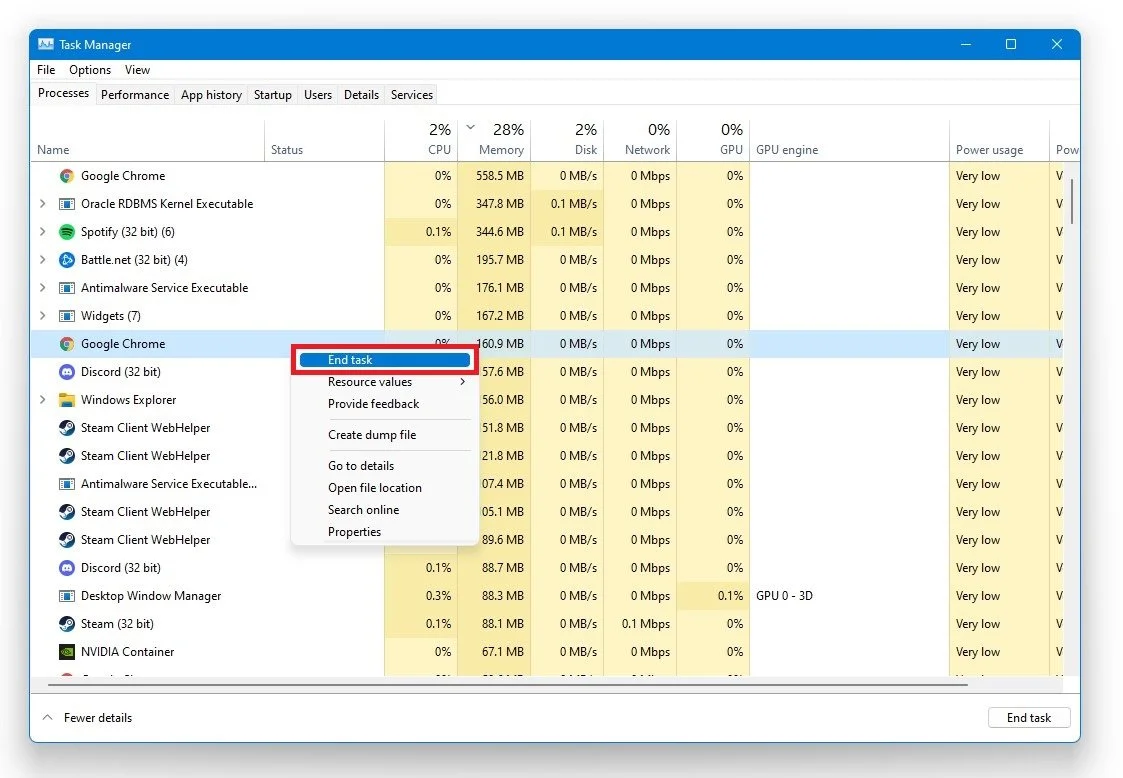
Task Manager > Processes > End Task
In the Startup tab, you can prevent programs from starting on system boot. You can now close the game and exit your Task Manager.
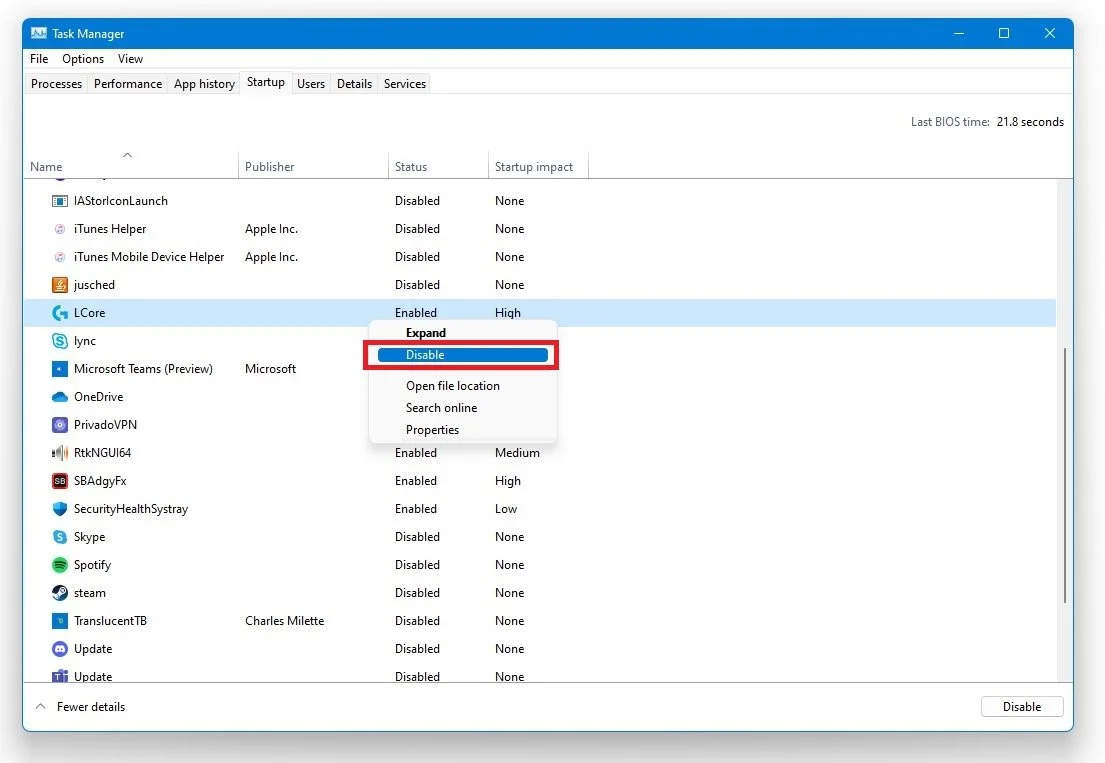
Task Manager > Startup
Update Graphics Card Driver
Ensure your graphics driver is up to date. We suggest using the GeForce Experience application if you’re using an NVIDIA GPU, but you can also use the AMD driver suite. Depending on how frequently you update your GPU, this tweak can make the biggest difference. In the Drivers tab, simply click on Download and the application will automatically download and install the latest driver.
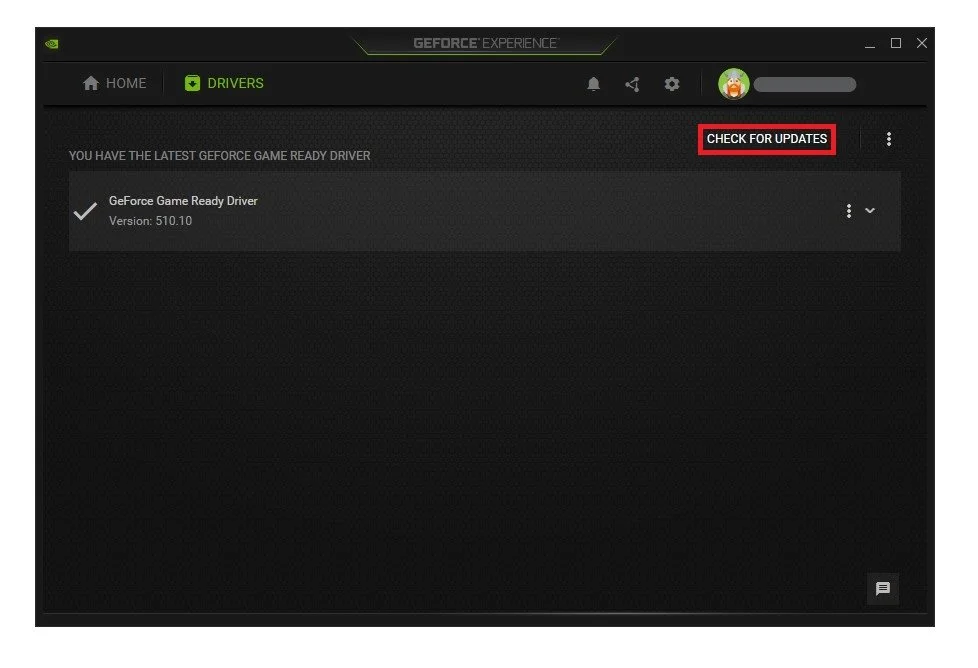
GeForce Experience > Drivers > Download
Geforce Experience Detail Settings
In the Home tab, select Details for Minecraft and here on the right side click on the gear icon, in order to optimize your in-game settings for performance with a slider system. You can change the display resolution and display mode from there. For abnormal screen resolutions, I suggest using 1920 x 1080 to see if it helps with performance issues.

Change the Minecraft display resolution in your GeForce Experience options
Update Operating System
To optimize your system for performance, you should ensure your operating system is up to date. Simply search for Update in your taskbar search. In your Check for updates system settings window, make sure to download the latest update and make sure to restart your PC after that the download is completed. This will help you with performance issues in Minecraft
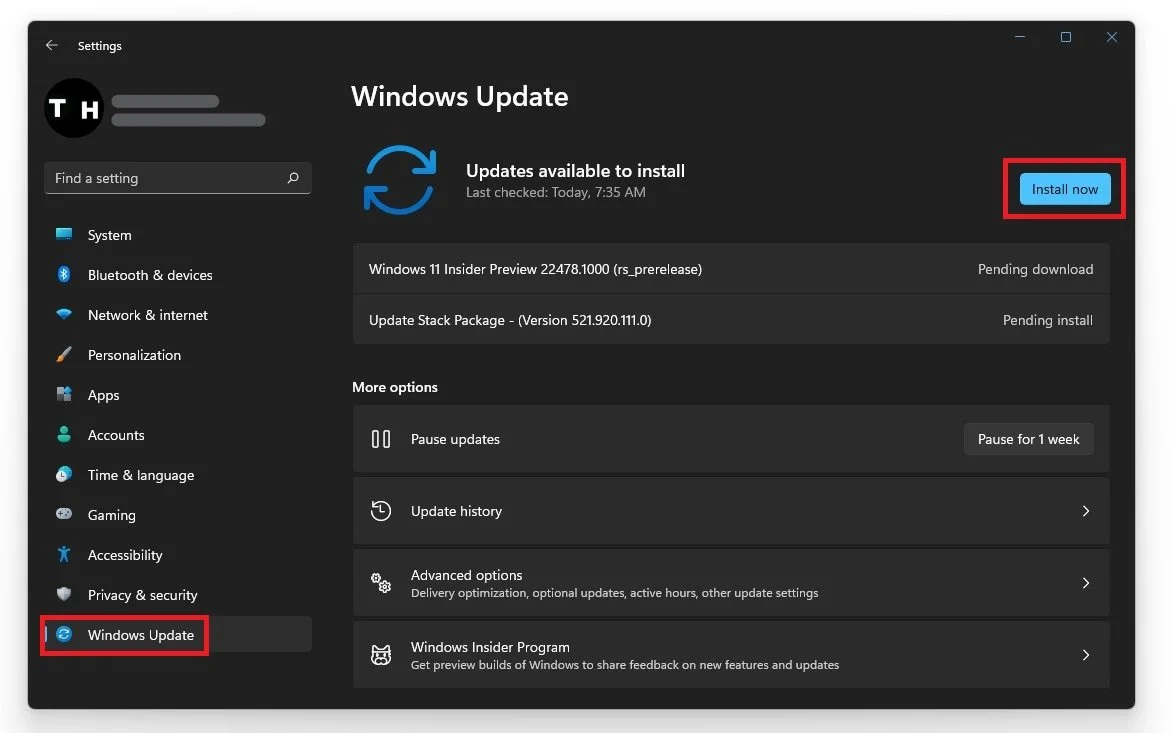
Windows Settings > Windows Update
Disable Xbox Game Bar Recording
Some native Windows 10 settings can reduce your overall performance while in-game. Disable the Game Bar recording option, as it continuously records your gameplay and audio. In your taskbar search, enter: Game Bar to open the game bar system settings. Uncheck the recording option. In the Captures tab, disable the background recording option additionally. These settings will only reduce your performance. If you want to record your gameplay, we suggest using OBS Studio, or an external capture card if you lack performance.

Windows Settings > Gaming > Game Bar
NVIDIA Control Panel Settings for Minecraft
Making changes to your NVIDIA control panel can be essential. Change a few options in your NVIDIA control panel to improve the game’s performance on your system. To open your NVIDIA control panel, right-click your desktop and select NVIDIA Control Panel. In your control panel, navigate to Manage 3D Settings > Program Settings.
Select Add a program to customize and add Minecraft from the program list. If you can’t find the game in the program list, click on Browse. In your file explorer, you must locate the drive and path on which you installed the game and add it to the program list from there. Ensure the CUDA setting is set to your primary GPU, set the Power management mode to Prefer maximum performance, and set the texture filtering quality to Performance.
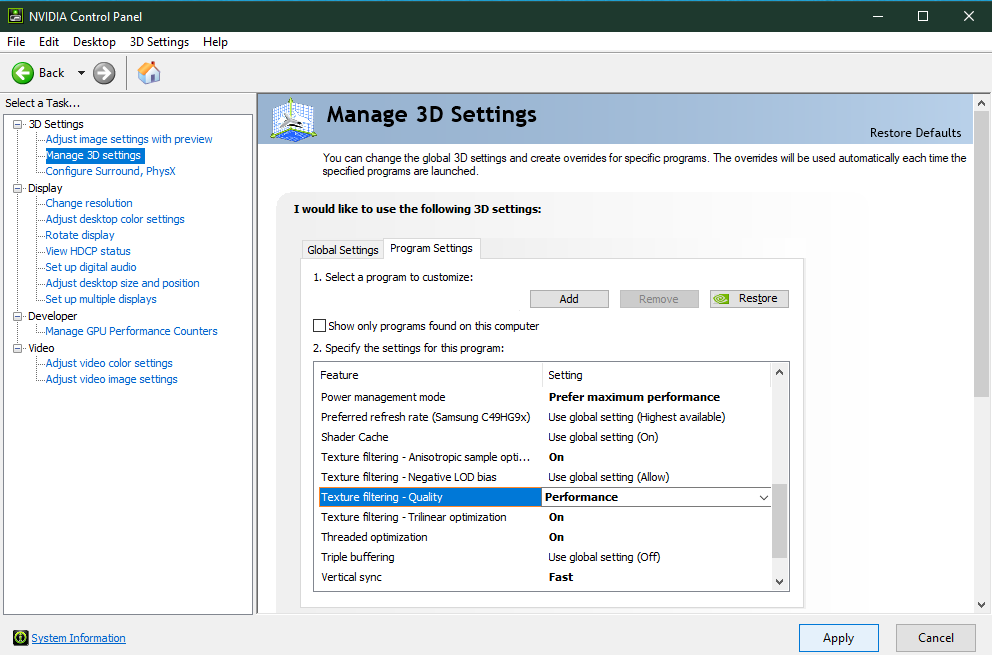
NVIDIA Control Panel > Manage 3D Settings
Change the Minecraft Graphics Preference
Windows 10 allows you to utilize power user settings, such as your graphics settings. To change your graphics settings, enter Graphics Settings in your taskbar search to open up your native settings. When selecting Browse, your file explorer will open up, where you will have to navigate to the drive and path where the game is saved. After adding the program to your graphics settings list, the operating system lets you choose between the following:
Let Windows choose
Power Saving (Usually Intel HD Graphics)
High Performance (Usually, your graphics card(s)
Specific GPU (Choose which GPU to use)
For the most system performance, use the High-Performance option. If your GPU is bottlenecking your performance, you should set it to High Performance. Don't forget to apply your changes.
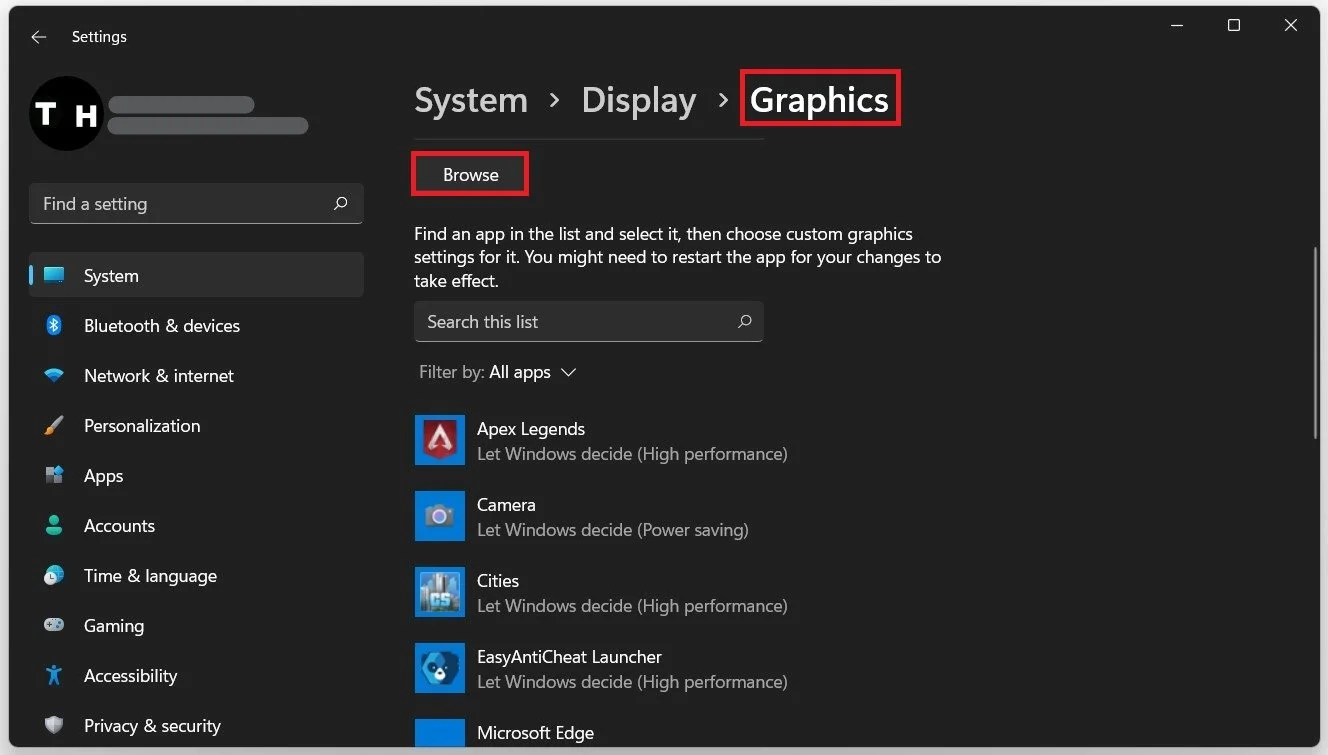
Graphics Settings > Graphics Preference > High Performance
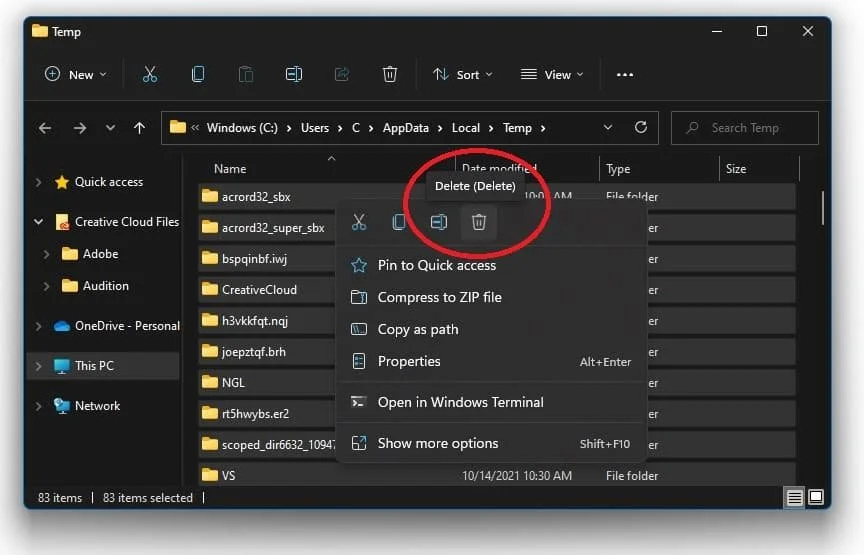
Delete the Windows Temporary Files
Your hard drive might be cluttered with unwanted files. These files will induce lag if not removed properly. You can delete your temporary files manually or use PC cleanup programs, such as CCleaner. These applications are usually the best choice as it will automatically keep your hard-drive clean for you. To manually delete your temporary files, enter %temp% in your taskbar search and hit enter.
A new folder will open up. Delete the content of your temporary files folder. Sometimes, this can take a few minutes if you haven’t done this before. Some files will most likely stay in your temp folder, as these are still in use by your programs. To thoroughly delete these files, you should also empty your recycle bin.
Delete your temporary files from time to time