

How To Fix WiFi Option Not Showing Up in Settings (Windows)

Are you unable to access your Wi-Fi settings on your Windows device? The absence of the Wi-Fi option in the Windows Settings can be frustrating, especially when you need to connect to the internet. This can be caused by various reasons such as outdated drivers, system corruption, or malware infections. But don't worry, several simple solutions can help you fix this issue in no time. In this article, we will guide you through a step-by-step process on how to fix the Wi-Fi option not showing up in Windows Settings and get your internet connection back up and running.
Enable WiFi & Disable VPN
Open up your Windows settings. On this window, navigate to the Network & internet section. Make sure that the WiFi option is enabled. Next, click on VPN and ensure your VPN is not connected. This could otherwise change your WiFi settings and prevent them from showing up.

Windows Settings > Network & internet > WiFi
Enable Network Adapters
Back in your Network & internet settings, select Advanced network settings. Make sure that all of your Network adapters are enabled.
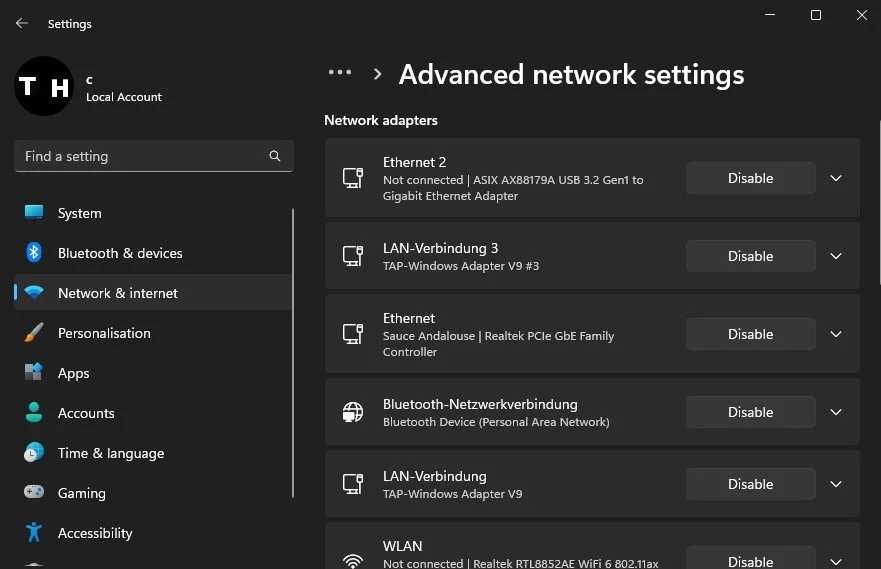
Network & internet > Advanced network settings
Reset Network Connection
Click on Network reset. This will allow you to reset your network settings and reinstall your network adapters. If you use custom DNS servers, you must reinstall your VPN client and change your DNS server addresses.
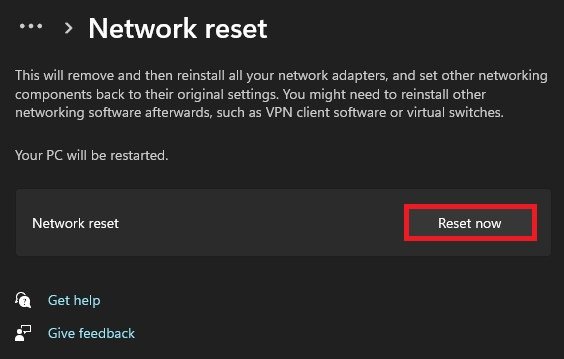
Reset Network & Restart PC
Check Windows Account Type
Head to your Accounts settings. Here, you should ensure that you are using an account with administrator privileges.

Windows Settings > Accounts
Change Account Type to Administrator
If you use a standard Windows account, open up your Control Panel. View your settings by Category and click on Change account type.

Control Panel > Change account type
Select your account and then Change the account type. This will allow you to control your PC and allow changes to your network settings by using an account with admin rights. If you’re using a work or school computer, you will have to request access from your admin to make changes to your WiFi or other network settings. You will have to restart your PC for the changes to take effect.

Change a new account type for your account
Run the Internet Connections Troubleshooter
Reopen your Windows settings, and under System, click on Troubleshoot. Under Other trouble-shooters, run the Internet Connections troubleshooter. This will take a moment to detect issues and apply some settings to fix your WiFi option problem.
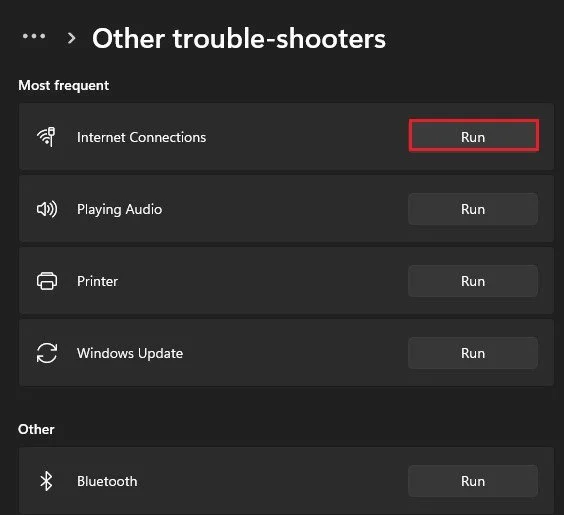
System Settings > Troubleshoot > Other trouble-shooters
-
Yes, this issue can be resolved by following the steps outlined in the article.
-
The issue of the Wi-Fi option not showing up in Windows Settings can occur on any version of Windows, including Windows 10, Windows 8, and Windows 7.
-
It is recommended to restart the computer after implementing the solutions to ensure that the changes take effect.
-
Updating outdated drivers is one of the solutions that can help resolve the issue of the Wi-Fi option not showing up in Windows Settings.
-
No, it is not necessary to install any additional software to fix the issue. All the solutions can be implemented using built-in Windows tools.


