How To Allow Google Chrome Through Windows Defender Firewall
Introduction
In the dynamic realm of cyberspace, seamless browsing forms the cornerstone of a gratifying online experience. Navigating this sphere with the robust Google Chrome browser often calls for certain safeguards to be in place, chief among them being the meticulous configuration of your Windows Defender Firewall settings. Embark on this guide as we delineate the steps to proficiently usher Google Chrome into the safe corridors of your Windows Defender Firewall. From pinpointing the precise settings in the expansive Windows Security app to modifying app permissions with finesse, this tutorial aims to elevate your browsing journey, shielding it from potential hiccups while keeping cyber threats at bay. Let's pave the way for a secure, unhindered browsing experience, starting right at your firewall settings.
Configuring Firewall Settings for Google Chrome
To ensure a secure and uninterrupted browsing experience, it becomes imperative to configure your firewall settings to allow Google Chrome seamless access. Here’s a concise guide to assist you:
Initiate the Process: Kickstart by accessing the Windows Security app. Simply type it in the start menu search bar to find it swiftly.
Navigate to Firewall Settings: Once the app window appears, select the "Firewall & network protection" option to dive into the specific settings of firewall controls.
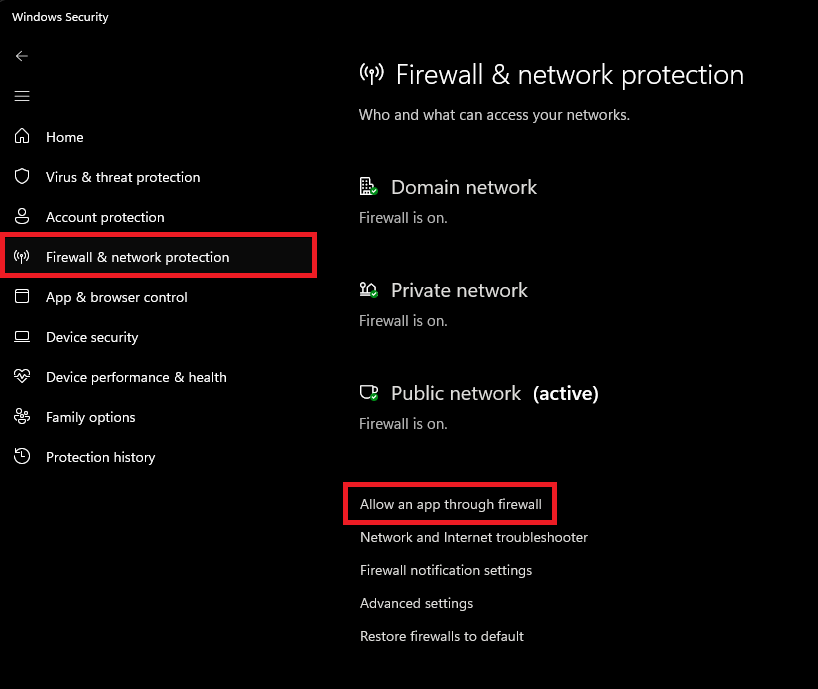
Windows Security > Firewall & Network Protection
Allowing Google Chrome Access: In this section, be prepared to grant Google Chrome the necessary permissions. Click on the "Allow an app through firewall" option to proceed.
Adjust App Permissions: You will be presented with a list showcasing various apps along with their firewall statuses. Hit “Change Settings” to modify these.
Locate Google Chrome: Scroll through the list to locate Google Chrome. Alternatively, you can quickly find it by selecting any app on the list and typing “Google Chrome”.
Finalizing the Setup: If the box next to Google Chrome isn’t checked, go ahead and mark it, granting access for both “Public” and “Private” networks.
Voila! You have successfully maneuvered through the settings to allow Google Chrome through the Windows Defender Firewall, paving the path for a safe and smooth browsing journey.
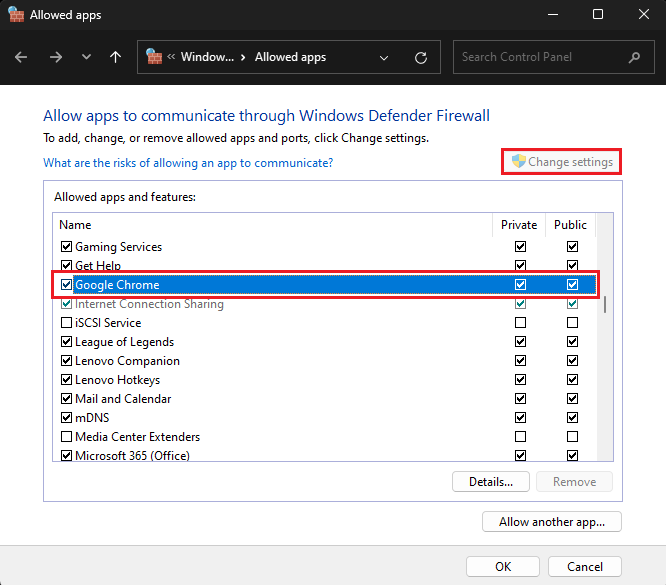
Allowed Apps > Change Settings > Google Chrome
-
To allow Google Chrome through Windows Defender Firewall, you need to access the Windows Security app, navigate to "Firewall & network protection", and adjust the settings to grant permission to Google Chrome for both Public and Private networks.
-
Granting Google Chrome access through your firewall ensures a smooth and secure browsing experience, allowing the browser to operate without unnecessary interruptions or blocks from the firewall.
-
You can locate Google Chrome in the list by scrolling through or simply start typing “Google Chrome” after highlighting any app in the list, this will directly take you to the Chrome option.
-
“Public” and “Private” network options determine the types of networks over which the app is allowed. “Public” refers to untrusted networks like public Wi-Fi, while “Private” refers to trusted networks such as your home or work network.
-
Once you check the box next to Google Chrome and select both “Public” and “Private” options, your settings are saved. This confirms that Google Chrome has been successfully allowed through the firewall.