

How To Fix Camera or Webcam Problems - Windows 11 Tutorial
Introduction
Navigating the labyrinth of camera or webcam issues on your Windows 11 PC can be a daunting task. Whether it's granting the necessary permissions or tackling outdated drivers, camera troubles can disrupt anything from Zoom meetings to virtual family gatherings. In this step-by-step tutorial, we'll demystify the process and guide you through solutions to get your camera back on track. So, if you've been struggling with camera malfunctions, read on to reclaim your visual connection to the digital world.
Enable Camera Access in Windows Settings
To troubleshoot your camera issues on Windows 11, first ensure that your PC can actually access the camera hardware. Open the Start Menu and type "Settings," then press Enter. Once in the Settings window, navigate to the "Privacy & Security" section. From there, scroll down to "App Permissions" and select "Camera." Ensure that the toggle for camera access is switched on.

Windows Settings > Privacy & Security > Camera
Grant Specific Applications Permission to Use Camera
Even if Windows has access to the camera, the app you're using might not. To fix this, go back to the "Camera" settings under "Privacy & Security." Look for the "Let apps access your camera" subsection. Scroll through the list to find the app in question—say, WhatsApp—and toggle on the camera access for it.
By meticulously setting camera permissions, you can solve some of the most common camera issues experienced by Windows 11 users.
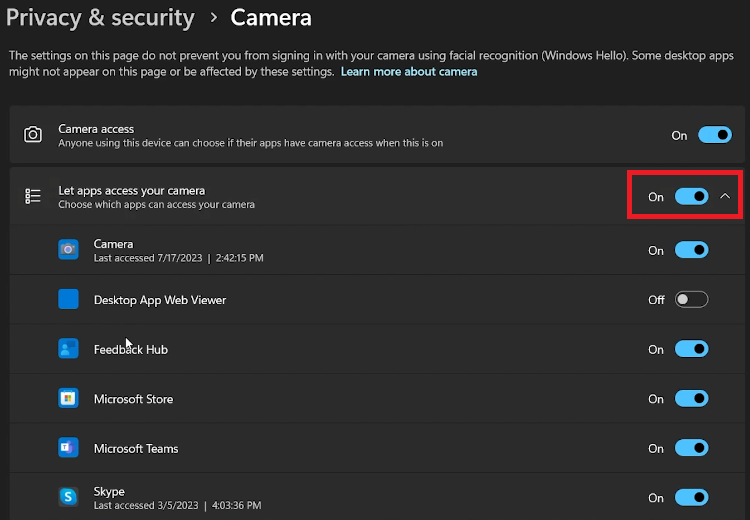
Privacy & Security > Camera > Let apps access your camera
Update or Reinstall Your Camera Driver
If you're still experiencing camera issues on your Windows 11 PC, the culprit could be an outdated or corrupt camera driver. To refresh it, open your Start Menu and search for "Device Manager." In the Device Manager window, expand the "Camera" section. Right-click on your camera driver and choose "Uninstall Device." A pop-up window will appear; make sure to leave the checkbox unchecked and click "Uninstall."
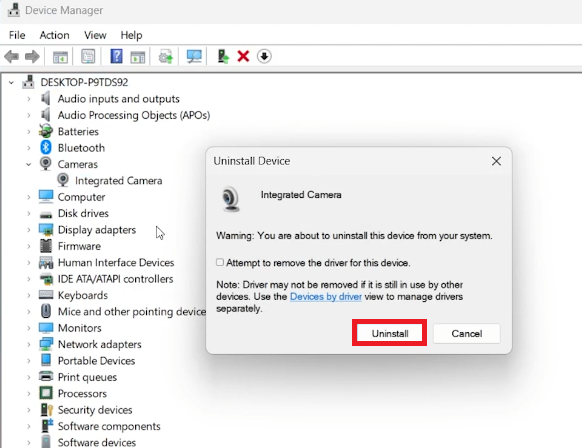
Device Manager > Cameras > Uninstall
After the driver is uninstalled, navigate to the "Actions" tab in Device Manager and select "Scan for hardware changes." This will prompt Windows to reinstall an updated camera driver, potentially resolving any lingering issues.
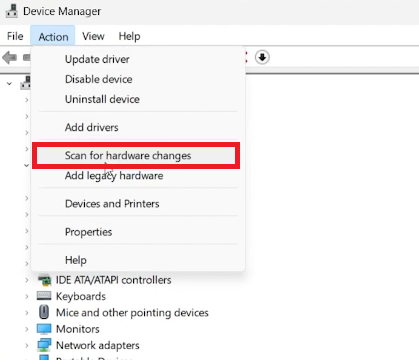
Device Manager > Action > Scan for hardware changes
Address Hardware Barriers
While software issues are common, sometimes the problem is purely physical. For example, some laptops have a camera lid for privacy. Make sure this lid is not obstructing the camera. Additionally, if you're using an external camera, consider switching the USB port it's connected to and ensure it receives adequate power supply to function optimally.
-
To update your camera driver, open Device Manager by searching for it in your Start Menu. Expand the "Camera" section, right-click on your camera driver, and select "Update driver." Follow the on-screen prompts to complete the process.
-
In Windows 11, go to Settings > Privacy & Security > App Permissions > Camera. Ensure the toggle for allowing camera access is on. You can also specify which apps are permitted to access your camera here.
-
The "Scan for hardware changes" option in Device Manager checks for any hardware changes on your system. If you've uninstalled a driver, selecting this option prompts Windows to reinstall an updated driver automatically.
-
Yes, some laptops have privacy lids that can obstruct the camera. Always ensure that any physical barrier that could cover the camera is moved aside before use.
-
Changing the USB port can solve issues that arise due to poor power supply or connectivity problems. Switch to a different USB port and check if the camera starts functioning properly.


