How To Manage & Disable Windows Notifications
Introduction
Ever find yourself deep in concentration only to be jolted out by incessant Windows notifications? It's not just you—managing a flood of pop-ups and pings is a universal struggle. While notifications can be useful, they can also disrupt focus and productivity. This article will walk you through how to master your Windows notification settings, from muting individual apps to setting up 'Do Not Disturb' schedules. Take back control and tailor your desktop environment to your needs.
Manage Your Windows Notifications Effectively
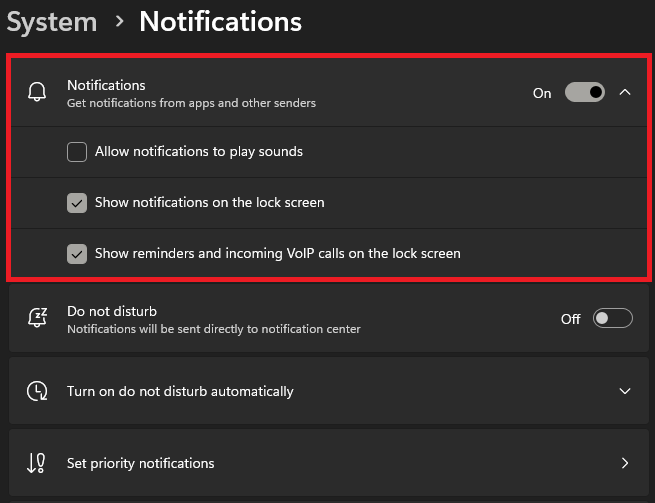
To start fine-tuning your Windows notification settings, navigate to your Windows settings. Here, click on "System" and then choose "Notifications." A slew of customizable options will present themselves, allowing you to determine how notifications behave. For example, you can set them to make a sound or even appear on your lock screen. Feel free to tweak these settings according to your daily needs.
Windows Settings > System > Notifications
Leveraging Do Not Disturb Mode
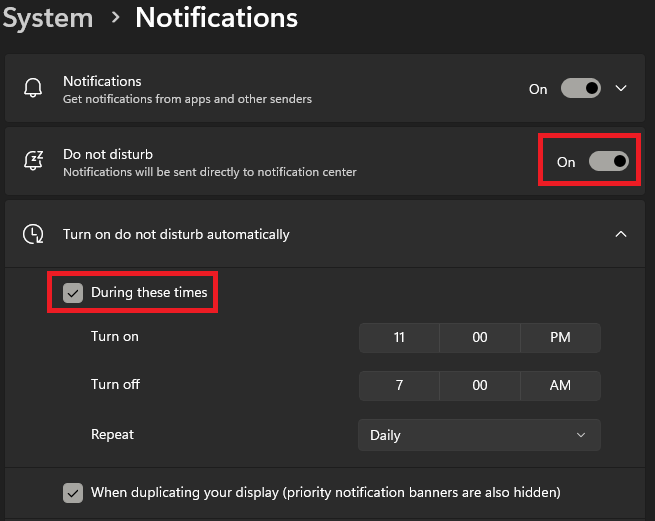
If you're looking for a blanket solution, activate the "Do Not Disturb" feature. This will mute all notifications temporarily, but they'll still collect in your notification center for later review. Customize this feature by selecting "Turn on do not disturb automatically," enabling you to schedule quiet hours. This is particularly useful if, say, you don't want to be disturbed while gaming; you can set "Do Not Disturb" to activate automatically as soon as you launch a game.
Do Not Disturb settings
Customize App-Specific Notifications
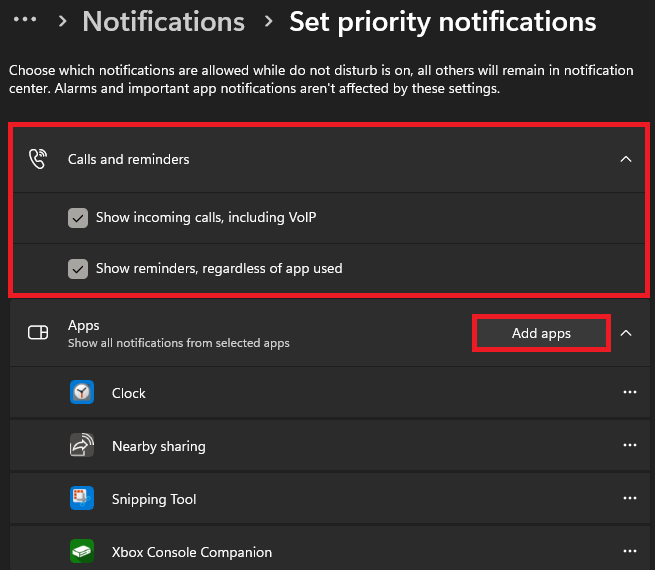
For notifications that are too important to miss, navigate to the 'Priority Notifications' section to customize which apps get priority status. With this setting enabled, priority app notifications will cut through even when 'Do Not Disturb' mode is active. If the app you want to give priority isn't listed, click 'Add Apps' to include it manually.
Balancing Notifications: The Best of Both Worlds
By smartly combining the 'Do Not Disturb' and 'Priority Notifications' settings, you achieve an optimized notification management system. This ensures you're not overwhelmed by irrelevant alerts while still receiving the important ones.
Disabling Unwanted App Notifications
Should you want to entirely mute notifications from certain apps, proceed to 'Notifications from apps and other senders'. Here, a simple toggle lets you disable alerts from individual apps, making your notification experience more streamlined and less intrusive.
Windows Notification Settings > Set Priority Notifications
Taming Windows Security Notifications
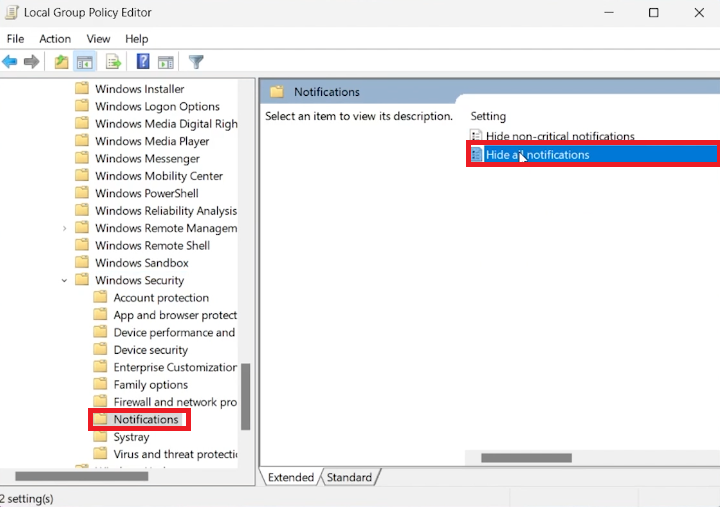
If you find the frequent alerts from Windows Security disruptive, you can manage these notifications through the Local Group Policy Editor. To do this, initiate a Start Menu search for 'gpedit.msc' and run the program as an administrator. From there, navigate to 'Administrative Templates' and subsequently, 'Windows Components'. Here, look for 'Windows Security' and drill down to the 'Notifications' settings.
You'll have two main choices:
Hide Non-Critical Notifications: This will only suppress alerts that are not urgent.
Hide All Notifications: This will disable all notifications, critical or otherwise.
Once you've made your selection, double-click the setting, set its status to 'Enabled', then click 'Apply' and 'OK' to confirm. This will declutter your notification area, letting you focus on tasks without unnecessary interruptions.
Local Group Policy Editor
-
To manage your Windows notifications, go to 'Settings', then click on 'System' and select 'Notifications & actions’.
-
Yes, you can use the "Do Not Disturb" feature in the Notifications section. This will temporarily disable all notifications but they will still be stored in your notification center.
-
Priority Notifications are alerts that you can set to appear even when "Do Not Disturb" is enabled. This allows crucial alerts to bypass the silent mode.
-
Navigate to 'Notifications & actions', scroll down to 'Get notifications from these senders', and toggle off the switch for the apps whose notifications you wish to disable.
-
You can disable Windows Security notifications by going to the Local Group Policy Editor and navigating to 'Administrative Templates' > 'Windows Components' > 'Windows Security' > 'Notifications'. Here, you can either hide non-critical or all notifications.


