

How To Fix Low Performance After Windows Update - Complete Guide
Introduction
Experiencing a slowdown on your PC after a Windows update? Our comprehensive guide offers practical and easy solutions to restore and boost your system's performance. Learn how to clean up old files, manage startup apps, and repair system issues to get your Windows running smoothly again. Perfect for anyone facing post-update performance hiccups, this guide is your key to a faster, more efficient PC experience.
Improving PC Performance by Cleaning Windows Update Files
Understanding Windows Update Files
Windows updates play a crucial role in maintaining the security and functionality of your PC, equipping it with the latest features and security patches. However, these updates can sometimes lead to reduced performance, affecting your work and overall experience.
Clearing Old Update Files to Boost Performance
One effective way to enhance your PC's speed is by removing old Windows update files. These are files from previous updates that are no longer necessary for your current version of Windows and could be bogging down your system.
Step-by-Step Guide to Delete Old Update Files
Access File Explorer: Open File Explorer on your PC.
Navigate to the Windows Folder:
Go to your C: drive.
Find and open the 'Windows' folder.
Locate and Clear the SoftwareDistribution Folder:
Scroll to find the 'SoftwareDistribution' folder.
Open it and delete all the files inside. These files are safe to remove as they are not essential for your current Windows operations.
Handling Persistent Files: If some files don't delete, it's okay to leave them. They might be in use or protected by the system.
By following these simple steps, you can free up space and potentially speed up your PC, ensuring a smoother and more efficient computing experience.

This PC > Local Disk (C:) > Windows > SoftwareDistribution
Optimizing Your PC by Cleaning the C: Drive
Why Clean the C: Drive?
Over time, your PC's C: drive accumulates unnecessary files, taking up valuable space and potentially slowing down your system. Clearing these files can free up space and improve your PC's performance.
Using Disk Cleanup for Efficient Cleaning
Instead of manually searching for and deleting files, which can be time-consuming and risky if you're not sure which files are safe to delete, use Windows' built-in Disk Cleanup tool.
Easy Steps to Clean Your C: Drive
Access Disk Cleanup:
Type “cleanmgr” in your Start menu search bar.
This command opens the Disk Cleanup application.
Select the C: Drive:
In the Disk Cleanup window, ensure the C: drive is selected for cleaning.
Choose Files to Delete:
Check all the options provided, such as 'Temporary files', 'Recycle Bin', and 'System created Windows Error Reporting files'.
These options help identify what types of files you can safely remove.
Complete the Cleanup:
Click 'OK' to start the cleaning process.
If prompted, confirm your decision by clicking on “Delete Files”.
By following these steps, you'll efficiently clear out unnecessary data from your C: drive, which can lead to noticeable improvements in your PC's performance.
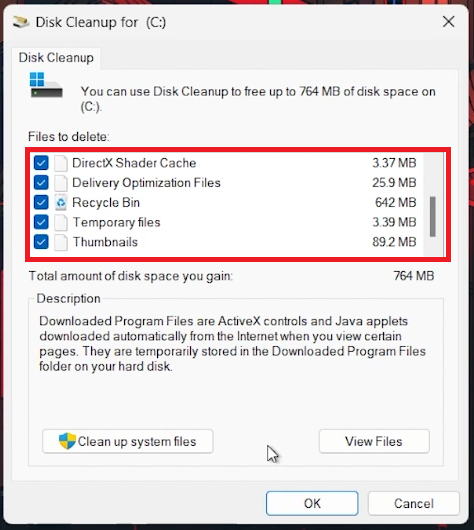
Disk Cleanup for (C:)
Managing Background Apps to Enhance PC Performance
The Impact of Background Apps on Performance
Background apps, especially on systems with older CPUs, can significantly slow down your PC. They consume resources by running silently in the background, affecting the overall speed and responsiveness of your computer.
Disabling Unnecessary Startup Apps
Controlling which apps run at startup is a key step in optimizing your PC's performance.
Access Task Manager:
Type 'Task Manager' in your Start menu search and open it.
Locate Startup Apps:
In Task Manager, click on the 'Startup' tab. This section shows all the apps that automatically start when your PC boots up.
Disable High Impact Apps:
Identify apps labeled as 'High Impact' on startup load.
Examples include heavy-duty programs like Discord or Steam.
Right-click on each app you don’t need immediately at startup and select 'Disable'.
Manually Launching Apps When Needed
It's more efficient to start resource-intensive applications manually when you need them, rather than having them launch automatically. This approach prevents unnecessary strain on your system resources at startup, ensuring a smoother and quicker boot process.
By taking these steps to manage background apps, you can significantly reduce CPU load and enhance your PC's overall performance.
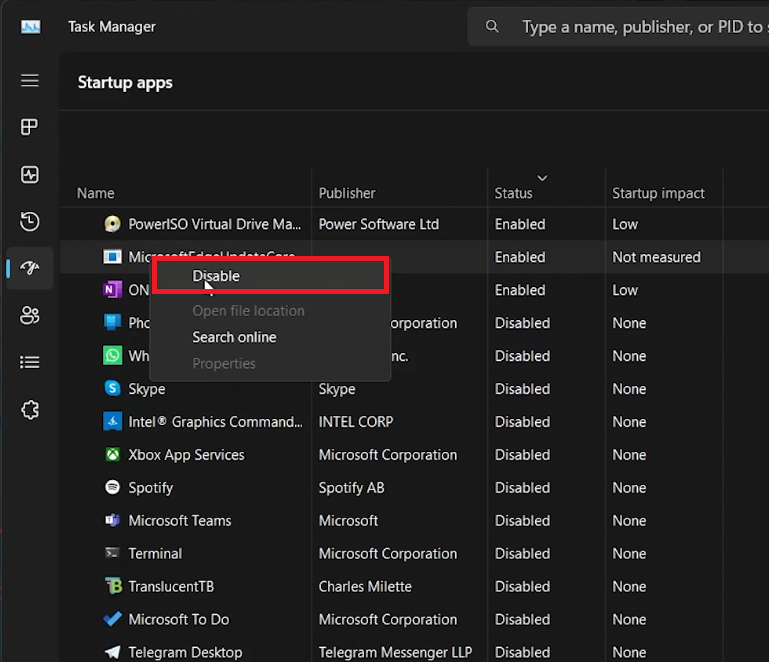
Task Manager > Startup Apps
Resolving Corrupted Files and Update Issues in Windows
Scanning and Repairing Corrupted Windows Files
Sometimes, system updates can lead to corrupted files in Windows, which might affect your PC's performance. Fortunately, Windows provides a built-in tool to identify and fix these issues.
Access Command Prompt:
Search for 'CMD' in your start menu.
Right-click on 'Command Prompt' and select 'Run as administrator' for full access.
Run the System File Checker:
In the Command Prompt, type
sfc /scannowand press Enter.This command scans all protected system files and replaces corrupted files with a cached copy.
Wait for the Process to Complete:
The scanning process may take some time. It's important to let it run without interruption to ensure thorough repair.
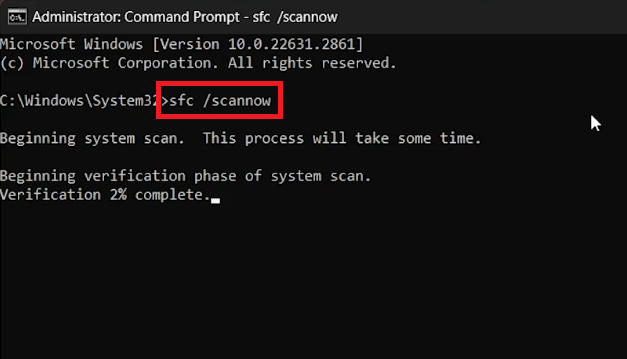
Run the Windows system file checker command
Using Windows Update Troubleshooter for Update Issues
After fixing any corrupted files, it’s advisable to address potential update issues.
Locate the Troubleshooter:
Type 'Troubleshooter' in the start menu search bar and open it.
Run Windows Update Troubleshooter:
In the System Settings, find and click on 'Other Troubleshooters'.
Here, select and run the 'Windows Update troubleshooter'.
Diagnose and Resolve Update Problems:
The troubleshooter will automatically identify and attempt to fix problems related to Windows Update.
By following these steps, you can ensure that your Windows system is free from corrupted files and update-related issues, thus maintaining optimal performance.
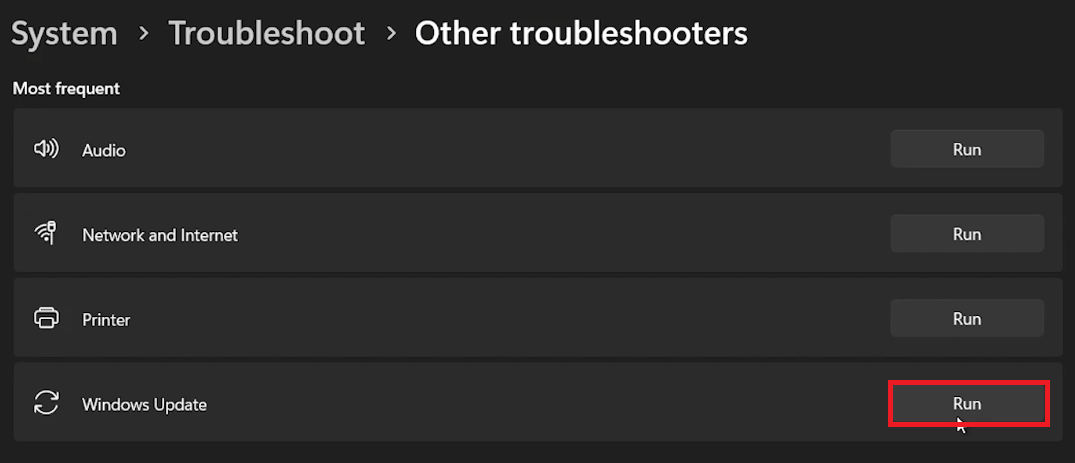
System Settings > Troubleshoot > Other Troubleshooters
-
Your PC may slow down after an update due to temporary files, outdated drivers, or system conflicts that can emerge with new updates.
-
Yes, cleaning the C: drive removes unnecessary files, freeing up resources and potentially speeding up your PC.
-
Use Task Manager to disable startup apps. Right-click on the app in the Startup tab and choose 'Disable' to prevent it from running automatically.
-
The 'sfc /scannow' command scans and repairs corrupted system files in Windows, which can improve system stability and performance.
-
Yes, the Windows Update troubleshooter can effectively diagnose and fix problems related to Windows updates, enhancing system performance.


