

How To Reset Microsoft Word To Default Settings
Introduction
Revamping Microsoft Word to its pristine state can feel like a spring cleaning for your digital workspace. Over time, alterations and customizations to Word's settings can accumulate, leading to a cluttered or even perplexing user experience. Resetting Microsoft Word to its default settings sweeps away the digital cobwebs, restoring the fresh, streamlined functionality you enjoyed at first use. This guide provides a straightforward route to rejuvenating your Word environment, whether you're on Word 2007 or the latest edition. By following a few simple steps in the registry editor or via the %AppData% pathway, you can effortlessly return Word to its original setup, and rekindle a more intuitive, distraction-free writing experience.
Resetting Word through Registry Editor 🛠️
Access the Registry Editor:
Click on your Start menu and type
RegEditin the search box, then press Enter to open the Registry Editor window.
Navigate to Microsoft Office Registry:
You can either copy and paste the following path from here or manually navigate to:
Computer\HKEY_LOCAL_MACHINE\SOFTWARE\Microsoft\Office
Locate Your Word Directory:
If you are using Word 2016 or a later version, expand the directory labeled
16.0. For Word 2013, it's15.0, for Word 2010, it's14.0, and for Word 2007, it's12.0.
Delete Word Folder:
Within the expanded directory, find the folder named
Word, right-click on it, and chooseDeleteto remove it from the registry.
Verify the Reset:
Now, launch your Microsoft Word application to check if it has reverted back to its default settings.
This method essentially erases custom configurations by removing Word's registry entries, allowing the program to rebuild its settings afresh the next time it's launched.
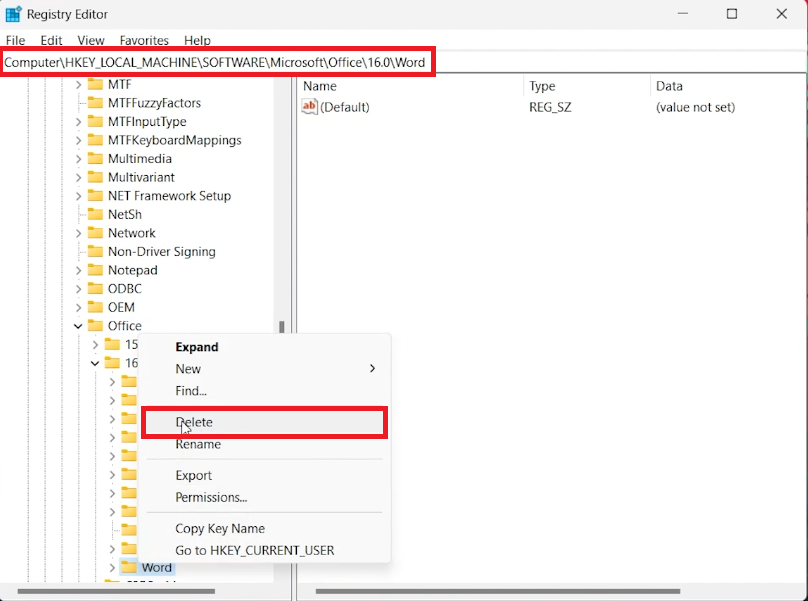
Registry Editor > Delete the Word Folder
Resetting Word through Application Data Files 🗂️
Access App Data Folder:
Click on the Start menu, type
%AppData%in the search box, and hit Enter. This action will open your File Explorer, directly navigating to the Roaming folder.
Navigate to Templates Folder:
From the Roaming folder, follow this path:
Microsoft > Templates. This is where Word stores its default template file.
Rename Normal Template:
Within the Templates folder, locate the file named
Normal. Right-click on it and chooseRename. You can rename it to anything, for instance,Backup_Normal.
Verify the Reset:
Upon renaming, launch Microsoft Word. The application will create a new
Normaltemplate, thus resetting all settings to default.
By renaming the Normal template, you're essentially forcing Microsoft Word to revert to its default settings, ensuring a clean slate for your document creation endeavors.

Rename the Word file in your Templates folder
-
You can reset Microsoft Word by either deleting the Word folder in the Registry Editor or renaming the Normal template in the Microsoft > Templates directory within the Roaming folder.
-
It's crucial to exercise caution when modifying the Registry Editor as incorrect changes can lead to system instability. Ensure to follow the instructions meticulously and consider creating a backup of your registry before proceeding.
-
The Normal template stores the default styles, themes, and settings that Word uses each time you create a new document. Altering or renaming this file will reset these settings to their defaults.
-
No, resetting Microsoft Word to its default settings will not delete any of your documents. It only resets the application’s settings and customizations.
-
Before resetting, you can export your Word settings via the Registry Editor or copy the Normal template file to a secure location to preserve your customizations.


