

How To Fix WiFi Connected But No Internet Access on Windows 11
Introduction
Navigating the digital world without an internet connection is like sailing without a compass - you're left stranded. Windows 11 users might sometimes encounter a peculiar problem: their WiFi shows as connected, but they can't access the internet. It's a common, yet frustrating issue. If you've found yourself stuck in this digital limbo, you're in the right place. In this comprehensive guide, we'll explore step-by-step solutions, from adjusting DNS server addresses to updating your network adapter, to ensure that you're back online and sailing smoothly in no time. Whether you're a tech novice or a seasoned pro, these simple yet effective methods will help you reconnect with the world at the click of a button.
Configure Custom DNS Server Addresses in Windows 11
A common remedy for the "WiFi connected but no internet access" issue on Windows 11 involves adjusting your DNS server settings. Follow these simple steps to configure custom DNS addresses:
Open Network Connections: Click the Windows Start Menu, type “view network connections,” and hit Enter.
Access WiFi Adapter Properties: Locate and right-click on your WiFi adapter. Then, select “Properties” followed by “Internet Protocol Version 4 (TCP/IPv4).”

Network Connection > Network Adapter > Properties
Modify DNS Settings: In the properties window, choose the “Use the following DNS server addresses” option. For a reliable connection, set the following:
Preferred DNS server: 8.8.8.8
Alternate DNS server: 8.8.4.4 (For example, Google's public DNS servers)
Apply Changes: Click “OK” to save the settings and close the properties window.
Restart Connection: Try connecting to your router again by restarting your WiFi connection.
These custom DNS settings often resolve connectivity issues, ensuring a stable and fast internet connection. If this doesn't work, don't worry; there are more troubleshooting steps to explore.

Internet Protocoll Version 4 > Use the following DNS server addresses
Utilize Command Prompt to Fix Connectivity Issues
If your Windows 11 machine is still displaying the "WiFi connected but no internet access" message, you can utilize command prompt commands to address the issue. This involves flushing your DNS resolver cache and resetting the network settings. Here’s how you can do it:
Open Command Prompt: Search for "CMD" in your start menu search and open it with administrative privileges.
Flush DNS Cache: In the command prompt window, type the command
ipconfig /flushdnsand hit Enter. This command clears the DNS cache, eliminating any corrupted or outdated DNS information.Reset Network Settings: Next, enter the command
netsh winsock resetand press Enter. This command resets the Winsock catalog back to its default state or a clean state, often resolving many network-related problems.Restart Your PC: To apply these changes, restart your PC.
By following these steps, you can effectively address various connectivity issues related to your DNS and network settings. If problems persist, consider seeking professional tech support or explore other troubleshooting methods.
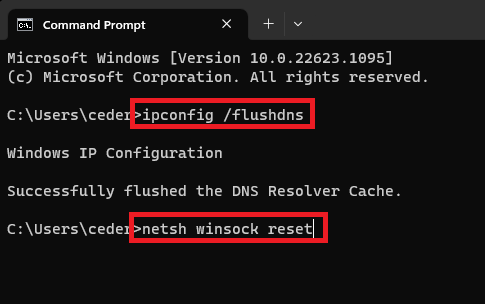
Command Prompt
Updating the Network Adapter Driver
Keeping your network adapter driver up-to-date is essential for maintaining optimal internet connectivity. An outdated driver can sometimes cause the "WiFi connected but no internet access" issue. Follow these straightforward steps to update your network adapter driver on Windows 11:
Open Device Manager: Search for "Device Manager" in the start menu and open it.
Find Your WiFi Adapter: Navigate to the "Network adapters" section and expand it. Here, you will find a list of all network adapters, including your WiFi adapter.
Update the Driver: Right-click on your WiFi adapter (the same one you saw under WiFi in the network connections window) and select "Update Driver."
Search for Updates: Click on "Search automatically for drivers." Windows will then search for the latest driver and install it if available. This process may take a few seconds to complete.
By ensuring that your network adapter driver is updated, you not only improve your internet connection but also possibly fix any existing connectivity issues. If this method doesn't resolve the problem, further investigation or professional assistance may be required.
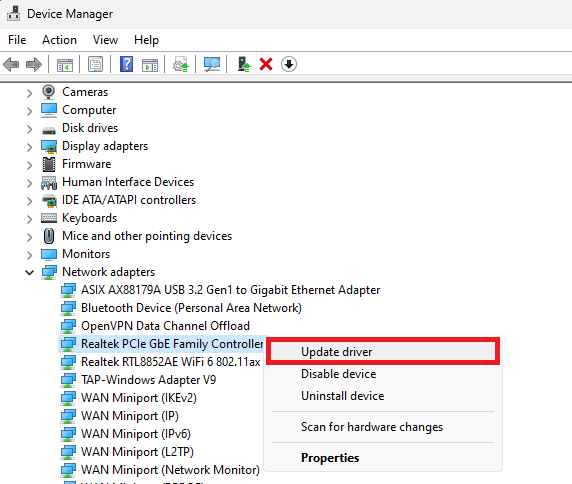
Device Manager > Network Adapters > Update Driver
-
Open Device Manager, expand the "Network adapters" section, and you will find your WiFi adapter listed there. It's the same adapter you see under WiFi in the network connections window.
-
Updating the network adapter driver ensures that you have the latest improvements and bug fixes, which can enhance internet connectivity and possibly resolve the "WiFi connected but no internet access" issue.
-
You can use specific commands such as "ipconfig /flushdns" and "netsh winsock reset" in Command Prompt to flush DNS resolver cache and reset network settings, which can often fix network-related problems.
-
Yes, switching to a different DNS server, such as Google's 8.8.8.8 for preferred and 8.8.4.4 for alternate, can enhance internet connectivity and sometimes solve connection issues.
-
If the provided solutions don't resolve the issue, it could be a more complex problem. You might need to contact your internet service provider or seek professional technical assistance.


