How To Fix Search Menu Keeps Opening - Windows 11
Introduction
Windows 11 has brought a fresh look and a myriad of new features to the world of operating systems. However, as with any major update, it's not without its quirks. One such annoyance that users have encountered is the persistent opening of the search menu. This issue can be both frustrating and interruptive to your daily workflow. Don't worry, though, as we've got your back! In this article, we'll delve into a comprehensive guide on how to fix the search opening up issue in Windows 11. With our expert advice, you'll be back to enjoying a seamless computing experience in no time. So, buckle up and get ready to troubleshoot like a pro!
Execute the Search and Indexing Troubleshooter
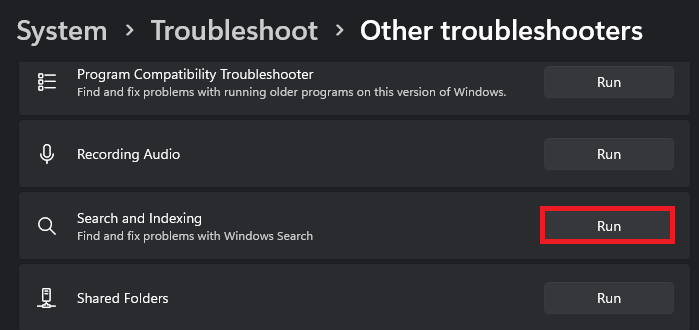
To begin, let's tackle the issue using the Windows search troubleshooter to resolve common problems. Access your Windows 11 settings and navigate to the System category. Within System, locate Troubleshoot, and choose "Other Troubleshooters." Now, scroll through the list and initiate the "Search and Indexing" troubleshooter. This utility will momentarily scan for potential issues related to your search menu and attempt to rectify them automatically.
Windows Settings > System > Troubleshoot
Unplug USB Devices and Additional Peripherals
Should the issue continue, consider disconnecting all USB devices like webcams, microphones, or keyboards, as these peripherals can occasionally activate the Start menu or taskbar in Windows 11. Prior to reconnecting your devices, ensure that the Windows search process is functioning smoothly on your computer.
Verify Windows Search Service Runs Automatically
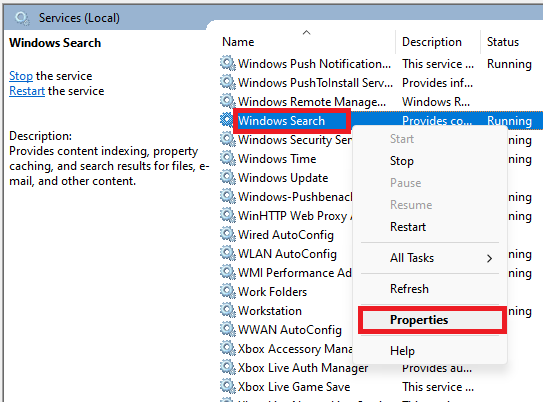
To access the Windows Services Manager, type "Services" in your Start menu. If you can't locate it, search for Services.msc instead. In the window, click on any service and begin typing "Windows Search" to locate the "Windows Search" service. Right-click the service to view its properties.
Windows Services Manager > Windows Search
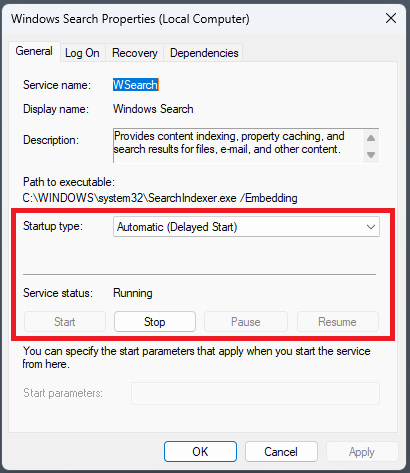
Within the General section, confirm that the Startup Type for this service is set to "Automatic." The service status should indicate it's running; if not, click on Start and apply the changes.
Windows Search Properties > Service Status (Running)
Restart the Windows Explorer Process
If the issue continues, you'll need to restart the "Windows Explorer" process and reboot your computer. Open your Task Manager, and under the Processes section, locate the Windows Explorer process. Right-click it and choose "Restart" to refresh the process.
Task Manager > Processes > Windows Explorer > Restart
Adjust Your Taskbar Preferences
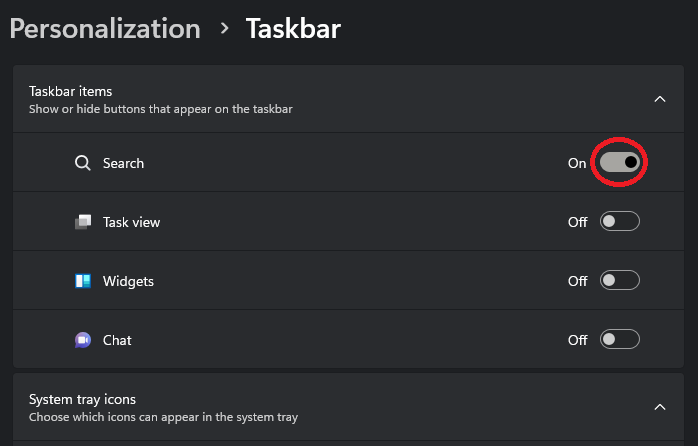
Occasionally, corrupt Windows files or updates can lead to problems with the Start menu search function. To address this, navigate back to your Windows settings. Under "Personalization," scroll down to access your taskbar settings.
Toggle the "Search" option OFF and ON, and beneath that, expand "Taskbar Behaviors" to also toggle the "Automatically hide the taskbar" option. This method can frequently resolve temporary issues with the Windows 11 search menu.
Windows Settings > Personalisation > Taskbar
Finally, visit the Windows Update section, click on "Check for Updates," and download the most recent update before restarting your computer.
Windows Settings > Windows Update
-
The search menu opening repeatedly on Windows 11 can be caused by a variety of factors, such as corrupted Windows files, issues with peripherals, or problems with the Windows Search service.
-
To use the Windows troubleshooter, open your Windows settings, navigate to "System," then "Troubleshoot," and select "Other Troubleshooters." From there, scroll down and run the "Search and Indexing" troubleshooter to scan and detect issues with your search menu.
-
Yes, certain USB devices or peripherals, like webcams, microphones, or keyboards, can trigger the start menu or taskbar on Windows. Disconnecting these devices and checking the Windows search process can help resolve the issue.
-
To run the Bluetooth troubleshooter on Windows 11, navigate to System in your Windows settings, and select Troubleshoot. Under "Other Troubleshooters," run the Bluetooth troubleshooter, which will scan for Bluetooth-related issues and attempt to fix them.
-
In your Windows settings, go to "Personalization" and access your taskbar settings. Toggle the "Search" option OFF and ON, and expand "Taskbar Behaviors" to toggle the "Automatically hide the taskbar" option. Additionally, make sure to check for any available updates in the Windows Update section.


