CapCut - How to Fix Network Error on PC
Introduction
Struggling with persistent network errors on CapCut while using your PC? You're not alone. Many users encounter this hurdle that disrupts their seamless editing experience. The good news? This tutorial offers simple solutions to combat these troublesome network errors. From leveraging VPN connections to manipulating DNS settings, there are several tactics we'll explore to reclaim your smooth CapCut experience. Whether you're in a region with limited access to CapCut servers or facing other network challenges, you're just a few steps away from a resolution. Let's navigate this together and get your CapCut back on track.
Use a VPN to fix the CapCut Network Error
CapCut users may occasionally face network errors due to geographical restrictions, where the app limits server access in certain regions, or due to general internet connectivity issues. A Virtual Private Network (VPN) can provide a reliable solution to these network challenges.
For example, PrivadoVPN is a powerful tool that can help bypass these limitations. It camouflages your original IP address, enabling access to CapCut servers without geographical hindrances. Here are the necessary steps:
First, close your active CapCut application to prepare for the VPN connection process.
Proceed to download and install PrivadoVPN
Once the VPN is installed, establish a connection through it.
By following these steps, you should be able to successfully circumvent the CapCut network error and enjoy a smooth video editing experience.

Install PrivadoVPN to use CapCut without Errors
Change the CapCut Version
Experiencing issues with the current version of CapCut? Here's a technique that could provide a solution: reverting to a previous version of the application. Sometimes, network errors can be tied to bugs in the latest updates, and using an older, stable version might just eliminate the problem.
Here's how you can do it:
Begin by uninstalling the current version of CapCut from your PC to pave way for the installation of the older version.
Click here to navigate to the page where you can access and download the previous versions of CapCut.
Once the download is complete, proceed with the installation of the older CapCut version.
Launch the application to verify if the network error still persists.
This simple switch might be all you need to resolve the CapCut network error and continue enjoying your video editing.
Change your DNS Server Addresses
Facing network errors while using certain applications could be a symptom of issues with the default DNS server on your PC. Altering your DNS server addresses might just be the fix you need. Here's how you can make this change on your Windows computer:
Kickstart the process by typing "Control Panel" into the Windows search bar and pressing enter. This will open the Control Panel window.
Look for the "Network and Internet" category and click on it to navigate to the next level of settings.
Once you're on the new page, find and select the "Network and Sharing Center" to open it.
In the newly opened window, look for your current connection type, this could be WiFi or Ethernet, depending on how you're connected to the internet.
Click on "Properties" from the pop-up window that appears when you select your current connection.
Look for and double-click on "Internet Protocol Version 4" to open up more options.
In the new window, you'll find an option that says, "Use the following DNS server addresses". Select it.
Now, it's time to enter the new DNS values. In the "Preferred DNS server" field, enter "1.0.0.1" and in the "Alternate DNS server" field, enter "1.1.1.1".
Finally, click on "OK" to save your changes.
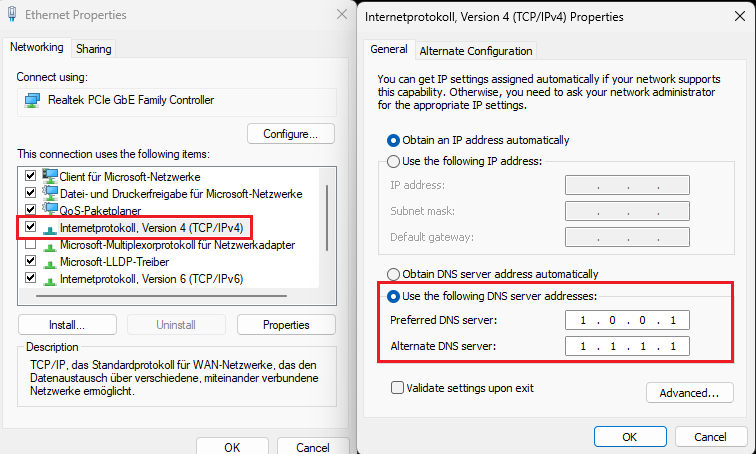
Ethernet Properties > Internetprotokoll V4 > Change DNS Server Addresses
Use Command Prompt to fix Network Issues
For the final step in resolving your CapCut network error, you'll utilize some crucial Command Prompt commands. Here's how you can do it:
Start by typing "Command Prompt" into the search bar in your Windows start menu.
Right-click on the "Command Prompt" application and choose "Run as administrator" to open it with elevated privileges.
Now, you'll need to carefully enter the following commands one at a time into the Command Prompt window. Make sure to press enter after each command to execute it:
ipconfig /renew
ipconfig /flushdns
netsh int ipv4 reset
netsh int ipv6 reset
netsh winhttp reset proxy
netsh winsock reset
ipconfig /registerdns
Once all commands have been entered and run, it's time to restart your PC to let the changes take effect.
These Command Prompt instructions can help alleviate the CapCut network error you've been facing. Remember, if CapCut is not supported in your region, consider using a VPN to bypass the geographical restrictions. Enjoy your seamless video editing journey with CapCut!
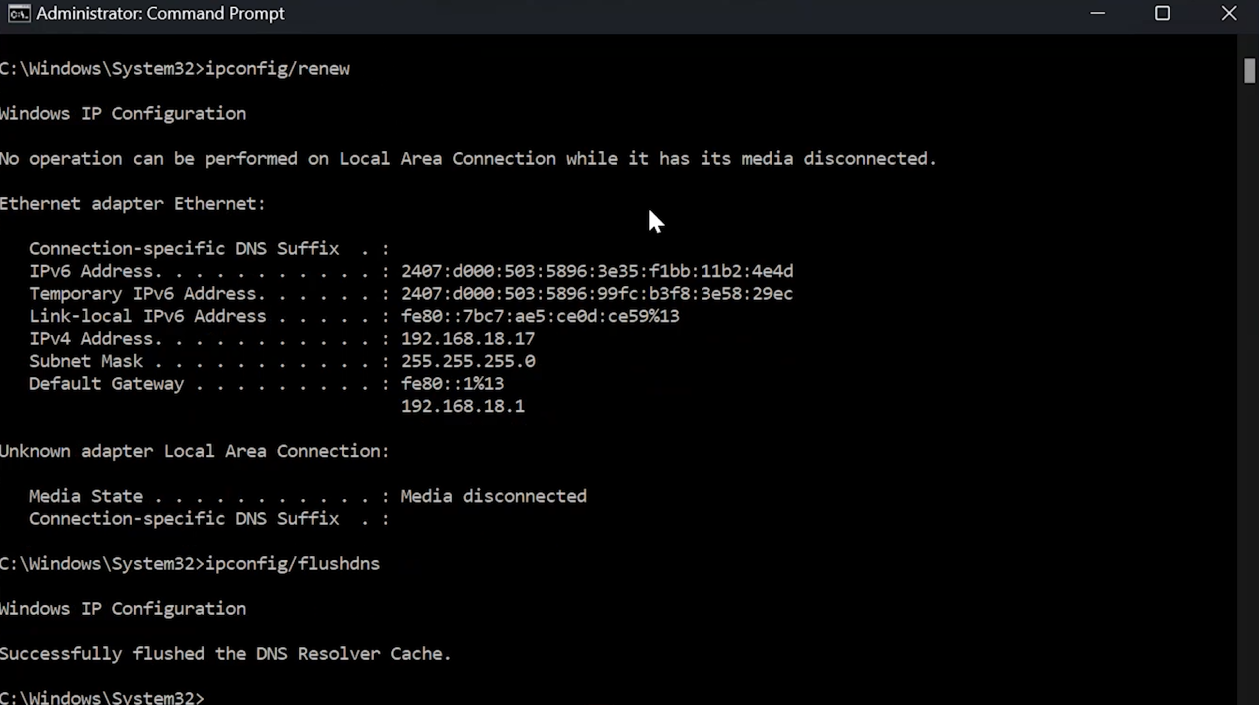
Command Prompt: Administrator
-
The CapCut network error may occur due to multiple reasons including blocked network access, region-based restrictions, internet issues, or problems with the default DNS server on your PC.
-
A VPN can help bypass network restrictions that are causing the CapCut error. By rerouting your internet connection through a server in a different location, a VPN like PrivadoVPN can provide unimpeded access to CapCut.
-
Yes, rolling back to a previous version of CapCut can sometimes solve the issue. Remember to uninstall the current version before installing an older one.
-
If there are issues with your default DNS server, you may experience network errors. Changing your DNS server addresses to a reliable provider can enhance your connection and resolve this error.
-
Yes, executing specific Command Prompt commands such as 'ipconfig /renew' and 'netsh winsock reset' can help rectify network issues contributing to the CapCut error. Remember to run Command Prompt as an administrator and restart your PC after entering the commands.