How To Make Slow Motion Video in CapCut - Complete Guide
Introduction
Transform your videos into cinematic masterpieces with our comprehensive guide on creating slow-motion effects in CapCut! This tutorial simplifies the process of adding a dramatic flair to your videos using the versatile editing tool, CapCut. Whether you're a beginner or an experienced video editor, you'll learn how to effortlessly switch between Normal and Curve speed settings to achieve the desired slow-motion effect. With easy-to-follow steps, this guide is perfect for anyone looking to explore the artistic potential of slow motion in their video projects, all from the convenience of their mobile device.
Importing a Video into CapCut for Slow Motion Effects
Creating a slow-motion video in CapCut starts with importing your video into the project:
Opening CapCut
Launching the App: Open the CapCut application on your mobile device.
Starting a New Project
Initiating New Project: In CapCut, navigate to the 'Edit' tab and tap on the 'New Project' button.
Importing Your Video
Selecting Your Video: Choose the video you want to add the slow-motion effect to.
Adding Video to the Editor: Tap on the 'Add' button to import your selected video into the CapCut video editor.

Import video to CapCut project
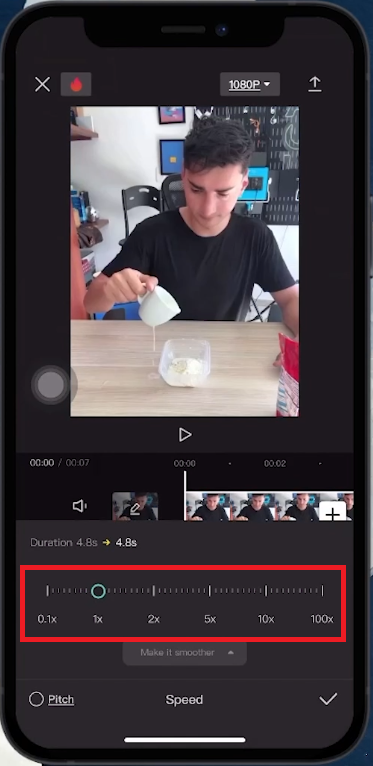
Preparing for Editing
Selecting the Video Sequence: Once the video is imported, you'll see it in the timeline at the bottom of your screen.
Accessing Speed Controls: Look for the 'Speed' option in the editing tools and tap on it to start adjusting the video speed.

Select the speed tool
Choosing Between Normal and Curve Speed in CapCut
Enhance your video with the perfect slow-motion effect by selecting the right speed option in CapCut:
Using Normal Speed
For Beginners: 'Normal' is ideal if you're new to creating slow-motion videos.
Simple Adjustments: It offers a straightforward interface to adjust video speed linearly.
Audio Pitch Control: You can also enable or disable the audio pitch in this mode.
Use the normal speed changes
Exploring Curve Speed
Advanced Customization: 'Curve' provides more creative control with additional features.
Accessing Presets: Use popular presets for sophisticated slow-motion effects.
Creating Custom Curves: Tap 'Custom' to design a unique slow-motion curve.
Explore the curved speed changes
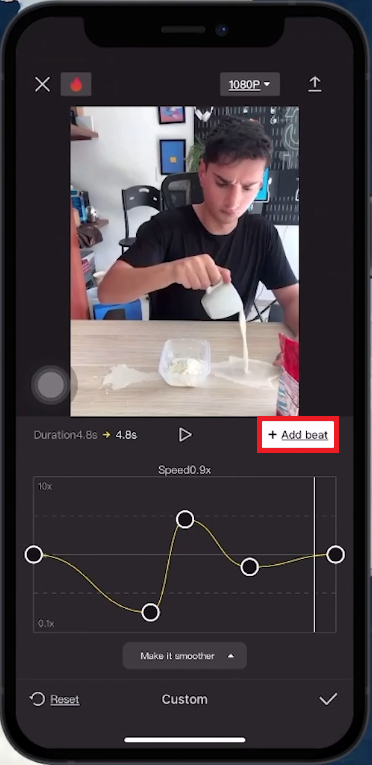
Adjusting Keyframes
Manipulating Keyframes: The default setting shows 5 keyframes. Slide these up or down to adjust the speed.
Adding More Keyframes: If you need more than 5 keyframes, use the 'Add Beat' button for extra control.
Deleting Unnecessary Keyframes: Remove keyframes if fewer than 5 are required.
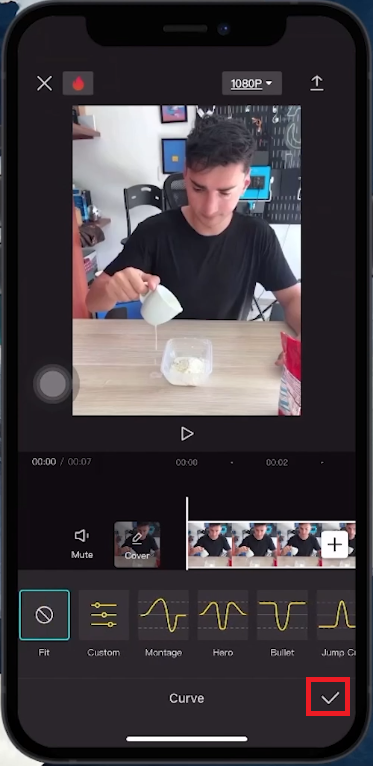
Finalizing Your Slow-Motion Effect
Applying the Effect: Once you're satisfied with the settings, tap the 'tick' button to apply the slow-motion effect to your video.
By following these steps, you can easily create stunning slow-motion effects that add a professional touch to your videos, whether you prefer the simplicity of 'Normal' or the flexibility of 'Curve' in CapCut.
Use a custom speed curve
-
Yes, you can apply slow-motion effects to any video imported into CapCut, regardless of its original speed or length.
-
Absolutely, the 'Normal' option provides an easy-to-use interface perfect for those new to video editing.
-
The 'Curve' option allows for advanced customization of the slow-motion effect, including adjusting keyframes for precise control.
-
Yes, in the 'Normal' speed setting, you can choose to enable or disable the audio pitch adjustment to match your video speed.
-
Once you’re done editing, tap the 'tick' button to apply your changes, and then save or export your slow-motion video directly from CapCut.