How to Delete your Facebook Account Permanently
Introduction
Navigating through the digital world, we sometimes feel the need to take a step back, and deleting our social media accounts can be a significant first step. If you've found yourself considering this path and are wondering how to permanently delete your Facebook account, you're in the right place. This article will walk you through the process, step-by-step, ensuring that you fully understand each stage before you take the plunge. From accessing your settings to inputting the final confirmation password, we'll be with you each step of the way. So whether you're planning a digital detox or simply looking to declutter your digital life, read on for your comprehensive guide to leaving Facebook for good.
Beginning the Process: Navigating to Account Ownership Settings
To initiate the process of permanently deleting your Facebook account, first ensure you're logged into the correct Facebook account on your desktop or laptop. This step is crucial if you operate multiple Facebook accounts for personal use or business. Start by clicking on your profile picture located in the top right corner of the Facebook homepage.
Subsequently, in the drop-down menu, click on "Settings & Privacy" and then on "Settings". This action will redirect you to a new page displaying various account settings options.
Within this page, locate and select the ‘Accounts Center’ section, and then click on "Personal Details."
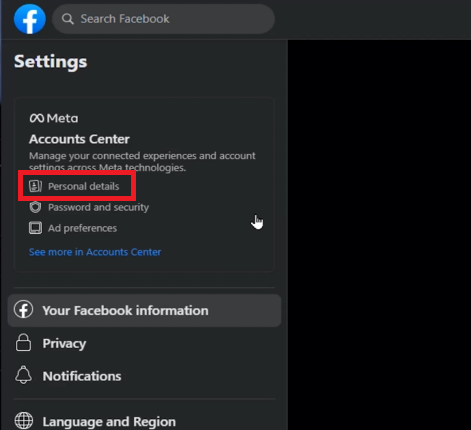
Facebook Settings > Personal Details
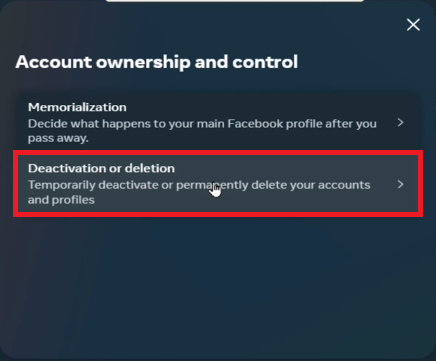
You're on the right track now. On the ensuing page, select "Personal Information" again, and finally, click on "Account Ownership and Control." This series of actions will take you closer to deleting your Facebook account.
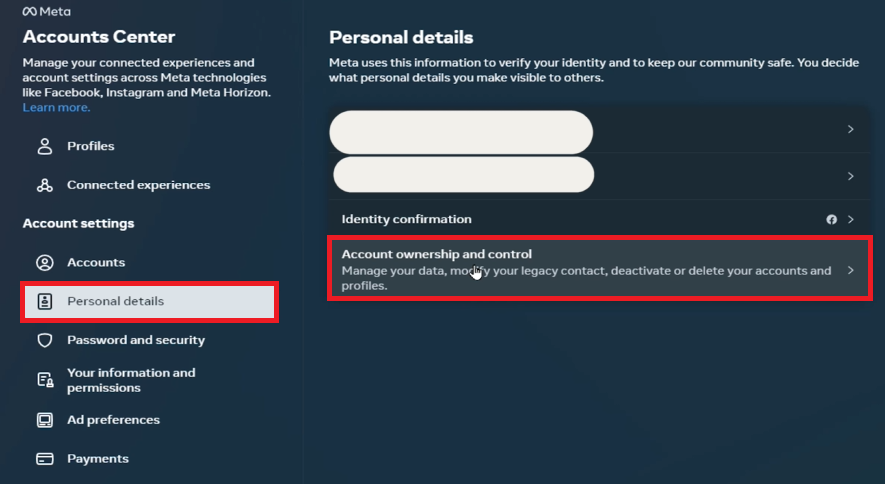
Meta Accounts Center > Personal Details > Account ownership and control
Executing the Final Steps: Permanently Deleting Your Facebook Account
As you progress to the subsequent page, you'll notice two distinct options: "Memorialization" and "Deactivation or Deletion." Select the "Deactivation or Deletion" choice, taking you a step closer to permanently removing your account. If you have more than one Facebook account, now's the time to pick the one you wish to delete.
Once you've selected the desired account, pause for a moment before clicking on "Continue and Delete Your Account," and carefully read the details provided. This information might prompt you to reconsider the deletion process.
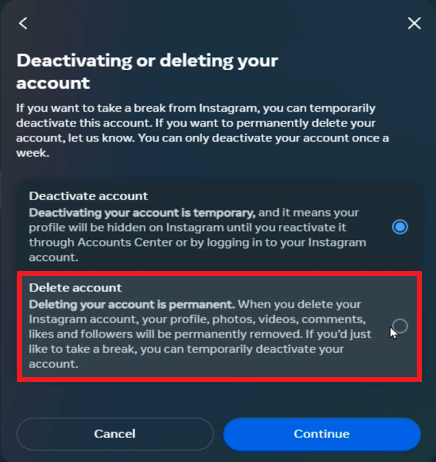
Deactivation or Deletion (Facebook Account)
At this juncture, you can either opt for temporary deactivation or go ahead with permanent deletion. If you decide on deactivation, then select "Continue." But, if you're resolute about removing your Facebook presence, choose the "Delete Account" option, and proceed by clicking "Continue."
The final step of this process requires you to input your password. Do so, and once again, click "Continue." And voila! You've successfully deleted your Facebook account.
Confirm the Facebook account deletion
-
Facebook typically takes up to 90 days to completely delete all your information. However, your account will be deactivated immediately and will not be accessible during this time.
-
Changing your Roblox Premium package is as simple as switching from playing Fortnite to Call of Duty, or changing your programming environment fr”
-
After you delete your account, people won't be able to see it on Facebook. It may take up to 90 days from the beginning of the deletion process to delete all of the things you've posted.
-
No, once you choose to permanently delete your Facebook account, you won't be able to retain access to Messenger.
-
Before deleting your account, you should appoint a new admin to any pages or groups you manage. Once your account is deleted, you won't be able to access these directly.