How To Disable Emoji History on WhatsApp (iOS & Android)
Introduction
Emojis can be a fun and expressive way to communicate, but sometimes, you may find yourself wishing to clear or disable the emoji history on WhatsApp. Whether you're using an iOS or Android device, managing your emoji preferences is a straightforward process, yet one that may require some guidance. In this article, we'll walk you through the simple steps to take control of your emoji usage. From backing up your chats to clearing the app cache, you'll find everything you need to personalize your WhatsApp experience. Follow along as we delve into the process, ensuring that your emoji history aligns with your preferences.
Backup Your WhatsApp Chats Before Disabling Emoji History
Ensuring that your WhatsApp chats are safely backed up is a vital first step in the process of disabling or removing your current emoji history. Here's a concise guide to accomplish this:
Open WhatsApp on your iOS or Android mobile device.
Navigate to Settings: Tap on the settings section within the app.
Access Chat Options: Select ‘Chats’, and then tap on ‘Chat Backup’.
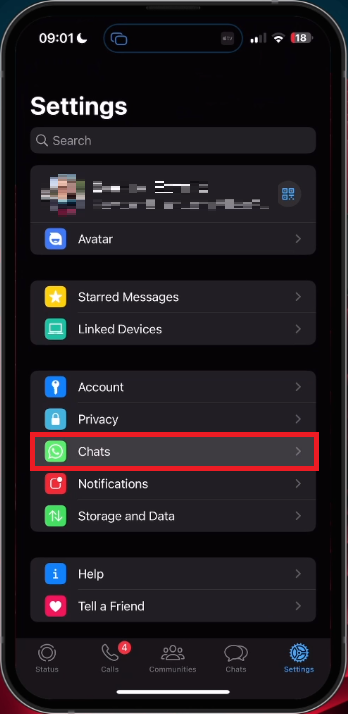
WhatsApp Settings > Chats
Create or Confirm Backup: Check if you have a recent backup of your WhatsApp chats. If not, create a new backup by tapping on the backup option.
By following these simple steps, you can ensure that your chats are secured, allowing you to proceed with clearing the app cache to modify your emoji history without losing important conversations. It's a key preparatory measure for those who want to gain more control over their WhatsApp experience.
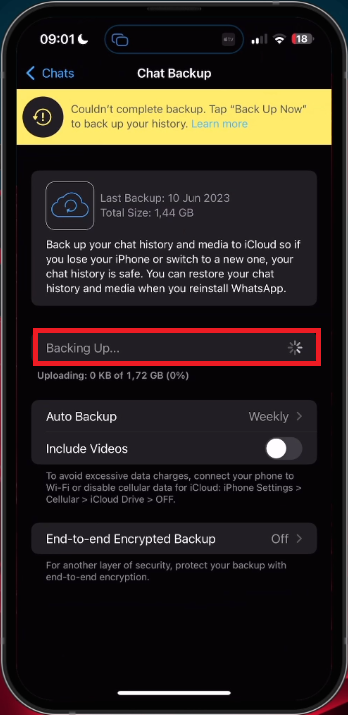
WhatsApp Settings > Chats > Chat Backup
Clear the WhatsApp Cache & Restore Chats
Clearing the WhatsApp cache and restoring chat backups is essential for disabling previous Emoji history. Here's how you can do it, tailored to both iOS and Android users:
For iOS Users:
Open Device Settings: Navigate to the ‘General’ section.
Select Storage Settings: This might take a moment to load your storage information.
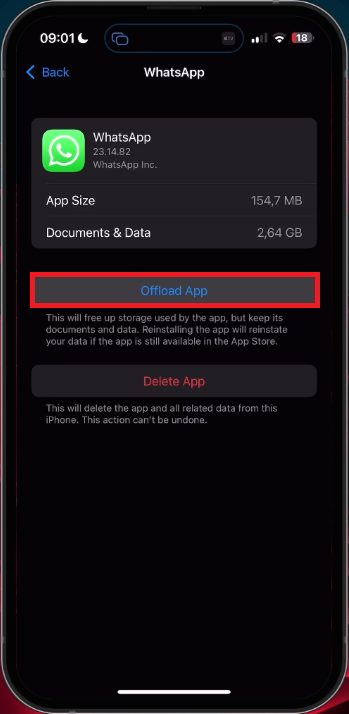
Find WhatsApp: Look up WhatsApp in the storage settings.
Offload App: Tap ‘Offload App’ to delete your current app cache and refresh the application.
For Android Users:
Access Storage Settings: Open your device's storage settings.
Find WhatsApp: Look for WhatsApp within the storage settings.
Clear Cache: Tap the option to clear the cache, which effectively reinstates the app as if it was freshly installed.
Restore Your Chats:
Relaunch WhatsApp: Open the WhatsApp application again.
Verify Your Account: Confirm your identity using your phone number.
Redownload Chat Backup: Access your saved chat backup and restore your conversations.
By following these specific instructions, you will be able to clear the cache and restore your saved chats without any hassles. This will enable you to successfully disable your previous Emoji history in WhatsApp, giving you a cleaner, more personalized chat experience.
iPhone Settings > General > iPhone Storage > WhatsApp
-
On your iOS device, go to ‘General’, then select ‘Storage Settings’. Look up WhatsApp, tap ‘Offload App’, and this will delete your current app cache.
-
On Android devices, access your storage settings. Find WhatsApp and tap the option to clear the cache. This refreshes the app as if it was freshly installed.
-
Clearing the cache won’t delete your chats as long as you have a recent backup. Always create a new backup of your WhatsApp chats before clearing the cache.
-
Disabling Emoji history on WhatsApp requires clearing the cache and redownloading your chat backup. Follow the specific guidelines for iOS or Android to ensure success.
-
‘Offload App’ in iOS settings allows you to delete the current app cache, effectively refreshing the application as if it was reinstalled. It's useful for troubleshooting issues like Emoji history in WhatsApp.