

How To Disable Windows 11 Login Password & Lock Screen
Introduction
Navigating the labyrinth of Windows 11 settings to disable login passwords and lock screens can be a headache. Yet, these features often serve as a hindrance rather than a help, especially if you're the sole user of your PC. In this article, you'll find a succinct guide that cuts through the clutter, detailing how to effortlessly disable your Windows 11 login password and lock screen. Ready to simplify your user experience?
Modify Sign-in Preferences
In the Windows Start Menu, type "Sign-in options" and press Enter. This will lead you to your system's sign-in settings. Navigate to the "Additional settings" section and look for the feature that reads, "If you have been away, when should Windows require you to sign in again?" Turn off this option to disable the re-login requirement. For example, this can be particularly useful if you step away from your computer frequently but don't want to re-enter your password each time.
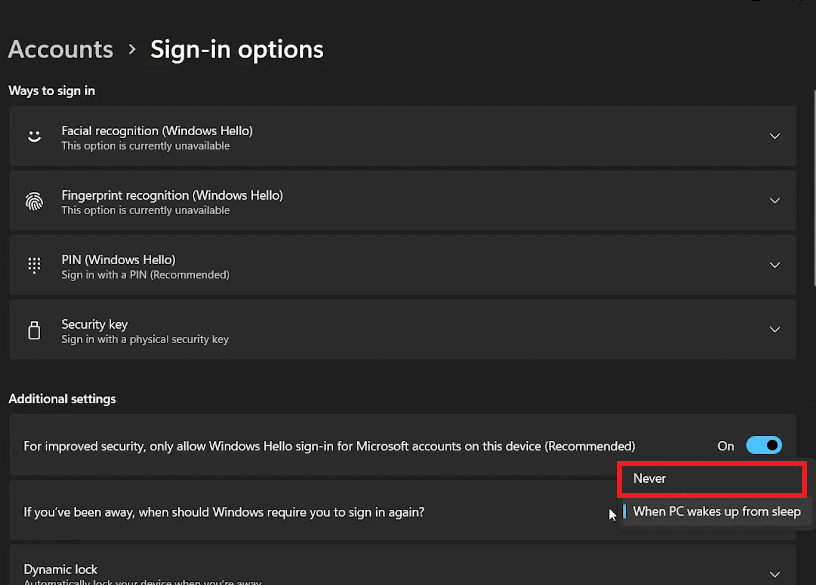
Windows Settings > Accounts > Sign-in Options
Execute a Command Prompt Task
Open the Start Menu and search for "CMD." Right-click on the Command Prompt and select 'Run as administrator' to initiate the command prompt with administrative privileges. Input the following command:
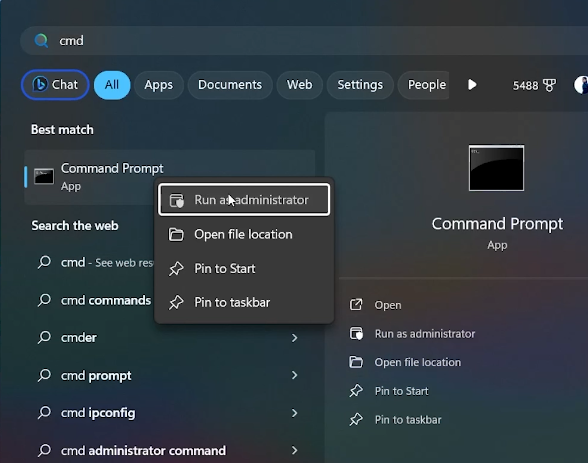
Run Command Prompt as an administrator
reg ADD "HKLM\SOFTWARE\Microsoft\Windows NT\CurrentVersion\PasswordLess\Device" /v DevicePasswordLessBuildVersion /t REG_DWORD /d 0 /f
After you execute this command by pressing Enter, you should see a message stating "The operation completed successfully." At this point, a system reboot is necessary for the changes to take effect. Remember to save any work before restarting your PC.
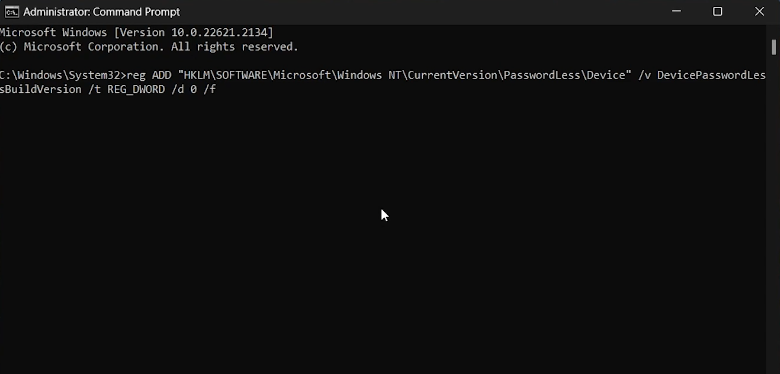
Admin Command Prompt
Fine-Tune User Account Preferences
After your system reboots, access your User Accounts settings by typing "Netplwiz" into the Start Menu and pressing Enter. Here, locate the option that says, "User must enter a username and password to use this computer," which you'll find below the user icon. Uncheck this box and click 'Apply' followed by 'OK.'
A pop-up window will appear prompting you to input your current password for verification. Once you do, you'll have successfully disabled both the Windows 11 login password and lock screen until you decide to undo these adjustments. For instance, this setting could be useful if you're the sole user of your PC and prefer quicker access without password constraints.
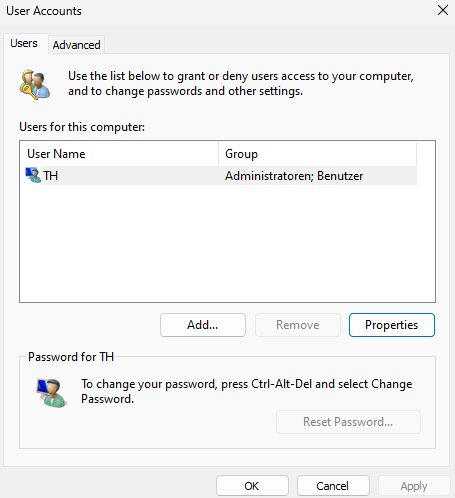
Windows User Accounts Properties
-
Disabling these features will remove an extra layer of security from your PC. This could be acceptable if you are the sole user and the device remains in a secure environment. However, it's not recommended for shared or public spaces.
-
Netplwiz is a built-in User Accounts management tool in Windows 11. It allows you to adjust login settings, including the option to disable the need for entering a password during login.
-
The command reg ADD "HKLM\SOFTWARE\Microsoft\Windows NT\CurrentVersion\PasswordLess\Device" /v DevicePasswordLessBuildVersion /t REG_DWORD /d 0 /f modifies the Windows Registry to deactivate the passwordless feature for your device, requiring a restart to apply the changes.
-
Yes, a system reboot is necessary for the changes to take effect. You will notice that the password and lock screen are disabled once your computer restarts.
-
To re-enable, you can simply go back to your User Accounts settings via Netplwiz and re-check the box that says, "User must enter a username and password to use this computer." Additionally, you'd have to undo the Registry change via Command Prompt.


