

How To Enable Windows Copilot in Windows 11 - Tutorial
Introduction
Unlock the full potential of your Windows 11 experience by enabling Windows Copilot! This guide will walk you through the simple steps to activate this handy feature, designed to answer your queries and assist with various tasks like adjusting settings or opening apps. Whether you're new to Windows 11 or just haven't explored Copilot yet, our tutorial makes it easy to get started and enhances your overall user experience with this innovative tool.
Updating Windows for Accessing Copilot
Ensuring Your System is Up-to-Date
To utilize the Windows Copilot feature in Windows 11, your system may need an update. Regular updates not only unlock new features like Copilot but also enhance your PC's security and performance.
Steps to Update and Restart Windows
Accessing Settings: Click on the Start Menu and type “Settings”. Press Enter to open the Settings menu.
Navigating to Updates: In the Settings menu, go to the “Windows Update” section.
Checking for Updates: See if there are any available updates for your system. If none are listed, click on “Check for Updates”.
Downloading Updates: If updates are available, start the download process. The time taken depends on the update's size and your internet speed.
Installing Updates: After the download, you'll be prompted to install these updates, which typically requires a PC restart.
Restarting Your PC: Once the installation is complete, your PC will restart. After this restart, check if the Copilot feature is now available.
By following these simple steps, you can ensure that your Windows 11 system is not only up to date with the latest features like Copilot but also secured with the most recent security patches and performance enhancements.

Windows Settings > Windows Update
Activating Windows Copilot in Your Settings
Enabling the Copilot Feature on Your PC
Even if your Windows 11 is up to date, the Copilot feature might not be visible because it could be disabled in your system settings. Here’s how to enable it:
Returning to Settings: First, open your Windows settings again.
Personalization and Taskbar: Within the settings, navigate to the “Personalization” section and then select “Taskbar”.
Finding Copilot Toggle: In the Taskbar settings, look for the option to turn on Windows Copilot.
Enabling Copilot: Once you find the Copilot toggle, switch it to the ‘on’ position.
After these steps, Windows Copilot should be active and visible on your taskbar. This feature is particularly useful for getting quick answers to your queries and performing actions like changing settings or opening apps directly from your taskbar, enhancing your Windows 11 experience.
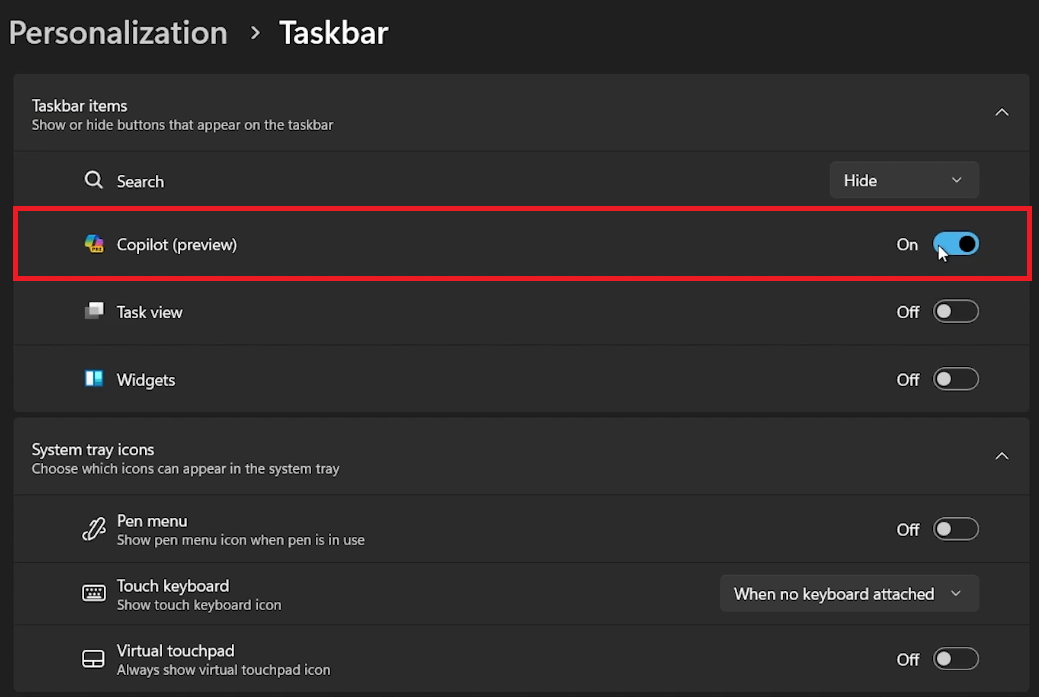
Windows Settings > Personalization > Taskbar
-
Windows Copilot is a feature in Windows 11 that assists with tasks, answers queries, and helps with system navigation directly from your taskbar.
-
Copilot may not be automatically available on all systems. It often requires the latest Windows 11 update to be accessible.
-
Go to the 'Settings' menu, navigate to 'Windows Update', and check for any available updates to ensure your system is up-to-date.
-
Yes, you can easily disable Windows Copilot by going to the 'Taskbar' settings in 'Personalization' and toggling it off.
-
Windows Copilot is designed to be a lightweight feature and should not significantly impact your system’s performance.


