

How To Enable XMP on MSI Motherboards - Complete Guide
Introduction
Maximizing your PC's performance starts with optimizing your RAM's speed, and enabling XMP on MSI motherboards is the key. XMP, or Extreme Memory Profile, ensures your high-speed RAM runs at its advertised potential rather than at default lower speeds. This guide will walk you through the straightforward process of activating XMP via your BIOS settings, a crucial step for enthusiasts looking to enhance their system's overall performance.
Accessing BIOS to Enable XMP
To unlock the full potential of your high-speed RAM, you need to enable XMP in the BIOS. Here’s how to access your BIOS on an MSI motherboard:
Restart Your Computer:
Reboot your PC.
Enter BIOS:
During startup, press the "Delete" key repeatedly. This is the standard method for MSI motherboard users to enter the BIOS setup.
If your computer prompts differently, follow those instructions, but generally, the "Delete" key is used for MSI systems.

Enter the MSI motherboard BIOS mode
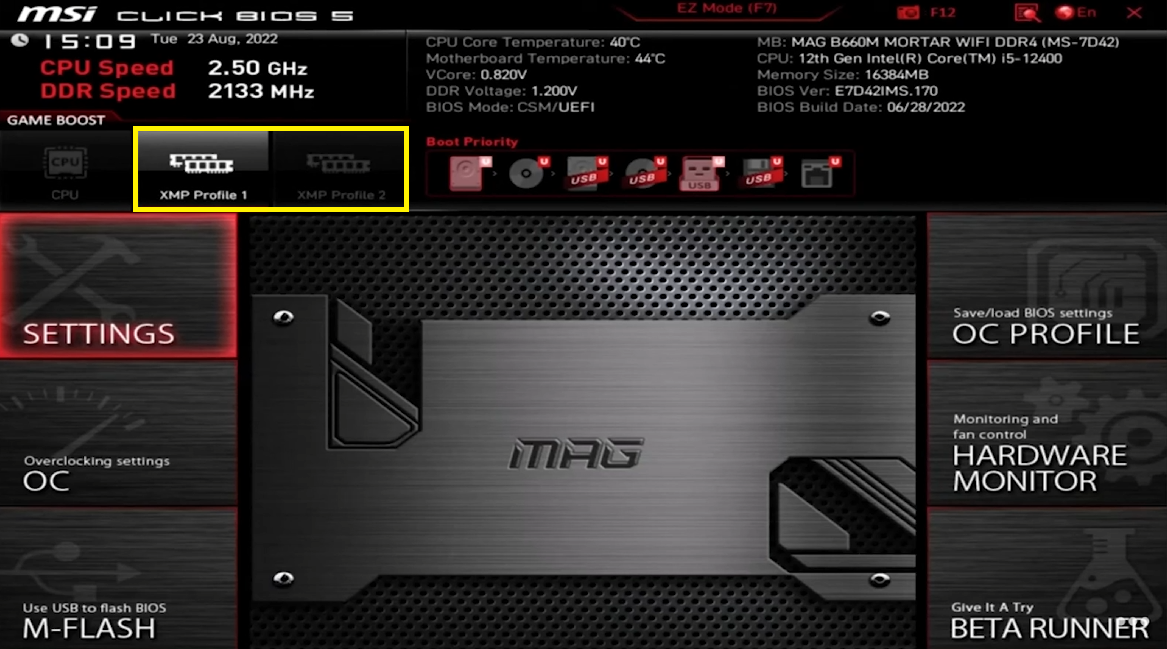
Selecting and Activating XMP in BIOS
Once you're in the BIOS, follow these steps to enable XMP:
Switch to Advanced View (if necessary):
Press the F7 key to switch to the advanced view if you are not already there. Note that this might vary slightly depending on your specific MSI motherboard model and BIOS version.
Navigate to XMP Settings:
Locate the XMP settings within the BIOS. This can usually be found in the "OC" (Overclocking) section.
Select an XMP Profile:
You will see options like Profile 1, Profile 2, etc. These profiles are pre-configured settings to optimize your RAM's performance.
Select Profile 1 for a balance of performance and stability as recommended by your RAM manufacturer.
Save and Exit:
Go to the "Save & Exit" section.
Select "Save Changes and Reboot."
Confirm your selection to apply the changes.
Change XMP profile
Verifying XMP Activation
After your computer restarts, verify that XMP has been successfully enabled:
Re-enter BIOS:
Press the "Delete" key during startup to access the BIOS again.
Check DRAM Settings:
Navigate to the "OC" section and inspect the DRAM settings.
Confirm that your selected XMP profile is active and that the memory is running at its advertised speed.
Congratulations! By following these steps, you've successfully enabled XMP on your MSI motherboard, optimizing your RAM's performance to its advertised peak. This ensures your system runs smoothly and efficiently, making the most out of your high-speed memory modules.

Save Extreme Memory Profile (XMP) configuration and exit
-
XMP (Extreme Memory Profile) is an Intel technology that allows you to overclock your memory and improve performance. Enabling XMP on an MSI motherboard ensures your RAM operates at its advertised speed, offering enhanced gaming and application performance.
-
Restart your PC and press the "Delete" key during the boot process to enter the BIOS. This key might vary; refer to your motherboard manual or on-screen prompts for the correct key.
-
While XMP is designed to be stable, overclocking can sometimes lead to system instability. If you encounter issues, try selecting a different XMP profile or revert to the default settings.
-
Enabling XMP is a safe process supported by motherboard and RAM manufacturers. It typically does not void warranties, but it's always a good idea to check with your specific manufacturer's policies.
-
After applying XMP settings and rebooting, re-enter the BIOS and check the "OC" or overclocking tab. Your DRAM settings should reflect the changes, confirming the XMP profile's activation.


