

How To Disable Automatic Updates on Windows 11 Permanently
Introduction
In the realm of seamless computing, automatic updates are a boon, ensuring that your system stays current with the latest features and security patches. However, there are instances where the auto-update feature on Windows 11 might not be a favorable companion—perhaps it consumes your limited bandwidth or you prefer to have control over when updates are installed. In this guide, we will journey through the steps to disable automatic updates on your Windows 11 PC permanently, handing the reins of update management back to you. While this path grants you control, it’s laden with the responsibility of manually keeping your system updated and secure. So, if you are ready to trade a bit of convenience for control, stride ahead into the realms of Windows settings with us.
Disable Automatic Updates: Windows Services Manager 🛑
Let’s initiate our journey by venturing into the realm of Windows Services Manager. This hub is your go-to to exert control over various system operations, including those pesky automatic updates. Here's a step-by-step walk-through:
Summon the Services Window: Open the
Start Menu, type “services”, and strikeEnter. Voila! The Services window emerges.Navigate to Windows Update: Tap anywhere on the list to activate the pane, hit ‘W’ on your keyboard to fast-track to services starting with ‘W’. Scroll a tad until “Windows Update” comes into view.
Dive into Properties: A simple right-click on “Windows Update” and selecting
Propertiesunveils the control center.Disable the Startup: Under the
Generaltab, set theStartup Typeto “Disabled” to halt automatic updates.Tweak Recovery Settings: Switch gears to the
Recoverytab, for the “First Failure” option, select “Take No Action” from the menu.Apply and Celebrate: Click
ApplythenOKto save your newfound settings. And there you have it - auto-updates are now in your control.
Each step here is a stride towards taking command over when your system gets updated. No more unexpected interruptions during critical tasks or untimely bandwidth consumption.
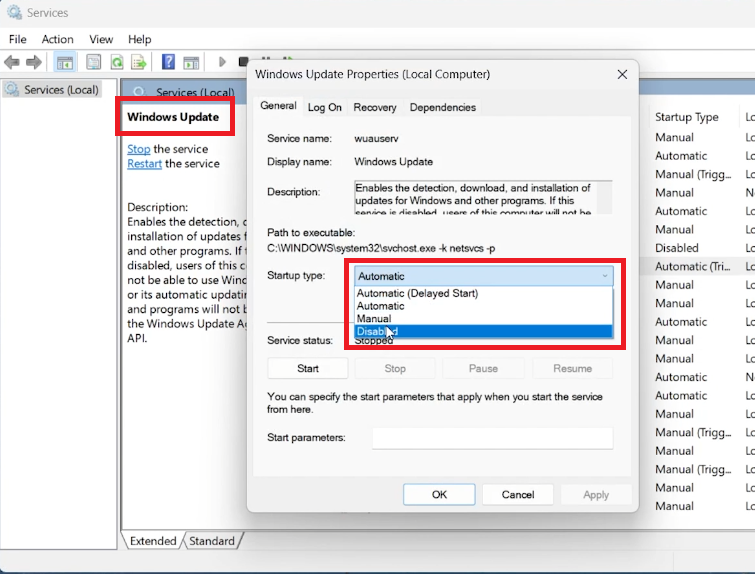
Windows Services Manager > Windows Update Properties > Startup Type
Take Control with Local Group Policy Editor 🛠️
If you find solace in diving a bit deeper into system settings, the Local Group Policy Editor is your ally in this quest. It provides another potent method to rein in automatic updates. Here's your roadmap:
Summon the Editor: Click on the
Start Menu, type “gpedit.msc”, and pressEnter. This action beckons the Local Group Policy Editor onto your screen.Navigate the Hierarchy: Begin by expanding the
Computer Configuration, followed byAdministrative Templates. It's like unfolding a digital origami to reveal control points.Delve into Windows Components: A double-click on
Windows Componentsunveils a list. Scroll down to find and expandWindows Update.Configure Automatic Updates: Hit
Configure Automatic Updates. A new window springs open, ready for your command.Disable the Updates: On the left-hand side, select
Disabled, then clickApplyandOKto anchor your settings.
This method of disabling automatic updates is like taking the reins of a powerful but obedient steed, guiding your Windows 11 system according to your whims, and ensuring a smooth, interruption-free digital journey.
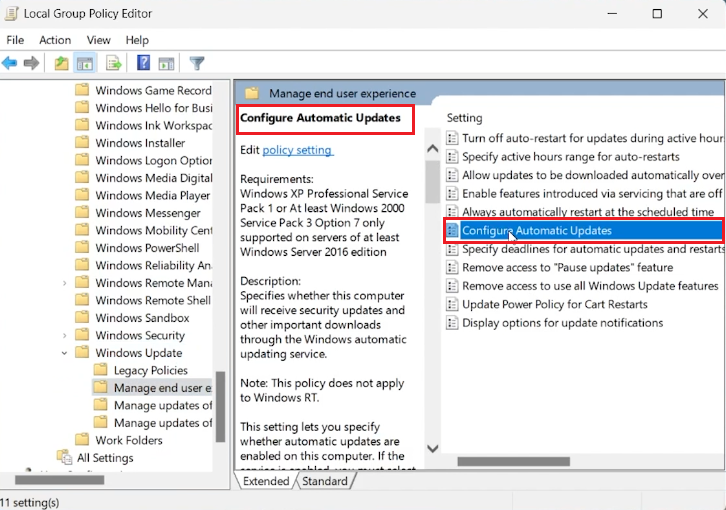
Local Group Policy Editor > Configure Automatic Updates
Master Your Windows 11 Updates with PassFab FixUWin
While disabling automatic updates gives you more control over your Windows 11 system, it's important to keep your PC running smoothly and securely. PassFab's FixUWin application can be a vital tool in this regard. It diagnoses and fixes over 200 Windows-related issues, including those that might arise from manual update management. Whether it's dealing with unexpected system errors or ensuring your drivers are up to date, FixUWin provides a comprehensive solution to maintain the optimal performance of your Windows 11 PC.
-
To permanently disable automatic updates on Windows 11, you can either use the Windows Services Manager or navigate through the Local Group Policy Editor to change the update settings.
-
Disabling automatic updates may prevent your PC from receiving critical security updates, exposing your system to vulnerabilities. It's essential to manually check for important updates regularly.
-
By utilizing the Local Group Policy Editor, you can configure the settings to control the types of updates you wish to receive on your Windows 11 PC.
-
Navigate to the Start Menu, type “services,” hit Enter, locate 'Windows Update,' right-click to select Properties, set the Startup Type to “Disabled,” and modify the Recovery tab settings accordingly.
-
To re-enable automatic updates, simply reverse the settings changed in the Windows Services Manager or the Local Group Policy Editor.
Affiliate Disclosure: This section contains affiliate links. By opting for PassFab's FixUWin through these links, you're not only taking control of your Windows updates but also supporting our website at no additional cost to you.


